1. Introduction
The ATEN CS1924-AT-A is a 4-Port USB 3.0 4K DisplayPort KVMP Switch designed to allow users to control up to four DisplayPort computers from a single USB keyboard, USB mouse, and DisplayPort monitor console. This device supports superior video quality up to 4K UHD (3840 x 2160 @ 60 Hz) and 4K DCI (4096 x 2160 @ 60 Hz). It also features a 2-port USB 3.1 Gen 1 hub for SuperSpeed 5 Gbps data transfer rates, enabling sharing of USB peripherals among connected computers. The switch supports Multi-Stream Transport (MST) for multiple monitors through a single DisplayPort connector and DisplayPort Dual-Mode (DP++) for compatibility with HDMI and DVI signals via appropriate adapters.
2. Package Contents
Verify that all components are present in your package:
- 1x ATEN CS1924-AT-A 4-Port USB 3.0 4K DisplayPort KVMP Switch
- 4x DisplayPort 1.2 Cables
- 4x USB 3.0 Type-B to Type-A Cables
- 4x Audio Cables (3.5mm jack)
- 1x Power Adapter
- 1x User Instructions (this manual)
3. Product Overview
3.1 Front Panel

The front panel provides direct access to port selection buttons, LED indicators for active ports, a convenient USB 3.0 port for quick peripheral connection, and audio jacks for headphones and a microphone.
3.2 Rear Panel
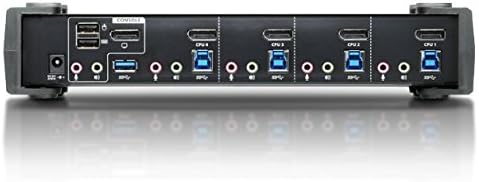
The rear panel houses the power input, dedicated USB ports for console keyboard and mouse, audio connections, and the four sets of DisplayPort and USB 3.0 inputs for connecting to the computers.
4. Setup and Installation
Follow these steps to set up your ATEN CS1924-AT-A KVMP Switch:
- Power Off All Devices: Ensure all computers, monitors, and the KVMP switch are powered off and unplugged from their power sources.
- Connect Console Devices:
- Connect your DisplayPort monitor to the DisplayPort output port on the rear panel of the KVMP switch.
- Connect your USB keyboard to the dedicated USB keyboard port on the rear panel.
- Connect your USB mouse to the dedicated USB mouse port on the rear panel.
- (Optional) Connect your speakers/headphones to the audio output jack and microphone to the audio input jack on the rear panel.
- Connect Computers: For each computer (up to four):
- Connect one end of a DisplayPort cable to the computer's DisplayPort output and the other end to a DisplayPort input port (e.g., CPU 1) on the rear panel of the KVMP switch.
- Connect one end of a USB 3.0 Type-B to Type-A cable to a USB 3.0 port on the computer and the other end to the corresponding USB 3.0 Type-B input port (e.g., CPU 1) on the rear panel of the KVMP switch.
- (Optional) Connect audio cables from the computer's audio output/input to the corresponding audio jacks for that CPU port on the KVMP switch.
- Connect Power: Plug the provided power adapter into the DC 5V power input on the rear panel of the KVMP switch, then plug the adapter into an AC power outlet.
- Power On: Power on the KVMP switch, then power on your monitor, and finally power on the connected computers.
Note: For optimal video performance, especially with 4K resolutions, use high-quality DisplayPort 1.2 or higher certified cables. Longer DisplayPort cables (e.g., 10 feet or more) may sometimes require a video card with stronger signal output or active DisplayPort cables to maintain signal integrity through the switch.
5. Operating Instructions
5.1 Switching Between Computers
The ATEN CS1924-AT-A offers multiple methods for switching between connected computers:
- Front Panel Pushbuttons: Press the corresponding port selection button (1-4) on the front panel to switch to the desired computer. The LED above the button will illuminate to indicate the active port.
- Hotkeys: Use keyboard hotkey combinations to switch ports. Refer to the full product manual for a complete list of hotkey commands. Common hotkeys include:
- Press Scroll Lock twice, then the port number (1-4).
- Press Ctrl twice, then the port number (1-4).
- Mouse Switching: Move the mouse cursor to the edge of the screen to switch to the next active port. This feature may need to be enabled and configured.
5.2 USB 3.0 Hub Functionality
The KVMP switch includes a 2-port USB 3.1 Gen 1 hub on the front panel, allowing you to share USB peripherals such as flash drives, printers, or webcams among the connected computers. Simply plug your USB device into one of the front panel USB ports. The device will be accessible by the currently active computer.
5.3 Audio Switching
Audio input and output are switched along with the video and USB signals when you change ports. Ensure your speakers/headphones and microphone are connected to the console audio jacks on the KVMP switch's rear panel, and that audio cables are connected from each computer to the corresponding CPU audio jacks.
6. Maintenance
To ensure the longevity and optimal performance of your ATEN CS1924-AT-A KVMP Switch:
- Cleaning: Use a soft, dry cloth to clean the exterior of the switch. Avoid using liquid or aerosol cleaners.
- Ventilation: Ensure the switch is placed in a well-ventilated area to prevent overheating. Do not block ventilation openings.
- Cable Management: Keep cables organized and avoid excessive bending or tension, which can damage connectors or internal wiring.
- Firmware Updates: Periodically check the ATEN website for any available firmware updates for your model. Firmware updates can improve performance, add features, or resolve known issues.

7. Troubleshooting
If you encounter issues with your KVMP switch, refer to the following common problems and solutions:
| Problem | Possible Cause / Solution |
|---|---|
| No video display or flickering screen. |
|
| Keyboard or mouse not responding. |
|
| Audio not working. |
|
| Switching is slow or unresponsive. |
|
| Does not support ultra-wide monitors. | While the switch supports 4K resolutions, compatibility with specific ultra-wide monitor resolutions and aspect ratios can vary. This model may not fully support all ultra-wide configurations. Consult ATEN support for specific ultra-wide monitor compatibility. |
8. Specifications
| Feature | Detail |
|---|---|
| Model Number | CS1924-AT-A |
| Ports | 4-Port KVMP Switch |
| Video Resolution | Up to 4K UHD (3880 x 2160 @ 60 Hz), 4K DCI (4096 x 2160 @ 60 Hz) |
| USB Hub | 2-port USB 3.1 Gen 1 (5 Gbps) |
| Console USB Ports | 2x USB 2.0 (for Keyboard/Mouse) |
| Operating System Support | Linux (and generally Windows, macOS) |
| Product Dimensions (LxWxH) | 10.63 x 3.46 x 2.19 inches (27 x 8.8 x 5.6 cm) |
| Item Weight | 2.01 pounds (0.91 kg) |
| Date First Available | January 23, 2017 |
9. Warranty and Support
ATEN products are designed for reliability and come with comprehensive support. For warranty information, please refer to the warranty card included with your product or visit the official ATEN website.
ATEN provides the following support services:
- Localized Repair Centers: For RMA (Return Merchandise Authorization) service.
- Extended Warranty Options: Variable value-added service packages are available.
- Free Technical Support: Assistance is available, with responses typically within 4 hours.
For further assistance, product registration, or to download the latest drivers and firmware, please visit the official ATEN website or contact ATEN customer support.


