
1. Introduction
This manual provides essential information for the proper setup, operation, maintenance, and troubleshooting of your Yamata FY757A High Speed Industrial Serger Overlock Interlock Machine. Please read this manual thoroughly before operating the machine to ensure safe and efficient use. This machine is designed for industrial sewing applications, offering high-speed performance and a 2-needle, 5-thread safety stitch capability.
2. Setup
Proper setup is crucial for the optimal performance of your industrial serger. Follow these steps carefully.
2.1 Unpacking and Inspection
- Carefully remove all components from the packaging.
- Inspect all parts for any signs of damage during transit. Report any damage to your supplier immediately.
- Ensure all listed components are present.
2.2 Assembly of Table and Motor
The machine head, table, and motor are typically shipped separately and require assembly.

Figure 2.2.1: Industrial sewing machine table. This sturdy table provides the necessary workspace and support for the serger machine head.
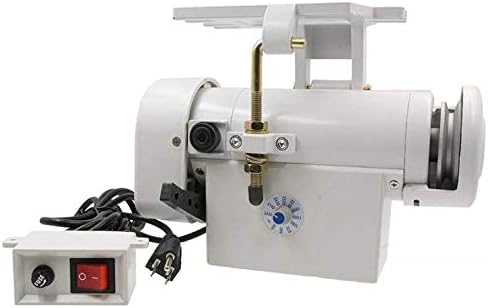
Figure 2.2.2: Industrial sewing machine motor. This motor powers the machine, often featuring speed control capabilities.
- Assemble the table stand according to the provided diagrams. Ensure all bolts are securely tightened.
- Mount the tabletop onto the stand. The tabletop will have a pre-cut opening for the machine head.
- Install the motor beneath the tabletop, aligning it with the drive belt mechanism. Connect the foot pedal linkage to the motor and the machine's clutch or servo control.
2.3 Mounting the Machine Head
Carefully place the Yamata FY757A machine head into the tabletop opening. Ensure it sits securely and is level. Secure it using any provided mounting brackets or screws.

Figure 2.3.1: Complete setup of the Yamata FY757A industrial serger. This image shows the machine head, table, and motor assembled and ready for operation.
2.4 Threading the Machine
The Yamata FY757A is a 2-needle, 5-thread safety stitch machine. Proper threading is critical for correct stitch formation. Refer to the threading diagram usually located on the machine or in a separate threading guide for detailed steps. Generally, the threading sequence involves:
- Upper Looper Thread
- Lower Looper Thread
- Safety Chainstitch Looper Thread
- Right Needle Thread
- Left Needle Thread
Always ensure threads pass through all tension discs, guides, and take-up levers in the correct order.

Figure 2.4.1: Close-up of the Yamata FY757A machine head. Note the threading path illustration, which is essential for correct thread installation.

Figure 2.4.2: Various perspectives of the Yamata FY757A serger machine head. These views highlight the different components and access points for maintenance and threading.
3. Operating Instructions
Understand the basic operation and safety guidelines before using your serger.
3.1 Power On/Off
- Ensure the machine is properly plugged into a grounded electrical outlet.
- Locate the main power switch, usually on the motor or control box, and turn it to the 'ON' position.
- To turn off, switch the power to 'OFF' and unplug the machine from the outlet when not in use for extended periods.
3.2 Foot Pedal Operation
The foot pedal controls the sewing speed. Press gently for slower speeds and apply more pressure for higher speeds. Release the pedal to stop the machine.
3.3 Stitch Adjustments
- Tension Dials: Adjust the tension for each thread using the corresponding numbered dials. Incorrect tension can lead to loose or puckered stitches.
- Stitch Length: Use the stitch length adjustment knob or lever to change the length of your stitches.
- Differential Feed: This feature helps manage fabric stretching or gathering. Adjust as needed for different fabric types.
3.4 Safety Precautions
- Always keep fingers clear of the needles and cutting blades.
- Turn off and unplug the machine before cleaning, oiling, or changing needles.
- Do not operate the machine with damaged cords or plugs.
- Use appropriate eye protection when operating the machine.
- Ensure adequate lighting in your workspace.
4. Maintenance
Regular maintenance ensures the longevity and smooth operation of your serger.
4.1 Cleaning
- Lint Removal: Regularly remove lint and dust from the looper area, feed dogs, and tension discs using a small brush or vacuum cleaner. Accumulation of lint can affect stitch quality and machine performance.
- Blade Cleaning: Keep the cutting blades clean and free of thread residue.
4.2 Lubrication (Oiling)
Industrial sergers require regular oiling. Refer to your machine's specific oiling points diagram, usually found in a detailed service manual. Use only high-quality sewing machine oil. Over-oiling can cause oil stains on fabric.
4.3 Needle Replacement
Replace needles regularly, especially if they are bent, dull, or causing skipped stitches. Use only the correct type and size of needles specified for industrial sergers (e.g., DCx27, B-27). Ensure the flat side of the needle faces the correct direction when inserting.
5. Troubleshooting
This section addresses common issues you might encounter and their potential solutions.
| Problem | Possible Cause | Solution |
|---|---|---|
| Skipped Stitches | Incorrect needle insertion, bent/dull needle, improper threading, incorrect tension. | Reinsert needle correctly, replace needle, re-thread machine, adjust tension. |
| Thread Breakage | High tension, burrs on thread path, poor quality thread, incorrect threading, dull needle. | Reduce tension, check thread path for rough spots, use quality thread, re-thread, replace needle. |
| Uneven Stitches / Puckering | Incorrect tension, differential feed setting, wrong needle/thread combination for fabric. | Adjust tension, adjust differential feed, use appropriate needle/thread. |
| Machine Not Starting | No power, motor issue, safety switch engaged. | Check power connection, consult technician for motor issues, ensure all covers are closed. |
For more complex issues, it is recommended to consult a qualified sewing machine technician.
6. Specifications
Key specifications for the Yamata FY757A Industrial Serger Overlock Interlock Machine:
- Model Number: FY7x7A
- Brand: Yamata
- Stitch Type: 2 Needle, 5 Thread Safety Stitch
- Color: White
- Power: Electric
- UPC: 760781218895
- First Available: December 2, 2016
7. Warranty and Support
For information regarding product warranty, technical support, or authorized service centers, please refer to the official documentation provided with your purchase or contact Yamata customer service directly. Warranty terms and conditions may vary based on region and retailer.