1. Introduction
This manual provides essential information for the installation, operation, and maintenance of your ASRock B250M-HDV MicroATX Motherboard. Please read this guide thoroughly before proceeding with installation to ensure proper setup and functionality.
The ASRock B250M-HDV motherboard supports 6th generation Intel Core processors (LGA1151 socket) and DDR4 2133MHz memory. It features 1 PCIe 3.0 x16 slot, 2 PCIe 3.0 x1 slots, 6 USB 3.0 ports (2 front, 4 rear), and M.2 storage support. Its high-density glass fabric PCB design helps protect against humidity-induced electrical shorts.
2. Product Overview
Familiarize yourself with the physical components of your ASRock B250M-HDV motherboard.

Figure 2.1: ASRock B250M-HDV Motherboard and retail packaging. This image provides a general view of the product as it appears in its box.

Figure 2.2: Angled view of the ASRock B250M-HDV motherboard, highlighting the CPU socket, RAM slots, and various connectors.
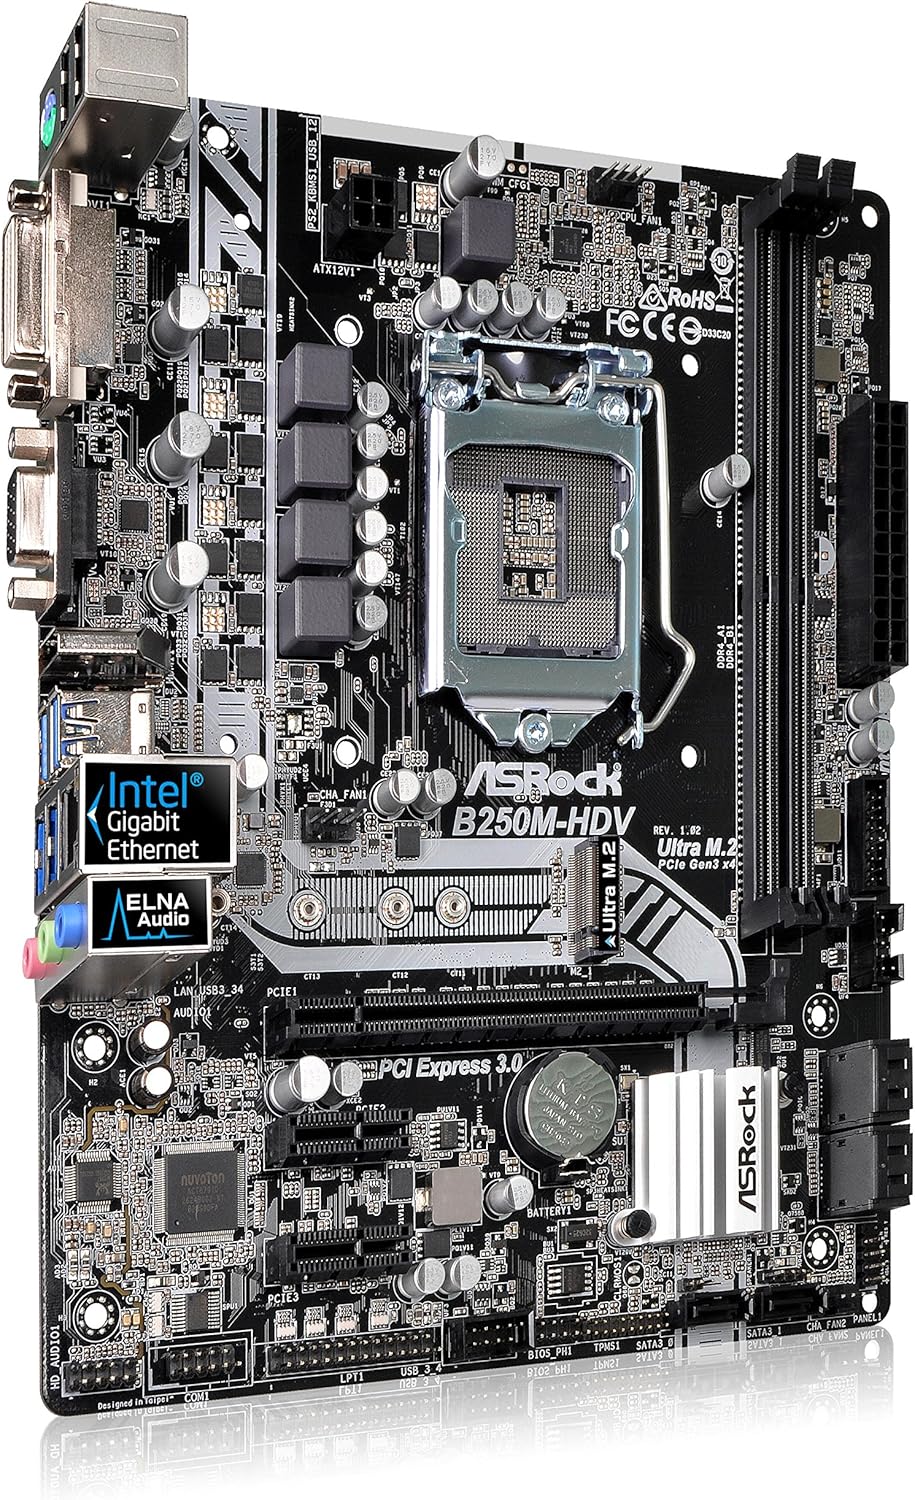
Figure 2.3: Top-down perspective of the ASRock B250M-HDV motherboard, showing the layout of components such as the Intel B250 chipset, PCIe slots, and SATA ports.

Figure 2.4: A more detailed top-down view of the ASRock B250M-HDV motherboard, emphasizing the CPU socket area and power delivery components.

Figure 2.5: Close-up of the ASRock B250M-HDV motherboard's rear I/O panel, displaying the various ports including USB, video outputs (DVI, VGA), and audio jacks.
3. Setup
3.1. CPU Installation
The ASRock B250M-HDV uses an LGA1151 socket. Carefully open the CPU retention mechanism, align the CPU with the triangular marker on the socket, and gently place it. Close the retention mechanism to secure the CPU.
3.2. RAM Installation
This motherboard supports Dual Channel DDR4 2133MHz memory. Insert DDR4 memory modules into the DIMM slots, ensuring the notches on the modules align with the slots. Press down firmly until the clips on both sides lock into place.
3.3. Storage Installation
Connect SATA 3.0 devices (HDDs/SSDs) to the SATA ports on the motherboard. For M.2 SSDs, locate the M.2 slot and secure the drive with the provided screw.
3.4. PCIe Card Installation
Install your graphics card into the PCIe 3.0 x16 slot. Additional expansion cards can be installed in the PCIe 3.0 x1 slots.
3.5. Power Connections
Connect the 24-pin ATX power connector and the 8-pin 12V CPU power connector from your power supply to the corresponding ports on the motherboard.
3.6. Front Panel Connections
Connect the front panel headers (power button, reset button, USB ports, audio jacks) to the appropriate pins on the motherboard. Refer to the detailed motherboard diagram in the full user manual for exact pin locations.
4. Operating Instructions
4.1. BIOS/UEFI Setup
Upon first boot, enter the BIOS/UEFI setup utility by pressing the designated key (usually DEL or F2) during startup. Configure boot order, system time, and other essential settings as needed.
4.2. Driver Installation
After installing your operating system, install all necessary drivers for the motherboard chipset, audio, LAN, and any other integrated components. Drivers are typically provided on a support CD or can be downloaded from the ASRock website.
4.3. Operating System Installation
Insert your operating system installation media (USB drive or DVD) and follow the on-screen prompts to install the operating system. Ensure all storage devices are properly detected and formatted.
5. Maintenance
5.1. Cleaning
Regularly clean your computer's interior to prevent dust buildup, which can lead to overheating. Use compressed air to remove dust from fans, heatsinks, and other components. Ensure the system is powered off and unplugged before cleaning.
5.2. BIOS Updates
Periodically check the ASRock website for BIOS/UEFI updates. Updates can improve system stability, add support for new hardware, or fix bugs. Follow the instructions provided by ASRock carefully when performing a BIOS update.
5.3. Humidity Protection
The ASRock B250M-HDV features a High Density Glass Fabric PCB design to reduce gaps between PCB layers, protecting against electrical shorts caused by humidity. While this design offers enhanced protection, it is still recommended to operate the motherboard in a dry, well-ventilated environment to prolong its lifespan.
6. Troubleshooting
6.1. No Power/No Boot
- Verify all power cables (24-pin ATX, 8-pin CPU) are securely connected.
- Ensure the power supply is switched on and functioning correctly.
- Check front panel connections for the power button.
6.2. No Display
- Confirm the monitor is connected to the correct video output on the graphics card or motherboard.
- Reseat the graphics card and memory modules.
- Test with a different monitor or cable if possible.
6.3. System Instability/Crashes
- Check CPU and GPU temperatures to ensure they are within normal operating ranges.
- Verify RAM modules are correctly installed and compatible.
- Ensure all drivers are up-to-date.
For more detailed troubleshooting steps, refer to the comprehensive user manual provided by ASRock.
7. Specifications
| Feature | Specification |
|---|---|
| Brand | ASRock |
| Model Name | B250M-HDV |
| CPU Socket | LGA 1151 |
| Chipset Type | Intel B250 |
| Compatible Processors | Intel Core i3, i5, i7, i9 (6th Gen) |
| RAM Memory Technology | DDR4 SDRAM |
| Memory Speed | 2133 MHz (Supports up to 2400 MHz) |
| PCIe Slots | 1 x PCIe 3.0 x16, 2 x PCIe 3.0 x1 |
| USB Ports | 6 x USB 3.0 (2 front, 4 rear), 2 x USB 2.0 (rear) |
| Storage Interfaces | SATA3, M.2 |
| Product Dimensions | 11 x 8 x 2.3 inches |
| Item Weight | 1.6 pounds |
8. Official Product Video
Video 8.1: ASRock B250M-HDV Motherboard Product Overview. This video provides a visual introduction to the motherboard's features and design.
9. Warranty and Support
For warranty information and technical support, please visit the official ASRock website or contact their customer service. Keep your proof of purchase for warranty claims.


