
1. Introduction
This manual provides detailed instructions for the installation, operation, and maintenance of your PIX-LINK WR01 WiFi Extender. The WR01 is designed to expand the coverage of your existing wireless network, eliminating Wi-Fi dead zones and providing a stable internet connection throughout your home or office. Please read this manual thoroughly before using the device.
2. Safety Information
- Ensure the device is connected to a power outlet within the specified voltage range.
- Do not expose the device to water, moisture, or extreme temperatures.
- Avoid placing the device near heat sources or in direct sunlight.
- Do not attempt to disassemble or repair the device yourself. Refer all servicing to qualified personnel.
- Use the device indoors only.
- Ensure adequate ventilation around the device to prevent overheating.
3. Product Overview
The PIX-LINK WR01 WiFi Extender is a compact device designed for easy integration into your existing network. Below is an image illustrating its main components:
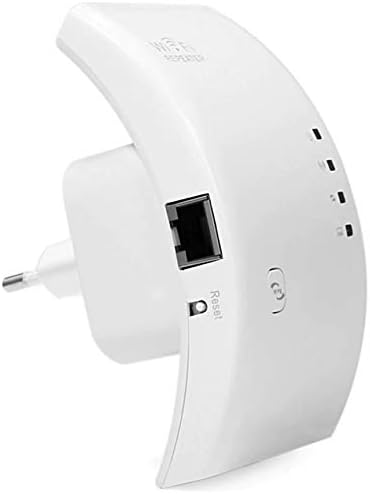
The PIX-LINK WR01 WiFi Extender features a standard power plug for wall outlet connection, an RJ-45 Ethernet port for wired connections, a small recessed reset button, and indicator LEDs for power, WiFi signal strength, and WPS status.
Key Components:
- Power Plug: For connecting to an electrical outlet.
- RJ-45 Ethernet Port: Used for wired connections in AP mode or for initial setup.
- Reset Button: Press and hold for 5-10 seconds to restore factory default settings.
- LED Indicators:
- Power LED: Indicates the device is powered on.
- WPS/Status LED: Indicates WPS activity or general device status.
- WiFi Signal LEDs: Show the strength of the signal from the main router.
4. Features
- Repeater Mode: Extends existing Wi-Fi coverage to eliminate dead zones, providing up to 300 Mbps data transfer rate.
- AP Mode: Transforms a wired internet connection into a new wireless network, ideal for devices like gaming consoles, smartphones, and media players.
- Universal Compatibility: Fully compatible with 802.11 b/g/n wireless standards and supports 2.4 GHz Wi-Fi networks.
- Easy Setup: Configuration can be performed conveniently via a smartphone, tablet, or laptop.
- High Speed: Offers a data transfer rate of up to 300 Mbps, enhancing streaming and browsing experiences.
5. Setup
The PIX-LINK WR01 offers two primary setup methods: via WPS button or through a web browser interface.
5.1. Repeater Mode Setup (WPS Method)
- Plug the PIX-LINK WR01 into a power outlet near your main router.
- Wait for the Power LED to become solid.
- Press the WPS button on your main router.
- Within two minutes, press the WPS button on the PIX-LINK WR01. The WPS/Status LED will blink during the connection process.
- Once the WPS/Status LED becomes solid, the extender has successfully connected to your router.
- Unplug the extender and relocate it to a suitable spot between your router and the Wi-Fi dead zone. Ensure the WiFi Signal LEDs indicate a good signal strength.
Note: The extender will create a new Wi-Fi network with your original network name followed by "_EXT" or similar, using the same password as your main network.
5.2. Repeater Mode Setup (Web Browser Method)
- Plug the PIX-LINK WR01 into a power outlet near your main router.
- On your computer, smartphone, or tablet, connect to the Wi-Fi network broadcast by the extender (e.g., "PIX-LINK_XXXX"). No password is required initially.
- Open a web browser and enter the default IP address (usually
192.168.1.254orrepeater.net) or follow instructions in the included detailed manual. - Log in using the default username and password (typically
adminfor both). - Follow the on-screen wizard to select "Repeater Mode" and choose your main Wi-Fi network from the list.
- Enter the password for your main Wi-Fi network and apply the settings.
- The extender will restart. Once restarted, relocate it to an optimal position.
5.3. AP Mode Setup
- Plug the PIX-LINK WR01 into a power outlet.
- Connect an Ethernet cable from your main router's LAN port to the RJ-45 port on the PIX-LINK WR01.
- Follow the Web Browser Method steps (5.2) to access the extender's configuration page.
- Select "AP Mode" from the setup wizard.
- Configure the new Wi-Fi network name (SSID) and password as desired.
- Apply settings and wait for the device to restart. The extender will now broadcast a new Wi-Fi network.
Important: The PIX-LINK WR01 extends Wi-Fi coverage but does not increase the internet speed provided by your original router. Its function is to relay the existing signal.
6. Operating
Once configured, the PIX-LINK WR01 operates automatically. The LED indicators provide visual feedback on its status:
- Solid Power LED: Device is powered on and functioning.
- Solid WPS/Status LED: Indicates a successful connection in Repeater Mode or active AP Mode.
- Blinking WPS/Status LED: Indicates WPS pairing in progress or a network activity.
- WiFi Signal LEDs: The number of illuminated LEDs indicates the strength of the signal received from the main router. More LEDs mean a stronger signal, which is ideal for optimal performance.
To connect devices, simply search for the extended Wi-Fi network (e.g., "YourNetworkName_EXT" or your custom AP network name) and enter the corresponding password.
7. Maintenance
- Cleaning: Use a soft, dry cloth to clean the device. Do not use liquid cleaners or aerosols.
- Firmware Updates: Periodically check the PIX-LINK official website for any available firmware updates to ensure optimal performance and security.
- Resetting: If you encounter persistent issues or wish to reconfigure the device from scratch, use the reset button to restore factory defaults.
8. Troubleshooting
Common Issues and Solutions:
- No Power LED: Ensure the device is properly plugged into a working power outlet. Try a different outlet.
- Cannot Connect to Extender's Wi-Fi: Ensure the extender is powered on. If using the web browser setup, ensure you are connecting to the extender's default Wi-Fi network.
- Extender Not Connecting to Main Router:
- Ensure the main router's Wi-Fi is active and broadcasting.
- Verify the Wi-Fi password entered during setup is correct.
- Move the extender closer to the main router during initial setup.
- Try resetting the extender to factory defaults and re-attempt setup.
- Slow Speed or Intermittent Connection:
- Relocate the extender to an optimal position where it receives a strong signal from the main router (check WiFi Signal LEDs).
- Reduce interference from other electronic devices (e.g., microwaves, cordless phones).
- Ensure your main router is providing adequate internet speed. The extender cannot increase your original internet speed.
- Forgot Login Password for Web Interface: Perform a factory reset using the reset button.
If you encounter any persistent issues not covered here, please refer to the detailed user manual included with your product or contact PIX-LINK customer support for assistance.
9. Specifications
| Attribute | Value |
|---|---|
| Brand | PIX-LINK |
| Model Number | CL-WR01 |
| Color | White |
| Wireless Standard | 802.11bgn |
| Data Transfer Rate | 300 Megabits per second |
| Frequency Band | 2.4 GHz |
| Included Components | 1 wireless repeater WR01, 1 RJ-45 cable, 1 detailed user manual |
| UPC | 707870118193 |
| ASIN | B01N9B8JGE |
10. Warranty and Support
For warranty information, please refer to the documentation provided at the time of purchase. PIX-LINK products typically come with a limited warranty covering manufacturing defects.
For technical support, troubleshooting assistance, or to inquire about firmware updates, please visit the official PIX-LINK website or contact their customer service department. Contact details are usually available in the detailed user manual included in the product packaging or on the manufacturer's website.
When contacting support, please have your product model (CL-WR01) and ASIN (B01N9B8JGE) ready.


