
Allied Telesis AT-GS910/5-10
Allied Telesis AT-GS910/5-10 Unmanaged Switch User Manual
Model: AT-GS910/5-10
1. Introduction
This manual provides essential information for the installation, operation, and maintenance of the Allied Telesis AT-GS910/5-10 Unmanaged Switch. This device is a high-performance, 5-port 10/100/1000T (Gigabit Ethernet) unmanaged switch designed for small office and home office (SOHO) environments, offering simple plug-and-play connectivity without complex configuration.
The AT-GS910/5-10 is equipped with an internal power supply unit (PSU), ensuring a compact and reliable design for seamless integration into your network.
2. Safety Information
Please read and understand the following safety precautions before installing or operating the switch. Failure to comply with these guidelines may result in injury or damage to the device.
- Power Source: Use only the power cord supplied with the device and connect it to a grounded electrical outlet. Ensure the voltage matches the requirements specified on the switch's label.
- Ventilation: Do not block any ventilation openings. Ensure adequate airflow around the switch to prevent overheating. Avoid placing the switch in enclosed spaces or on soft surfaces that may impede ventilation.
- Environment: Operate the switch in a dry environment, away from water, moisture, and excessive humidity. Avoid exposure to direct sunlight or extreme temperatures.
- Placement: Place the switch on a stable, flat surface. Do not place heavy objects on top of the switch.
- Servicing: Do not attempt to service this product yourself. Refer all servicing to qualified service personnel.
3. Package Contents
Verify that all items are present and in good condition upon unpacking. If any item is missing or damaged, contact your vendor immediately.
- Allied Telesis AT-GS910/5-10 Unmanaged Switch
- Power Cord
- Quick Start Guide (or similar documentation)
4. Product Features
The AT-GS910/5-10 switch offers robust features for reliable network connectivity:
- 5 Gigabit Ethernet Ports: Provides five 10/100/1000T RJ45 ports for high-speed wired connections.
- Unmanaged Operation: Plug-and-play functionality requires no configuration, making it easy to deploy.
- Auto-Negotiation: Each port automatically detects the speed and duplex mode of the connected device.
- Auto MDI/MDIX: Eliminates the need for crossover cables, simplifying network setup.
- Internal Power Supply: Integrated power supply for a cleaner setup and reduced cable clutter.
- LED Indicators: Front-panel LEDs provide real-time status for power, link/activity, and speed.
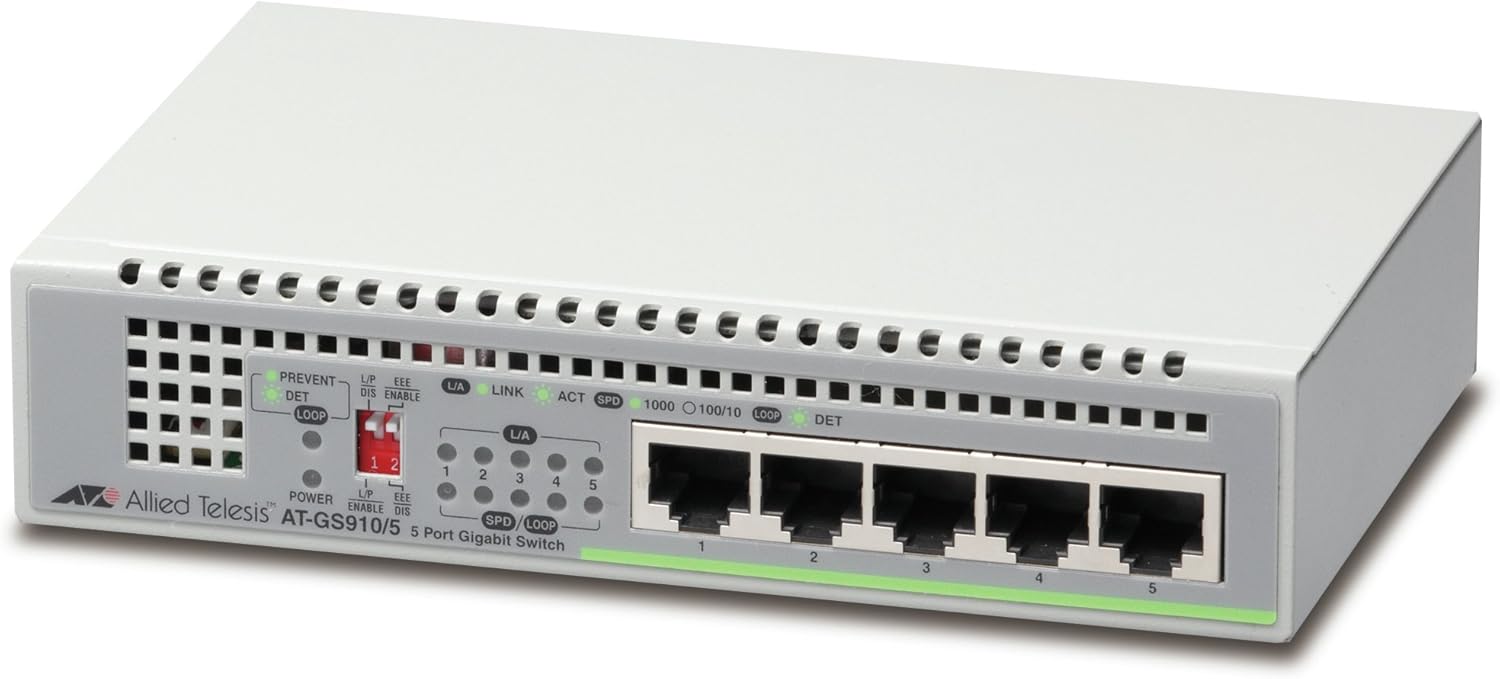
Figure 4.1: Front view of the AT-GS910/5-10 switch, highlighting the five Gigabit Ethernet ports and status LEDs.

Figure 4.2: Rear view of the AT-GS910/5-10 switch, illustrating the power input and overall compact design.
5. Setup
Follow these steps to set up your AT-GS910/5-10 switch:
- Choose a Location: Select a flat, stable surface for the switch. Ensure there is adequate space around the device for proper ventilation. Avoid placing it near heat sources or in direct sunlight.
- Connect Power:
- Insert one end of the provided power cord into the AC power inlet on the back of the switch.
- Plug the other end of the power cord into a standard electrical outlet.
- The Power LED on the front panel should illuminate, indicating the switch is receiving power.
- Connect Network Devices:
- Using standard Ethernet cables (Cat5e or better recommended for Gigabit speeds), connect your network devices (e.g., computers, printers, network-attached storage, routers) to any of the five RJ45 ports on the front of the switch.
- The Link/Act LED for each connected port will illuminate when a valid network connection is established and will blink to indicate data activity.
- The SPD (Speed) LED will indicate the connection speed (e.g., 1000 for Gigabit, 100 for Fast Ethernet, 10 for Ethernet).
Your AT-GS910/5-10 switch is now ready for use. As an unmanaged switch, no further configuration is required.
6. Operating the Switch
The Allied Telesis AT-GS910/5-10 is an unmanaged switch, meaning it operates automatically without the need for user configuration. Once powered on and connected to network devices, it will begin forwarding data traffic.
LED Indicators
The front panel LEDs provide visual status of the switch's operation:
- Power LED:
- On: The switch is powered on and operating normally.
- Off: The switch is powered off or not receiving power.
- L/A (Link/Act) LED (per port):
- On: A valid network link is established on the port.
- Blinking: Data activity is occurring on the port.
- Off: No link is established or the connected device is off.
- SPD (Speed) LED (per port):
- 1000 (Green): The port is operating at 1000 Mbps (Gigabit Ethernet).
- 100 (Orange): The port is operating at 100 Mbps (Fast Ethernet).
- 10 (Off): The port is operating at 10 Mbps (Ethernet).
- LOOP DET (Loop Detection) LED:
- On: Indicates a network loop has been detected. The switch will block the port(s) causing the loop to prevent network instability.
- Off: No network loop detected.
7. Maintenance
The AT-GS910/5-10 switch is designed for minimal maintenance. However, following these guidelines can help ensure its longevity and optimal performance:
- Cleaning: Periodically clean the exterior of the switch with a soft, dry cloth. Do not use liquid or aerosol cleaners. Ensure the ventilation openings are free from dust and debris.
- Ventilation: Regularly check that the switch's ventilation holes are not obstructed. Proper airflow is crucial to prevent overheating.
- Cable Management: Ensure network cables are neatly organized and not excessively bent or strained. This prevents damage to cables and ports.
- Power Cycle: If the switch experiences unusual behavior, a simple power cycle (unplugging the power cord, waiting 10 seconds, and plugging it back in) can often resolve minor issues.
8. Troubleshooting
If you encounter issues with your AT-GS910/5-10 switch, refer to the following common problems and solutions:
| Problem | Possible Cause | Solution |
|---|---|---|
| No Power LED indication. | Switch is not receiving power. |
|
| Link/Act LED is off for a connected device. | No valid network link. |
|
| Slow network speed. | Cable issue, device limitation, or network congestion. |
|
| LOOP DET LED is on. | Network loop detected. |
|
9. Specifications
| Feature | Description |
|---|---|
| Model Number | AT-GS910/5-10 |
| Ports | 5 x 10/100/1000T RJ45 Gigabit Ethernet Ports |
| Switch Type | Unmanaged |
| Data Transfer Rate | 10/100/1000 Mbps (Gigabit Ethernet) |
| Power Supply | Internal PSU |
| Dimensions (LxWxH) | 6.3 x 4.13 x 1.38 inches (160 x 105 x 35 mm) |
| Item Weight | 1.1 pounds (500 Grams) |
| Interface Type | RJ45 |
| Case Material | Plastic |
Note: Specifications are subject to change without notice. For the most current information, please refer to the manufacturer's official website.
10. Warranty and Support
For information regarding the product warranty, please refer to the warranty card included with your product or visit the official Allied Telesis website. Warranty terms and conditions may vary by region and product.
If you require technical assistance or have questions not covered in this manual, please contact Allied Telesis customer support or your local reseller. Support contact information can typically be found on the Allied Telesis official website:
Related documentsAT-GS910/5-10

Ask a question about this manual
Ask about setup, troubleshooting, compatibility, parts, safety, or missing instructions. Manuals+ will review the question and use this page’s manual context to help answer it.