1. Introduction
This manual provides comprehensive instructions for the setup, operation, maintenance, and troubleshooting of your Targus Universal USB 3.0 Dual Video Laptop Docking Station (DOCK171USZ). This docking station is designed to expand the connectivity of your laptop, offering dual video outputs, multiple USB 3.0 ports, Gigabit Ethernet, and audio connections, all through a single USB connection to your computer.
Please read this manual thoroughly before using the product to ensure proper functionality and to maximize your experience.
2. Safety Information
- Do not expose the device to water, moisture, or extreme temperatures.
- Avoid dropping or subjecting the device to strong impacts.
- Use only the power adapter supplied with the docking station.
- Do not attempt to disassemble or repair the device yourself. Refer all servicing to qualified personnel.
- Ensure proper ventilation around the docking station during operation.
3. Package Contents
Verify that all items are present in your package:
- Targus Universal USB 3.0 Dual Video Laptop Docking Station (DOCK171USZ)
- USB 3.0 µB to A Host Cable (3.3 ft)
- DC Host Power and Charging Cable (3.3 ft)
- 90W AC Power Adapter
- Power Tips for various laptop brands
- Quick Start Guide (or similar documentation)
4. Product Overview
The Targus DOCK171USZ provides a comprehensive set of ports to expand your laptop's capabilities.

Figure 4.1: Front view of the Targus DOCK171USZ Docking Station.
4.1. Front/Side Ports

Figure 4.2: Side view showing USB 3.0 µB host port and audio jack.
- USB 3.0 µB Host Port: Connects the docking station to your laptop using the provided USB 3.0 µB to A cable.
- Audio In/Out (3.5mm Jack): Connect headphones, speakers, or a microphone.
- USB 3.0 Type-A Port (BC 1.2 Fast Charging): Provides fast charging for mobile devices up to 1.5A.
- Kensington Lock Slot: For securing the docking station.
4.2. Rear Ports
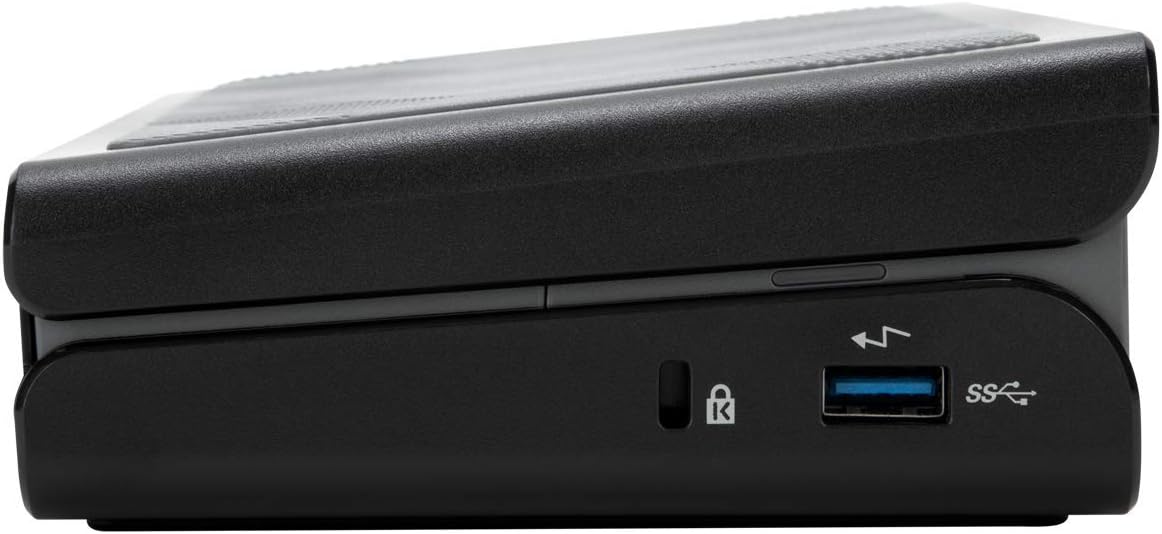
Figure 4.3: Rear view displaying power input, Ethernet, USB, DVI, and HDMI ports.
- DC 19.5V Power Input: Connect the included 90W AC power adapter here.
- Gigabit Ethernet Port: For wired network connectivity.
- USB 3.0 Type-A Ports (x3): Connect USB peripherals such as keyboards, mice, and external drives.
- DVI-I Port: Connect a monitor using a DVI cable. Can be converted to VGA with an adapter (not included).
- HDMI 1.4 Port: Connect a monitor using an HDMI cable. Can be converted to a second DVI-D port with an adapter (not included).
- Power Button: To turn the docking station on or off.
4.3. Power Tips

Figure 4.4: Included power tips for laptop charging.
The docking station includes a selection of power tips to ensure compatibility with a wide range of laptops for charging purposes via the DC Host Power and Charging Cable.
5. Setup
Follow these steps to set up your Targus docking station:
- Connect Power: Plug the 90W AC power adapter into the DC 19.5V Power Input port on the rear of the docking station, then plug the adapter into a wall outlet.
- Install Drivers: For optimal performance and display functionality, it is recommended to install the latest DisplayLink drivers. Visit the official DisplayLink website (www.displaylink.com/downloads) and download the appropriate drivers for your operating system (Windows, macOS, Linux, Android, Chrome OS). Follow the on-screen instructions to complete the installation.
- Connect Monitors:
- For the first monitor, connect an HDMI cable from your monitor to the HDMI 1.4 port on the docking station.
- For the second monitor, connect a DVI cable from your monitor to the DVI-I port on the docking station. If your monitor uses VGA, you will need a DVI-to-VGA adapter (not included).
- Connect Peripherals: Plug your USB devices (keyboard, mouse, external hard drives, etc.) into the available USB 3.0 Type-A ports on the docking station.
- Connect Network (Optional): If desired, connect an Ethernet cable from your router or network switch to the Gigabit Ethernet port on the docking station.
- Connect to Laptop: Connect the USB 3.0 µB to A Host Cable from the docking station's USB 3.0 µB Host Port to an available USB 3.0 Type-A port on your laptop.
- Laptop Charging (Optional): If your laptop supports charging via the docking station, select the appropriate power tip and connect the DC Host Power and Charging Cable from the docking station to your laptop's power input.
- Power On: Press the power button on the docking station. Your laptop should detect the docking station and connected devices.
6. Operating
6.1. Display Configuration
Once connected, your operating system should automatically detect the external monitors. You can configure display settings (extend, duplicate, primary display) through your computer's display settings:
- Windows: Right-click on the desktop and select 'Display settings' or 'Screen resolution'.
- macOS: Go to 'System Preferences' > 'Displays'.
The docking station supports dual monitor setups up to 2048 x 1152 at 60Hz. A single 2K (2560 x 1440) resolution is supported at 50Hz via the HDMI port.
6.2. USB Port Usage
The USB 3.0 ports provide high-speed data transfer for connected peripherals. The dedicated BC 1.2 fast charging port on the side can charge compatible devices more quickly.
6.3. Audio and Network
The 3.5mm audio jack allows for connection of headphones or speakers. The Gigabit Ethernet port provides a stable and fast wired network connection, which is often more reliable than Wi-Fi.
7. Maintenance
- Cleaning: Use a soft, dry cloth to clean the exterior of the docking station. Do not use liquid cleaners or aerosols.
- Storage: When not in use for extended periods, store the docking station in a cool, dry place away from direct sunlight.
- Cable Management: Ensure cables are not excessively bent or tangled to prevent damage.
8. Troubleshooting
If you encounter issues with your docking station, refer to the following common problems and solutions:
| Problem | Possible Solution |
|---|---|
| No display on external monitors. |
|
| USB devices are not recognized. |
|
| No network connection via Ethernet. |
|
| Laptop is not charging. |
|
9. Specifications
| Feature | Detail |
|---|---|
| Model Number | DOCK171USZ |
| Video Outputs | 1 x HDMI 1.4, 1 x DVI-I |
| Max Resolution (Dual Display) | 2048 x 1152 @ 60Hz |
| Max Resolution (Single Display) | 2560 x 1440 @ 50Hz (HDMI) |
| USB Ports | 4 x USB 3.0 Type-A (1 x BC 1.2 Fast Charging), 1 x USB 3.0 µB Host Port |
| Ethernet | 1 x Gigabit Ethernet (RJ-45) with WOL |
| Audio | 1 x 3.5mm Audio In/Out Combo Jack |
| Power Supply | 90 Watts AC Power Adapter |
| Dimensions (LxWxH) | 4.8 x 2 x 8.25 inches (12.2 x 5.1 x 21 cm) |
| Weight | 1.4 pounds (0.64 kg) |
| Hardware Platform | PC, Mac, Linux, Android |
| Operating System Compatibility | Windows, macOS, Linux, Android, Chrome OS |
10. Warranty and Support
Targus provides a standard limited warranty for this product. Please refer to the warranty card included with your purchase or visit the official Targus website for detailed warranty terms and conditions. Note that the limited warranty may not cover products purchased from third-party sellers.
For technical support, driver downloads, or further assistance, please visit the Targus support website or contact their customer service:
- Targus Support Website: us.targus.com/pages/support
- Targus Store: Targus Amazon Store


