
1. Introduction
The LGIDTECH WL-Box2 Miboxer Gateway Hub is designed to provide seamless control over your Miboxer/Mi.Light 2.4GHz smart lighting products via a smartphone application. This manual provides detailed instructions for setting up, operating, and maintaining your WL-Box2 gateway hub, ensuring optimal performance and user experience.
2. Product Overview
The WL-Box2 serves as a central hub, enabling remote control and automation features for compatible lighting devices. It offers enhanced functionality compared to previous versions, including expanded zone control and improved app integration.

Image 2.1: Front view of the LGIDTECH WL-Box2 Miboxer Gateway Hub, showing the Miboxer logo and SYS/LINK indicators.
Key Features:
- Smartphone control for Mi.Light series lights.
- Timer function for scheduling ON/OFF times.
- Supports 100 zones for individual or group control.
- Compatible with Miboxer/Mi.Light 2.4GHz products.
- Supports third-party voice control (e.g., Alexa).
Dimensions:
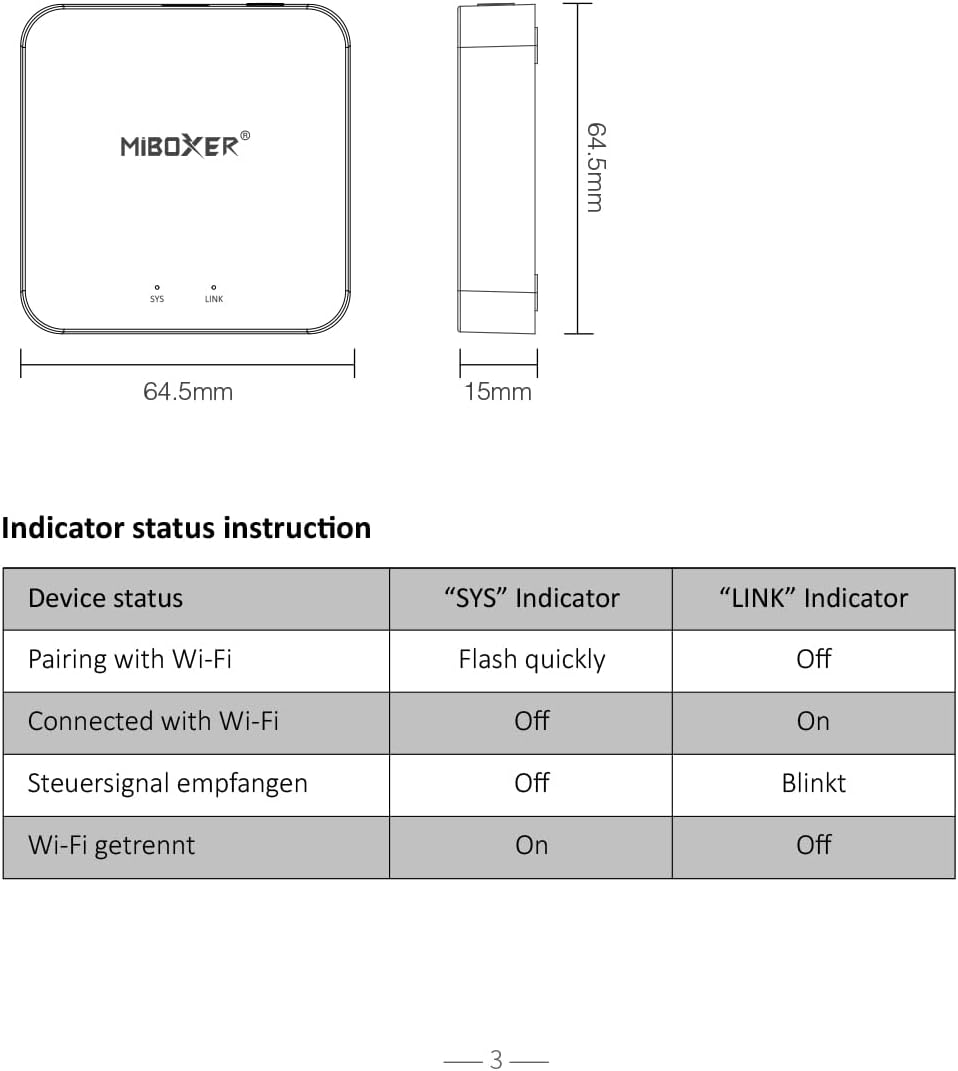
Image 2.2: Diagram showing the dimensions of the WL-Box2 hub: 64.5mm x 64.5mm x 15mm.
The device measures approximately 64.5mm in width, 64.5mm in length, and 15mm in height, making it compact and easy to place.
3. Setup Instructions
Follow these steps to set up your LGIDTECH WL-Box2 Miboxer Gateway Hub and connect it to your smart lighting system.
3.1. Download the Miboxer App
- Search for "Miboxer" in your smartphone's app store (Google Play Store for Android or Apple App Store for iOS). Note: The correct app name is "Miboxer", not "Miboxer Smart".
- Download and install the application.

Image 3.1: The Miboxer app icon as it appears in app stores.
3.2. Device Connection Steps
Ensure your Wi-Fi network is 2.4GHz. The WL-Box2 is not compatible with 5GHz networks.

Image 3.2: Visual guide for connecting the WL-Box2 to the Miboxer app.
- Step 1: Download the "Tuya Smart" app (or Miboxer app, depending on the specific version/integration).
- Step 2: On the app's home page, tap the "+" icon in the upper right corner to add a device.
- Step 3: Touch "Lighting" and then select "Light Source (BLE+Wi-Fi)".
- Step 4: Reset the device. If the indicator is already blinking or breathing, skip this step. Turn the device ON, OFF, ON, OFF, and ON until the indicator blinks or breathes slowly. Confirm the indicator is blinking or breathing in the app.
- Step 5: The gateway indicator flashes red. If not, press and hold the "SET" button for 3 seconds.
- Step 6: The gateway completes the match. Touch "Done".
- Step 7: Match the code with the device using smart control.

Image 3.3: Comprehensive visual steps for connecting the WL-Box2 to a Wi-Fi network and pairing with the app, including Wi-Fi selection and device linking.
During the setup process, ensure your smartphone is connected to a 2.4GHz Wi-Fi network. If your router supports both 2.4GHz and 5GHz, temporarily disable the 5GHz band or ensure your phone is connected to the 2.4GHz SSID.
4. Operating Instructions
Once your WL-Box2 is successfully set up, you can control your Miboxer/Mi.Light products using the smartphone app.
4.1. App Remote Control
The Miboxer app allows you to control all paired devices. You can manage up to 100 zones individually, and customize zone names (e.g., Zone 1 to Zone 16 for initial setup).

Image 4.1: Overview of the Miboxer app interface, highlighting features like 100 zones control, group timer switch, Do Not Disturb mode, indicator light control, and remote pairing.
- Zone Control: Control individual lights or groups of lights by assigning them to specific zones.
- Timer Function: Set schedules for lights to turn ON or OFF automatically.
- Do Not Disturb: Activate a mode to prevent lights from turning on unexpectedly.
- Indicator Light Control: Option to turn the hub's indicator light ON/OFF.
- Remote Copy: Copy settings from another paired remote control.
4.2. Third-Party Voice Control
The WL-Box2 supports integration with third-party voice assistants, such as Amazon Alexa and Google Assistant, allowing for hands-free control of your lighting system.

Image 4.2: Illustration of voice control functionality, showing an Amazon Echo device and the command "Alexa, turn off bedroom lights."
Refer to the specific instructions within the Miboxer app or your voice assistant's app for detailed setup of voice commands.
5. Indicator Status Instruction
The WL-Box2 features "SYS" and "LINK" indicator lights that provide information about its current status. Refer to the table below for an explanation of each status.
Image 5.1: Diagram showing the WL-Box2 with a table explaining the SYS and LINK indicator light behaviors.
| Device Status | "SYS" Indicator | "LINK" Indicator |
|---|---|---|
| Pairing with Wi-Fi | Flashes quickly | Off |
| Connected with Wi-Fi | Off | On |
| Receiving control signal | Off | Flashes |
| Wi-Fi disconnected | On | Off |
6. Compatibility
The LGIDTECH WL-Box2 Gateway Hub is designed to control all Miboxer/Mi.Light 2.4GHz products. It is important to note that the WL-Box2 cannot directly control LED strip lights; a compatible Mi.Light series LED strip controller is required for this function.
Image 6.1: Diagram illustrating the WL-Box2's compatibility with various Miboxer 2.4GHz products, including bulbs and controllers.
Examples of Compatible Products:
- LED light bulbs (e.g., FUT014, FUT012, FUT105).
- LED Spotlights (e.g., GU10, MR16 like FUT103, FUT104, FUT106).
- LED Downlights, Ceiling lights (e.g., FUT066, FUT068).
- LED Flood Lights (e.g., FUTT02, FUTT07).
- For LED strip lights, a Mi.Light series LED strip controller (e.g., FUT038 RGBW LED strip controller) is necessary.
7. Maintenance
To ensure the longevity and optimal performance of your WL-Box2 Gateway Hub, follow these general maintenance guidelines:
- Cleaning: Gently wipe the device with a soft, dry cloth. Avoid using liquid cleaners or abrasive materials.
- Placement: Place the hub in a dry, well-ventilated area, away from direct sunlight, extreme temperatures, and moisture.
- Power Supply: Use the provided USB cable and a compatible 5V power adapter.
- Software Updates: Regularly check the Miboxer app for any available firmware updates for the WL-Box2 to ensure you have the latest features and bug fixes.
8. Troubleshooting
If you encounter issues with your WL-Box2, refer to the following common troubleshooting steps:
- Device Not Connecting to Wi-Fi:
- Ensure your Wi-Fi network is 2.4GHz. The WL-Box2 does not support 5GHz Wi-Fi.
- Verify that your Wi-Fi password is entered correctly in the app.
- Move the WL-Box2 closer to your Wi-Fi router.
- Restart your Wi-Fi router and the WL-Box2.
- Perform a device reset as described in Section 3.2.
- Lights Not Responding to App Control:
- Confirm the WL-Box2 is connected to Wi-Fi (LINK indicator is ON).
- Ensure the lights are properly paired with the WL-Box2 and assigned to a zone in the app.
- Check if the lights themselves are powered on.
- Restart the Miboxer app.
- Intermittent Connectivity:
- Check for potential Wi-Fi interference from other devices.
- Ensure the WL-Box2 is not obstructed by large metal objects.
- Update the device firmware via the app if available.
If problems persist, contact LGIDTECH customer support for further assistance.
9. Specifications
Below are the technical specifications for the LGIDTECH WL-Box2 Miboxer Gateway Hub:
| Feature | Detail |
|---|---|
| Brand | LGIDTECH |
| Model Number | WL-Box2 |
| Control Method | App |
| Power Source | DC |
| Voltage | 5 Volts |
| Wattage | 1 watts |
| Accepted Voltage Frequency | 100 to 240 Volts and 50 Hertz to 60 Hertz |
| Product Dimensions | 2.6"W x 0.59"H (approx. 64.5mm x 15mm) |
| Item Weight | 0.085 ounces (approx. 2.4 Grams) |
| Material | Plastic |
| Indoor/Outdoor Usage | Indoor |
| Special Feature | Timer |
| Included Components | USB Cable |
| UPC | 603813404135 |
10. Warranty and Support
For warranty information, please refer to the documentation included with your purchase or contact the retailer. LGIDTECH provides customer support for product inquiries and technical assistance.
For further assistance, please visit the LGIDTECH Store on Amazon or consult the official Miboxer website.