
1. Introduction
This manual provides detailed instructions for the safe and correct installation, operation, and maintenance of your HOMCOM 6-Foot Rustic Interior Sliding Barn Door Mounting Hardware Kit. This kit is designed to convert traditional barn doors into sliding doors, offering a practical and space-saving solution for interior spaces. Please read all instructions carefully before beginning installation.
2. Safety Information
- Always read and understand all instructions before assembly and use.
- Ensure all components are present and undamaged before starting installation. Do not use if any parts are missing or damaged.
- Installation typically requires two people for safety and ease.
- This hardware kit is designed for wooden doors with a thickness of 35-45mm or 40-45mm.
- The maximum weight capacity for this hardware kit is 220 lbs (100 kg). Do not exceed this weight limit.
- Use appropriate tools and safety gear (e.g., safety glasses, gloves) during installation.
- Ensure the mounting surface (wall) is structurally sound and capable of supporting the weight of the door and hardware.
- Keep children and pets away from the installation area.
3. Package Contents
Verify that all the following components are included in your package. If any parts are missing or damaged, please contact customer support.

Figure 3.1: All components included in the hardware kit.
The kit includes the sliding track, rollers, door stops, floor guide, anti-jump pads, and all necessary fasteners and mounting hardware. Note: The barn door itself is NOT included.
4. Setup and Installation
Follow these steps carefully for proper installation. Refer to the provided diagrams and images for visual guidance.
4.1 Pre-Installation Checks
- Door Compatibility: Ensure your wooden door has a thickness between 35-45mm or 40-45mm.
- Wall Structure: Confirm the wall where the track will be mounted is solid wood or has wood studs that can securely hold the track. If not, additional blocking or a header board may be required.
- Tools Required: Measuring tape, pencil, level, drill, drill bits, wrench, screwdriver, stud finder (if applicable).
4.2 Mounting the Track

Figure 4.1: Track length and door specifications.
- Measure and mark the desired height for the track. The track should be mounted at a height that allows the door to clear the floor by approximately 1/2 inch (1.27 cm).
- Locate wall studs using a stud finder. Mark the center of each stud.
- Align the track with your marks, ensuring it is perfectly level. The track has pre-drilled holes.
- Drill pilot holes into the wall at the marked locations.
- Secure the track to the wall using the provided lag bolts and spacers. Ensure the track is firmly attached.
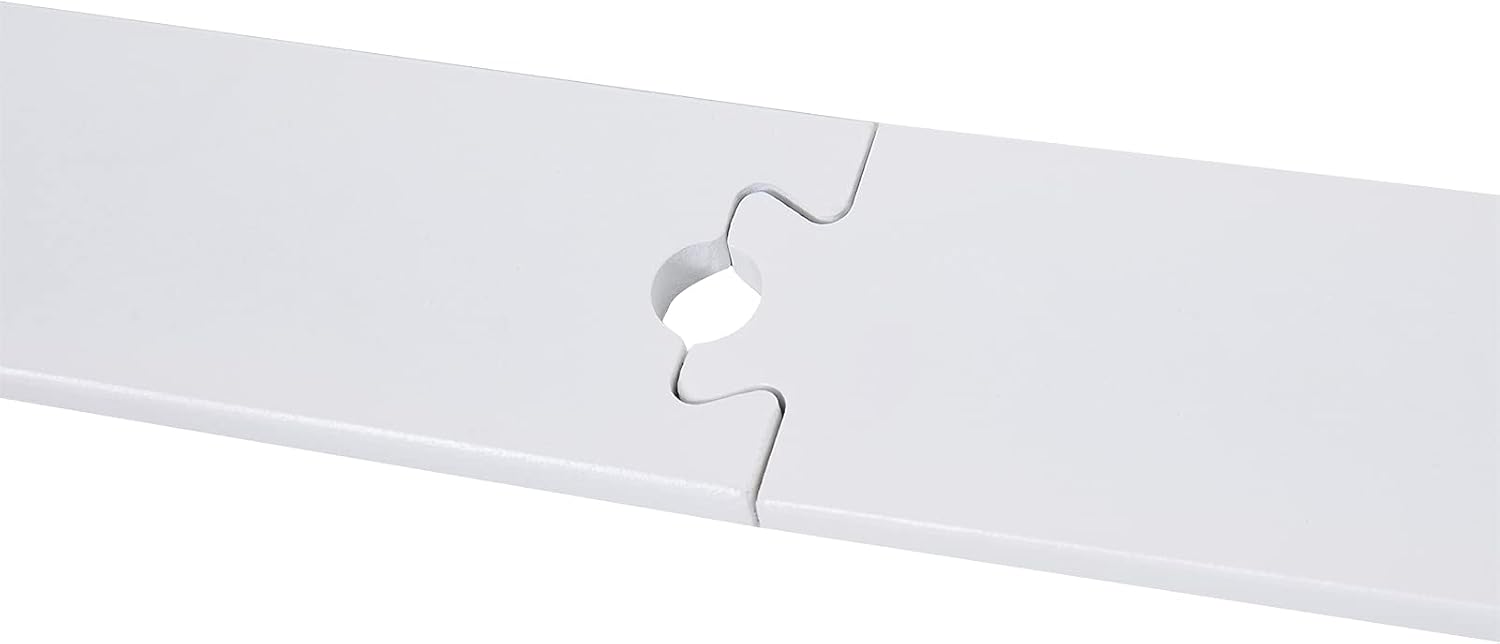
Figure 4.2: Track connection detail.
4.3 Attaching Rollers to the Door

Figure 4.3: Close-up of roller mechanism.
- Measure and mark the positions for the rollers on the top edge of your door. Typically, these are placed a few inches from each end.
- Drill pilot holes into the door at the marked locations.
- Attach the roller hangers to the door using the provided bolts. Ensure they are securely fastened and aligned.
4.4 Hanging the Door and Installing Accessories
- Carefully lift the door and hook the rollers onto the track. This step is best performed with two people.
- Install the anti-jump pads on the top edge of the door, above the rollers, to prevent the door from lifting off the track.
- Slide the door to its open and closed positions to determine the placement of the door stops.
- Install the door stops at the desired locations on the track to prevent the door from sliding too far. Tighten them securely.
- Install the floor guide at the bottom of the door opening to keep the door stable and prevent it from swinging out.

Figure 4.4: Example of installed barn door hardware.

Figure 4.5: White barn door application.
4.5 Installation Video Guide
For additional visual assistance, please refer to the official installation video below:
Video 4.1: Official product video demonstrating the HOMCOM 6-foot sliding barn door hardware kit in various settings and showcasing its components.
5. Operating Instructions
Once installed, the barn door operates by sliding smoothly along the track. Gently push or pull the door to open or close it. The door stops will prevent the door from exceeding its intended travel limits. Ensure the floor guide is properly engaged to maintain door stability.
6. Maintenance
- Regular Cleaning: Wipe the track and rollers periodically with a soft, damp cloth to remove dust and debris.
- Lubrication: Apply a silicone-based lubricant to the roller wheels and track surface every 6-12 months to ensure smooth operation. Avoid oil-based lubricants that can attract dirt.
- Fastener Check: Periodically check all screws and bolts to ensure they remain tight. Re-tighten if necessary to prevent loosening over time.
- Door Condition: Inspect the door for any signs of wear or damage that might affect its operation.
7. Troubleshooting
- Door is difficult to slide: Check the track for obstructions or debris. Ensure rollers are clean and lubricated. Verify that the track is level and securely mounted.
- Door wobbles or swings: Ensure the floor guide is properly installed and engaged with the bottom of the door. Check that all mounting hardware is tight.
- Door stops are not holding: Ensure the door stops are securely tightened on the track.
- Noise during operation: Lubricate the rollers and track. Check for any loose components or friction points.
8. Specifications
| Feature | Specification |
|---|---|
| Brand | HOMCOM |
| Model Number | B81-002WT |
| Color | White |
| Material | Steel, Hard Plastic |
| Track Length | 6 feet (approx. 183 cm) |
| Door Thickness Compatibility | 35-45mm and 40-45mm |
| Maximum Weight Capacity | 220 lbs (100 kg) |
| Product Dimensions | 0.32 x 72 x 1.6 inches (track) |
| Item Weight | 12.1 pounds |
9. Warranty and Support
For warranty information or technical support, please refer to the documentation included with your purchase or contact HOMCOM customer service directly. Keep your purchase receipt for warranty claims.