
1. Introduction
This manual provides essential instructions for the safe and efficient operation, setup, and maintenance of your Yamata FY5318 Walking Foot Lockstitch Sewing Machine. Please read this manual thoroughly before assembly and first use to ensure proper function and longevity of your machine. This industrial sewing machine is designed for heavy-duty sewing tasks, including multiple layers of fabric and materials like vinyl and leather.
2. Safety Instructions
- Always disconnect the machine from the power supply before cleaning, oiling, or performing any maintenance.
- Keep fingers and hands away from the needle, presser foot, and other moving parts during operation.
- Do not operate the machine with damaged cords or if it has been dropped or damaged.
- Ensure the machine is placed on a stable, level surface.
- Use only recommended needles and accessories for this machine.
- Keep children and pets away from the machine during operation.
3. Setup and Assembly
The Yamata FY5318 sewing machine requires assembly. It typically arrives in multiple boxes containing the machine head, table stand, and servo motor. Refer to the following steps for proper setup.
3.1 Unpacking and Component Identification
Carefully unpack all components and verify against the packing list. Identify the machine head, table legs, tabletop, servo motor, foot pedal, and accessory box.

Figure 3.1: Main components for assembly.
3.2 Assembling the Table Stand
- Assemble the table legs and crossbars using the provided bolts and nuts. Ensure all connections are secure.
- Attach the tabletop to the assembled stand. The tabletop has pre-drilled holes for mounting the machine head and motor.
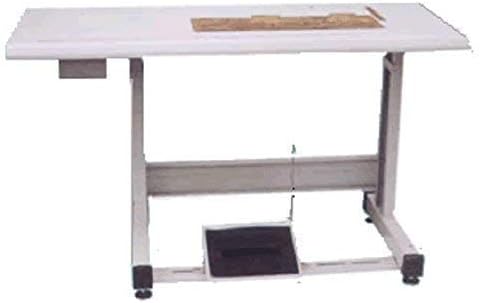
Figure 3.2: Assembled table stand.
3.3 Mounting the Machine Head
- Carefully place the machine head into the cutout of the tabletop.
- Secure the machine head to the tabletop using the provided mounting screws.

Figure 3.3: Machine head mounted on the table.
3.4 Installing the Servo Motor
- Mount the servo motor underneath the tabletop, aligning it with the machine's pulley.
- Attach the V-belt between the motor pulley and the machine's handwheel pulley. Adjust belt tension as needed.
- Connect the foot pedal to the servo motor control box.

Figure 3.4: Servo motor with speed control.
3.5 Oiling the Machine
Before first use, fill the oil pan (if applicable) and lubricate all designated oiling points as indicated in the machine's specific diagram (refer to the included manual for detailed oiling instructions). Use only high-quality industrial sewing machine oil.

Figure 3.5: Included accessories, including oil container.
3.6 Needle and Thread Installation
- Needle Installation: Insert the needle with the flat side facing the back of the machine, pushing it up as far as it will go, then tighten the needle clamp screw.
- Upper Threading: Follow the numbered thread guides from the spool pin, through the tension discs, take-up lever, and finally through the needle eye.
- Bobbin Winding: Place an empty bobbin on the bobbin winder spindle. Guide thread from the spool through the tension disc of the winder and around the bobbin. Engage the winder and press the foot pedal.
- Bobbin Insertion: Open the bobbin case cover, insert the wound bobbin into the bobbin case, ensuring the thread feeds correctly through the tension spring. Insert the bobbin case into the shuttle hook.

Figure 3.6: Needle and presser foot area.
4. Operating Instructions
4.1 Power On/Off
Connect the machine to a suitable power outlet. Use the power switch on the servo motor control box to turn the machine on or off.
4.2 Adjusting Stitch Length
The stitch length is adjusted using the dial or lever located on the machine head. Rotate the dial or move the lever to increase or decrease the stitch length. Test on a scrap piece of fabric to achieve the desired length.
4.3 Adjusting Servo Motor Speed
The servo motor allows for adjustable speed control. Use the speed dial on the motor unit to set the maximum sewing speed. Press the foot pedal to start sewing; the pressure applied to the pedal will control the actual speed up to the set maximum.
4.4 Using the Walking Foot Mechanism
The walking foot mechanism ensures even feeding of multiple layers or slippery materials. Ensure the walking foot is properly engaged for your sewing task. The upper and lower feed dogs work in conjunction to move the fabric.
4.5 Sewing Operation
- Place your fabric under the presser foot.
- Lower the presser foot using the knee lift or hand lever.
- Gently press the foot pedal to begin sewing. Guide the fabric smoothly.
- To reverse stitch, engage the reverse lever/button while sewing.
- When finished, raise the needle to its highest position, lift the presser foot, and remove the fabric. Cut threads.

Figure 4.1: Sewing through material with the walking foot.
4.6 Knee Lift Function
The knee lift lever, located under the table, allows you to raise and lower the presser foot without using your hands, improving efficiency. Ensure it is properly connected and adjusted for comfortable use. If the knee lift is not functioning, check its linkage and adjustment screws underneath the table.
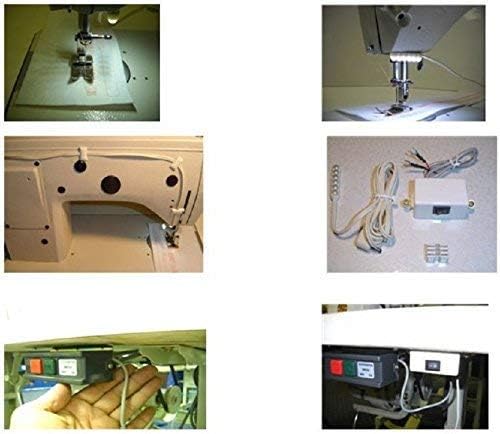
Figure 4.2: Machine details including knee lift and LED light.
5. Maintenance
Regular maintenance is crucial for the optimal performance and longevity of your sewing machine.
- Cleaning: Regularly clean lint and dust from the bobbin area, feed dogs, and tension discs using a brush or vacuum.
- Oiling: Follow the machine's oiling schedule (typically daily or weekly depending on usage) and apply oil to all designated lubrication points.
- Needle Replacement: Replace needles frequently, especially when sewing dense materials, to prevent skipped stitches and fabric damage.
- Belt Tension: Periodically check the V-belt tension between the motor and machine head. Adjust if too loose or too tight.
6. Troubleshooting
This section addresses common issues you might encounter with your Yamata FY5318 machine.
| Problem | Possible Cause | Solution |
|---|---|---|
| Machine does not start | No power, motor switch off, foot pedal disconnected | Check power connection, turn on motor switch, ensure foot pedal is connected. |
| Skipped stitches | Bent or dull needle, incorrect needle size, improper threading | Replace needle, use correct needle for fabric, re-thread machine carefully. |
| Thread breaking | Incorrect tension, poor quality thread, burrs on thread path, needle inserted incorrectly | Adjust tension, use good quality thread, check thread path for rough spots, re-insert needle correctly. |
| Uneven stitches | Incorrect tension, inconsistent fabric feeding | Adjust upper and bobbin tension, ensure walking foot is engaged and feeding smoothly. |
| Knee lift not working | Disconnected linkage, improper adjustment | Check the physical connection of the knee lift rod to the presser foot lifter mechanism. Adjust the rod length or angle if necessary. |
7. Specifications
| Feature | Detail |
|---|---|
| Model Number | FY5318 |
| Brand | Yamata |
| Type | Walking Foot Lockstitch Sewing Machine |
| Motor | Servo Motor (Adjustable Speed) |
| Power Source | Corded Electric |
| Material | Metal |
| UPC | 760781218796 |
8. Warranty and Support
For warranty information and technical support, please refer to the documentation provided with your purchase or contact the seller directly. Keep your purchase receipt as proof of purchase.