1. Introduction
This manual provides essential instructions for the setup, operation, and maintenance of your Kessil Tuna Sun A80 LED Aquarium Light, Mini Gooseneck, and Spectral Controller kit. Please read this manual thoroughly before installation and use to ensure proper function and longevity of your equipment.
2. Important Safety Information
- Always disconnect power before performing any maintenance or installation.
- Do not operate the light if any part is damaged.
- Ensure the light is securely mounted to prevent accidental falls.
- Keep electrical connections dry and away from water.
- This product is designed for indoor aquarium use only.
- Avoid direct eye exposure to the LED light.
3. Package Contents
Verify that all items are present in your kit:
- Kessil A80 Tuna Sun LED Light
- Mini Gooseneck Mounting Arm
- Spectral Controller (Optional, if included in kit)
- Power Supply (100-240V AC input, 24V DC output)
4. Product Features
The Kessil A80 Tuna Sun LED light is engineered for freshwater and planted aquariums, offering advanced features for optimal growth and vibrant coloration.
- Innovative Heat Dissipation: Fanless, low-maintenance, shell-shaped design.
- Advanced Optics: Creates smooth color mixing and shimmer.
- Dense Matrix LED Array: High-power and deep penetration from a single small chip.
- Efficiency: Maximized light output per watt.
- Aquarist-Specific Spectrums: Designed for vibrant coloration and prolific plant growth.
- Advanced Controllability: Dials for spectrum and intensity adjustment, compatible with 0-10V controllers.
- Kessil Logic: Maintains consistent output across all spectrums.
- Daisy-Chain Capability: Seamless control of multiple lights from a single source.
5. Setup
5.1. Attaching the Mini Gooseneck
The Mini Gooseneck provides a flexible and secure mounting solution for your A80 light.
- Attach the clamp end of the Mini Gooseneck to the rim of your aquarium. Tighten the screws until secure.
- Screw the Kessil A80 light onto the threaded end of the Mini Gooseneck.
- Adjust the gooseneck to position the light over your aquarium at the desired height and angle.
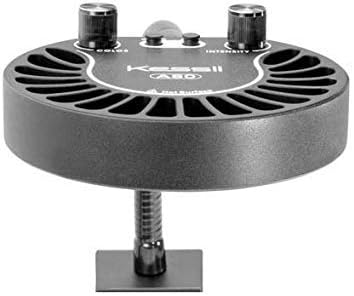
Figure 1: Kessil A80 light with Mini Gooseneck mount.
Description: This image shows the Kessil A80 LED light attached to the Mini Gooseneck mounting arm, which is clamped to the edge of an aquarium. The gooseneck allows for flexible positioning of the light.
5.2. Power Connection
- Connect the power cable to the Kessil A80 light.
- Plug the power adapter into a suitable electrical outlet.

Figure 2: Kessil A80 LED light with visible control dials for color and intensity, and power input.
Description: This image displays two Kessil A80 LED lights. The front light clearly shows two control dials labeled 'COLOR' and 'INTENSITY', along with input/output ports. The rear light shows the LED array.
6. Operating Instructions
6.1. Manual Control (A80 Light)
The Kessil A80 features two manual dials for direct control:
- Color Dial: Adjusts the spectrum of the light. Turn to achieve desired color temperature for your freshwater or planted tank.
- Intensity Dial: Controls the overall brightness of the light. Turn to increase or decrease light output.
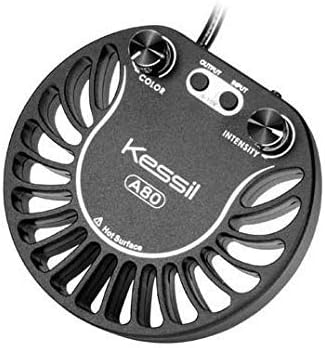
Figure 3: Top view of the Kessil A80 LED light, highlighting the 'COLOR' and 'INTENSITY' adjustment dials.
Description: This image provides a top-down view of the Kessil A80 LED light, clearly showing the two rotary dials for adjusting color and intensity, along with the Kessil A80 branding.
6.2. Using the Spectral Controller (Optional)
For advanced control and programming, connect the Kessil Spectral Controller (if included in your kit) to the A80 light via the 0-10V input/output ports.
- Connect the Spectral Controller to the A80 light using the appropriate cable.
- Refer to the Spectral Controller's dedicated manual for detailed programming instructions, including setting custom light schedules, intensity ramps, and color changes.

Figure 4: Kessil Spectral Controller, a black rectangular device with a screen and control buttons, shown from front and side views.
Description: This image shows the Kessil Spectral Controller, a sleek black device with a digital display and control buttons. It is presented from both a front view and a side profile, highlighting its compact design.
7. Maintenance
- Cleaning: Regularly wipe the exterior of the light and gooseneck with a soft, damp cloth. Ensure the light is unplugged before cleaning. Do not use harsh chemicals or abrasive cleaners.
- Lens Care: Gently clean the LED lens with a soft, lint-free cloth to maintain optimal light output.
- Ventilation: Ensure the heat dissipation fins on the light are free from dust and debris to prevent overheating. The fanless design requires good airflow around the unit.
8. Troubleshooting
- Light Not Turning On: Check all power connections. Ensure the power adapter is securely plugged into both the light and the electrical outlet. Verify the outlet is functional.
- Inconsistent Light Output: If using a Spectral Controller, check its settings and connections. Ensure no loose connections between the controller and the light.
- Overheating: Ensure the light's heat fins are clear of obstructions and there is adequate airflow around the unit.
9. Specifications
| Feature | Detail |
|---|---|
| Model | A80 Tuna Sun |
| Power Consumption | 15W |
| Power Supply Input | 100-240V AC |
| Power Supply Output | 24V DC |
| Outer Diameter | 4.88 inches (12.4 cm) |
| Height | 0.98 inches (2.5 cm) |
| Coverage | Up to 24 inch (61 cm) surface diameter |
| Light Source Type | Light Emitting Diode (LED) |
| Material | Shell |
10. Warranty and Support
Kessil products are designed for reliability and performance. For warranty information, technical support, or service inquiries, please refer to the official Kessil website or contact their customer service directly. Keep your proof of purchase for warranty claims.


