1. Introduction
This manual provides essential information for the safe and effective operation of your WSTA Ozone Machine Generator, Model WT100. This multipurpose device is designed for generating ozone to purify air and water, and to treat food items. Please read this manual thoroughly before initial use and retain it for future reference.
2. Important Safety Information
CAUTION: USE IN UNOCCUPIED SPACE ONLY.
- Ensure the device is used in a well-ventilated area.
- Do not operate the ozone generator in the presence of people, pets, or plants.
- Allow sufficient time for ozone to dissipate after treatment before re-entering the treated area.
- Keep the device away from water and moisture when not in use for water treatment.
- Do not attempt to open or repair the device yourself. Contact qualified service personnel.
- Keep out of reach of children.
3. Package Contents
Verify that all items are present in the package:
- 1 x WSTA Ozone Purifier (Model WT100)
- 1 x Silicone Hose
- 2 x Diffuser Balls (Air Stones)
- 1 x User Manual
- Mounting Screws and Wall Anchors (may be included with some models)

Figure 3.1: Ozone Machine Generator and Accessories. This image displays the main unit alongside the silicone hose, two diffuser balls (air stones), and mounting hardware, which are typically included in the product package.
4. Product Features
- Multipurpose Ozone Purifier: Designed for purifying air and water. Effective in removing odors and smoke. Ozone water can be used for cleaning hands, skin, face, vegetables, and fruits.
- Large Ozone Output: Produces over 500mg/h of ozone, suitable for purifying air, water, vegetables, fruits, bath water, utensils, and feeding bottles.
- Adjustable Timer: Features 5 adjustable time settings: 5 minutes, 10 minutes, 15 minutes, 30 minutes, and 60 minutes.
- Compact and Portable: Lightweight and easy to install, making it convenient for use in homes, kitchens, offices, cars, or during travel.
5. Specifications
| Parameter | Value |
|---|---|
| Ozone Output | >500 mg/h |
| Rated Voltage Factor | AC110V |
| Wattage | 10 watts |
| Product Dimensions (L x W x H) | 9.2 x 7.7 x 2.6 inches (23.37 x 19.56 x 6.6 cm) |
| Weight | 1.95 lb (0.88 kg) |
| Item Model Number | WT100 |
| Floor Area (Air Purification) | Up to 10 Square Meters (approx. 107 sq ft) |
| Noise Level | 10 dB |
| Controller Type | Button Control |
6. Setup
Before operating the WSTA Ozone Machine Generator, ensure it is placed on a stable, flat surface or securely mounted to a wall.
- Unpacking: Carefully remove the ozone generator and all accessories from the packaging.
- Placement:
- For air purification, place the unit in the center of the room to be treated, ensuring adequate air circulation around the device.
- For water or food purification, place the unit near the water container, ensuring the hose can reach the water without kinking.
- Hose and Diffuser Ball Connection (for Water/Food Treatment):
- Connect one end of the silicone hose to the detachable oxygenating tube connection port on the side of the unit.
- Attach a diffuser ball (air stone) to the other end of the silicone hose.
- Power Connection: Plug the power cord into a standard AC110V electrical outlet.

Figure 6.1: Device Connections and Mounting Options. This image highlights the detachable oxygenating tube connection for the hose, the air intake vent, and the pre-drilled holes for wall mounting.
7. Operating Instructions
The WSTA Ozone Machine Generator features a user-friendly control panel for easy operation.

Figure 7.1: Control Panel Overview. This diagram illustrates the main control buttons: 'UP' for increasing time, 'ON/OFF' for power, and 'DOWN' for decreasing time, along with the digital display for the timer.

Figure 7.2: Front View of the Ozone Machine. This image provides a clear view of the device's front panel, including the digital timer display and the operational buttons.
7.1. Air Purification
- Ensure the hose and diffuser balls are disconnected.
- Place the ozone generator in the room to be treated. Ensure no people, pets, or plants are present in the room.
- Press the ON/OFF button to power on the device. The digital display will illuminate.
- Use the UP or DOWN buttons to select the desired operating time (5, 10, 15, 30, or 60 minutes).
- The device will begin generating ozone and will automatically shut off once the timer expires.
- After the cycle is complete, allow at least 30-60 minutes for the ozone to dissipate before re-entering the room. Ensure adequate ventilation.

Figure 7.3: Air Purification in a Room. This image depicts the ozone machine operating in a room, illustrating its function in purifying the air. Remember to use in unoccupied spaces only.
7.2. Water and Food Purification
- Connect the silicone hose and diffuser ball as described in the Setup section.
- Place the diffuser ball into the water container (e.g., a bowl of water for vegetables, a pitcher for drinking water). Ensure the ozone generator unit itself is kept dry and away from water splashes.
- Press the ON/OFF button.
- Use the UP or DOWN buttons to select the desired operating time. Typical times for water/food treatment range from 5 to 15 minutes, depending on volume and desired intensity.
- The device will bubble ozone through the water and automatically shut off when the timer expires.
- After treatment, remove the diffuser ball and hose. The treated water or food is ready for use.
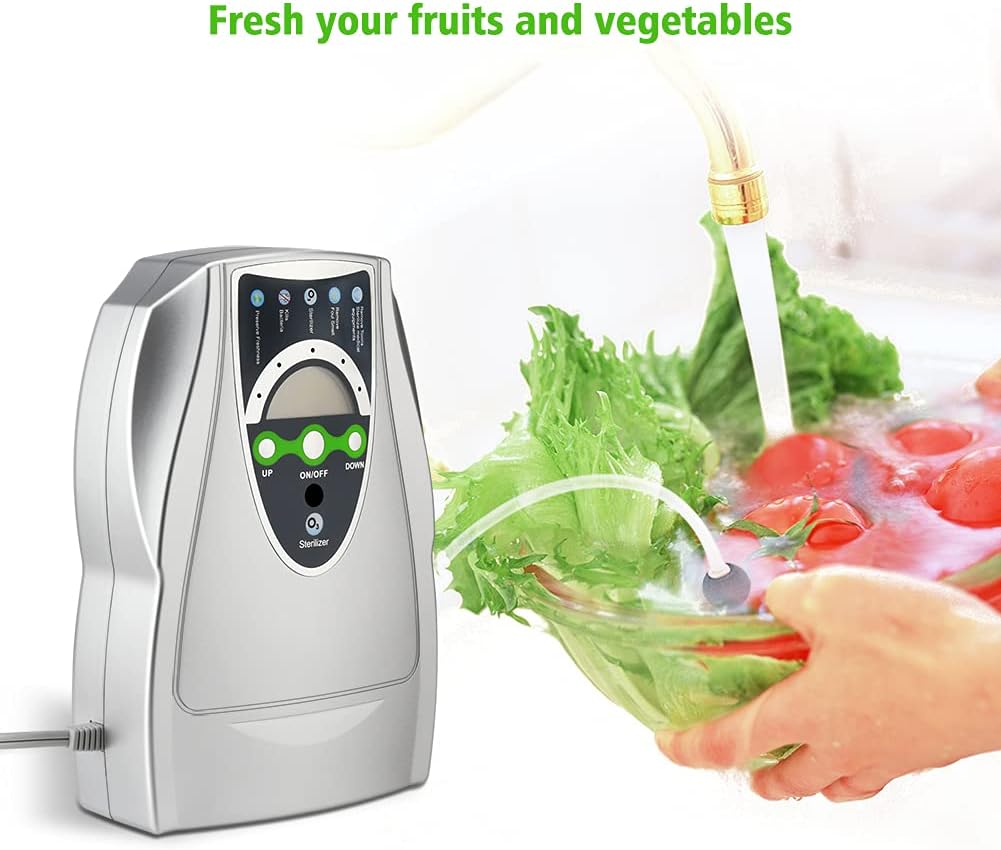
Figure 7.4: Purification of Fruits and Vegetables. This image demonstrates the ozone machine in use for purifying produce, with the diffuser stone submerged in a bowl of water containing fruits and vegetables.

Figure 7.5: Multipurpose Applications. This diagram illustrates the versatility of the ozone machine for various uses such as purifying drinking water, washing produce, sterilizing baby bottles, and maintaining hygiene in pet environments.
8. Maintenance
Regular maintenance ensures optimal performance and longevity of your ozone generator.
- Cleaning the Unit:
- Ensure the device is unplugged before cleaning.
- Wipe the exterior of the unit with a soft, damp cloth. Do not use abrasive cleaners or solvents.
- Ensure no water enters the air intake or ozone outlet.
- Cleaning/Replacing Diffuser Balls:
- Rinse the diffuser balls with clean water after each use, especially after treating food items.
- If the diffuser balls become clogged or show signs of wear, they may need to be replaced to maintain efficient ozone dispersion. Replacement diffuser balls and tubes can be found using ASIN: B07FD2D1LW.
- Storage: Store the unit in a cool, dry place when not in use.
9. Troubleshooting
If you encounter issues with your WSTA Ozone Machine Generator, refer to the following common problems and solutions:
| Problem | Possible Cause | Solution |
|---|---|---|
| Device does not power on. | No power supply or loose connection. | Ensure the power cord is securely plugged into a working electrical outlet. Check the outlet with another device. |
| No ozone smell or weak output. | Air intake blocked, diffuser ball clogged, or unit malfunction. | Check if the air intake is clear. Clean or replace the diffuser ball. If the problem persists, contact customer support. |
| Timer not functioning correctly. | Incorrect setting or internal issue. | Ensure you are pressing the UP/DOWN buttons correctly to set the time. If the issue continues, contact customer support. |
| Hose detaches during use. | Improper connection or worn hose/port. | Ensure the hose is firmly pushed onto the connection port. If the hose or port is damaged, consider replacing the hose. |
For issues not covered in this section, please contact WSTA Customer Service for assistance.
10. Warranty and Customer Support
WSTA offers customer service support for its products. This includes options for a refund or free replacement if the product is found to be defective or if you are unsatisfied with its performance.
For warranty claims, technical assistance, or any product-related inquiries, please refer to the contact information provided on the product packaging or the official WSTA website.