
1. Product Overview
The Epson BrightLink 685WI is an Ultra Short-Throw Interactive Display designed for educational environments. It supports wireless content display from various devices including Chromebooks, Windows and Mac computers, and iOS and Android devices, projecting at a 1280 x 720 resolution.
Key Features
- Bright and colorful projection.
- 1280 x 720 (720P) resolution.
- Interactive capabilities with two interactive pens for simultaneous use.
- Multi-packs projection and moderator function.
- Includes USB extension cable.
What's in the Box
- LCD projector
- Pen tray
- 2 Interactive Pens
- Wireless remote control
- 4 x AA batteries
- Battery charger
- USB cable - USB Type A to B
- USB extension cable
2. Setup Instructions
Follow these steps to set up your Epson BrightLink 685WI projector.
2.1 Physical Placement
The BrightLink 685WI is an ultra short-throw projector, designed to be mounted close to the projection surface. Ensure the mounting surface is stable and can support the projector's weight. For optimal interactive performance, the projector should be aligned correctly with the screen or whiteboard.

Figure 2.1: The Epson BrightLink 685WI projector shown mounted on a wall, illustrating its typical installation position for ultra short-throw projection.
2.2 Connecting Power
- Connect the supplied power cord to the projector's AC inlet.
- Plug the other end of the power cord into a grounded electrical outlet.
2.3 Connecting Input Devices
The projector offers various input ports for connecting computers, video players, and other devices.
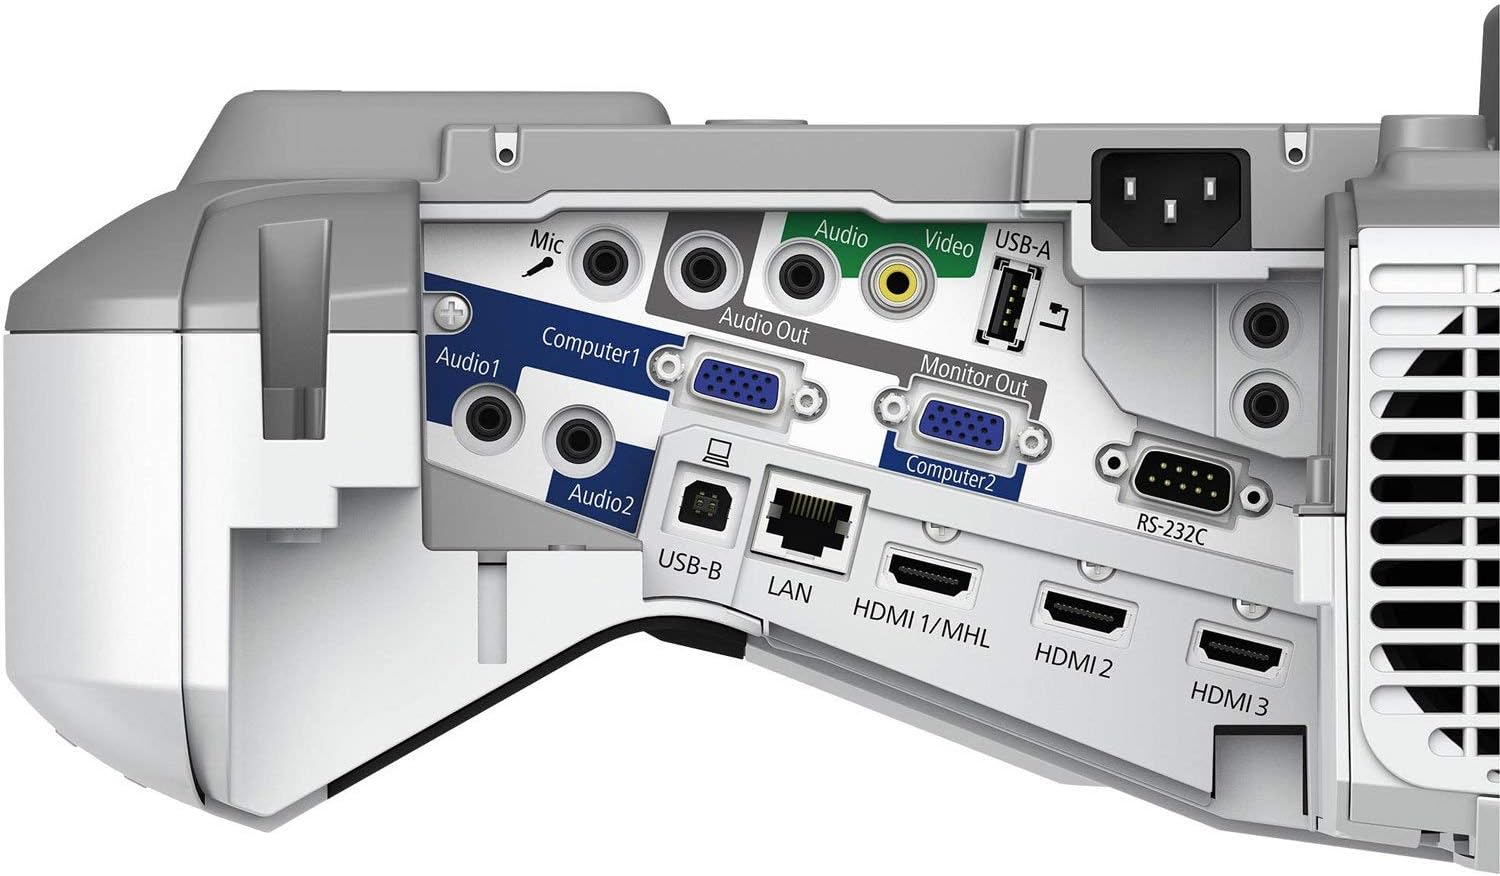
Figure 2.2: Detailed view of the projector's connection panel, highlighting ports such as HDMI, USB-A, USB-B, LAN, Audio In/Out, Video, and Computer (VGA) inputs.
- HDMI: Use an HDMI cable to connect to devices like laptops, Blu-ray players, or streaming devices. The projector has multiple HDMI inputs (HDMI 1/MHL, HDMI 2, HDMI 3).
- Computer (VGA): Connect a computer using a VGA cable to the Computer1 or Computer2 port. Ensure to also connect an audio cable if sound is required.
- USB: Use the USB-B port for interactive functions with a computer. The USB-A port can be used for USB memory devices or optional wireless adapters.
- LAN: Connect an Ethernet cable for network connectivity and control.
- Audio: Separate audio input jacks (Audio1, Audio2) are available for VGA connections. An Audio Out port is also provided.
3. Operating Instructions
This section covers the basic operation of your BrightLink 685WI projector.
3.1 Powering On/Off
- Power On: Press the Power button on the projector's control panel or the remote control. The status light will turn blue.
- Power Off: Press the Power button again. A confirmation message will appear. Press the Power button a second time to confirm shutdown.

Figure 3.1: The projector's top control panel, featuring the power button, menu navigation, and input selection buttons.
3.2 Selecting an Input Source
To display content from a connected device, select the appropriate input source:
- Press the Source Search button on the control panel or remote control to cycle through available inputs.
- Alternatively, use the dedicated input buttons (e.g., HDMI, Computer) on the remote control.
3.3 Using Interactive Features
The BrightLink 685WI supports interactive functions with the included interactive pens.
- Ensure the projector is connected to a computer via the USB-B port for interactive functionality.
- Install the necessary interactive software (e.g., Epson Easy Interactive Tools) on your computer.
- Calibrate the interactive pens according to the on-screen instructions for accurate interaction.
- Use the interactive pens to write, draw, and control your computer desktop directly on the projected image.
4. Maintenance
Regular maintenance ensures optimal performance and extends the lifespan of your projector.
4.1 Cleaning the Air Filter
The air filter prevents dust from entering the projector and affecting performance. Clean the filter regularly, especially in dusty environments.
- Turn off the projector and unplug the power cord.
- Locate the air filter cover (refer to the detailed diagram in the full manual if needed).
- Remove the filter cover and carefully pull out the air filter.
- Use a small vacuum cleaner or a soft brush to remove dust from the filter. Do not wash the filter with water.
- Reinsert the clean filter and replace the filter cover securely.
4.2 Replacing the Lamp
The projector lamp has a limited lifespan. When the lamp indicator lights up or the projected image becomes dim, it's time to replace the lamp.
- Turn off the projector and unplug the power cord. Allow the projector to cool down for at least an hour.
- Locate the lamp cover (refer to the full manual for exact location).
- Unscrew the lamp cover and carefully remove it.
- Unscrew the lamp module and gently pull it out.
- Insert the new genuine Epson replacement lamp module and secure it with screws.
- Replace the lamp cover and secure it.
- Reset the lamp usage timer through the projector's menu system.
Caution: Projector lamps operate at high temperatures and contain mercury. Handle with care and dispose of used lamps according to local regulations.
5. Troubleshooting
This section provides solutions to common issues you might encounter with your projector.
5.1 No Image Projected
- Check Power: Ensure the projector is powered on and the power indicator light is blue.
- Input Source: Verify that the correct input source is selected (e.g., HDMI 1, Computer 1). Press the Source Search button.
- Cable Connection: Confirm that the video cable (HDMI, VGA) is securely connected to both the projector and the source device.
- Source Device: Ensure the source device (computer, media player) is powered on and outputting a signal. Try connecting another source device to isolate the problem.
- Blanking Function: Check if the A/V Mute function is active. Press the A/V Mute button on the remote control to disable it.
5.2 No Sound
- Volume Level: Increase the volume on the projector and the source device.
- Audio Cable: If using a VGA connection, ensure the audio cable is properly connected from the source device to the projector's audio input. HDMI connections typically carry audio automatically.
- Audio Output Settings: Check the audio output settings on your source device to ensure sound is being sent to the correct output.
5.3 Remote Control Not Working
- Batteries: Replace the batteries in the remote control with new ones.
- Line of Sight: Ensure there are no obstructions between the remote control and the projector's remote sensor.
- Distance: Operate the remote control within its effective range.
6. Specifications
Detailed technical specifications for the Epson BrightLink 685WI projector.
| Feature | Detail |
|---|---|
| Brand | Epson |
| Model Name | BrightLink 685Wi |
| Model Number | 8G7263 |
| Display Type | 3LCD |
| Native Resolution | 1280 x 720 |
| Maximum Display Resolution | 1280 x 720 |
| Connectivity Technology | USB |
| Special Feature | Portable |
| Recommended Uses | Education |
| Mounting Type | Ceiling Mount |
| Color | White |
| Controller Type | Remote Control |
| Compatible Devices | PC, Mac |
| Minimum Throw Distance | 1 Feet |
| Maximum Throw Distance | 1 Feet |
| Minimum Image Size | 30 Inches |
| Maximum Image Size | 100 Inches |
| Lamp Wattage | 380 Watts |
| Item Weight | 12.8 Pounds |
| Video Encoding | H.264, H.265 |
7. Warranty and Support
7.1 Warranty Information
The Epson BrightLink 685WI projector comes with a 2-year limited warranty. The projector lamp is covered by a 90-day limited warranty. Technical support via phone consulting is available for 2 years.
7.2 Technical Support
For technical assistance, troubleshooting beyond this manual, or warranty claims, please contact Epson customer support. Refer to the official Epson website or the documentation included with your product for the most current contact information and support resources.
When contacting support, please have your projector's model number (8G7263) and serial number ready.


