Introduction
This manual provides comprehensive instructions for the installation, operation, maintenance, and troubleshooting of your CATA E-100 GTH ventilator. Please read this manual carefully before installation and use to ensure proper function and safety.
The CATA E-100 GTH is a high-performance bathroom ventilator designed for efficient air extraction, featuring humidity control, a timer, and quiet operation. It is equipped with a backdraft damper to prevent air re-entry.
Safety Information
Always follow basic safety precautions when installing, operating, and maintaining this appliance to reduce the risk of fire, electric shock, or injury to persons.
- Ensure the power supply is disconnected before any installation or maintenance work.
- Installation must be carried out by a qualified electrician and in accordance with local wiring regulations.
- Do not install the unit in areas where water may directly splash onto it.
- This appliance is not intended for use by persons (including children) with reduced physical, sensory or mental capabilities, or lack of experience and knowledge, unless they have been given supervision or instruction concerning use of the appliance by a person responsible for their safety.
- Children should be supervised to ensure that they do not play with the appliance.
- The appliance is designed for continuous operation.
Product Overview
The CATA E-100 GTH ventilator is designed for effective ventilation in bathrooms and other humid environments. Key features include:
- Humidity and Temperature Digital Display: Provides real-time environmental readings.
- Adjustable Humidity Control: Can be set from 40-95% Relative Humidity (R.F).
- Adjustable Timer: Run-on timer adjustable from 0 to 15 minutes.
- Dual Speed System: Allows switching to a higher mode for more effective results.
- Energy Efficient: Low power consumption of 8 Watts.
- Quiet Operation: Operates at a low noise level of 31 dB.
- Integrated Backdraft Damper: Prevents air from flowing back into the room.
- Easy to Clean: Features an extra-flat white glass cover.

Image: The CATA E-100 GTH ventilator, showing its main unit with the front glass panel and the separate backdraft damper component.

Image: Close-up of the CATA E-100 GTH ventilator's front panel, highlighting the digital display which shows temperature and humidity readings.
Setup and Installation
Before beginning installation, ensure you have all necessary tools and that the power supply is turned off at the main circuit breaker.
Dimensions and Mounting

Image: Technical drawing illustrating the dimensions of the CATA E-100 GTH ventilator. The unit measures 150mm x 150mm on the front panel, with a depth of 94mm for the main body and an additional 28.5mm for the front panel. The duct diameter is 98mm.
The unit is designed for wall mounting. Ensure the mounting surface is flat and stable. The required duct diameter is approximately 100mm.
Installation Steps
- Prepare the Opening: Create a circular opening in the wall or ceiling with a diameter suitable for the ventilator's duct (approx. 100mm).
- Install the Duct and Backdraft Damper: Insert the ventilator's main body into the prepared opening. If using the included backdraft damper, ensure it is properly seated in the duct before or during the main unit installation.
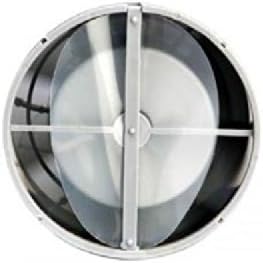
Image: Diagram illustrating how the backdraft damper is inserted into the ventilator's circular duct, ensuring proper airflow direction and preventing reverse flow.
- Secure the Unit: Fasten the ventilator to the wall using appropriate screws and wall plugs.
- Electrical Connection: Connect the electrical wiring according to the wiring diagram. The unit requires a 220-240V, 50/60Hz power supply. Ensure correct connection of Live (L), Neutral (N), and Switched Live (SL) for timer/humidity functions.

Image: Detailed wiring diagram for the CATA E-100 GTH ventilator, showing connections for Live (L), Neutral (N), and Switched Live (SL) for the timer and humidity sensor functions, along with an example light switch connection.
- Attach Front Panel: Once wiring is complete and tested, attach the glass front panel. It can be rotated to align the display as desired.

Image: Series of diagrams demonstrating how the glass front panel of the CATA E-100 GTH can be rotated and then securely attached to the main unit after installation.
- Power On: Restore power and test the unit.
Operating Instructions
The CATA E-100 GTH operates automatically based on humidity levels and timer settings. The digital display shows current temperature and humidity.
Humidity Control Adjustment
The humidity sensor activates the fan when the ambient humidity exceeds the set threshold. The adjustable range is 40-95% R.F. To adjust:
- Locate the humidity adjustment dial, typically accessible after removing the front panel.
- Use a small screwdriver to turn the dial to increase or decrease the humidity threshold. Turning clockwise usually increases the threshold (fan activates at higher humidity), and counter-clockwise decreases it (fan activates at lower humidity).
Timer Adjustment
The timer allows the fan to continue running for a set period after the light switch (or other switched live input) is turned off. The adjustable range is 0-15 minutes. To adjust:
- Locate the timer adjustment dial, typically next to the humidity dial.
- Use a small screwdriver to turn the dial to set the desired run-on time.
Two-Speed Function
The fan is equipped with a two-speed motor. The speed setting is typically configured during installation or via internal jumpers/switches. Refer to the wiring diagram and internal labels for specific speed selection methods. The higher speed provides a flow rate of 115 m3/h.
Maintenance
Regular cleaning and maintenance will ensure optimal performance and longevity of your ventilator.
Cleaning the Unit
- Disconnect Power: Always turn off the power supply to the unit at the main circuit breaker before cleaning.
- Remove Front Panel: Carefully remove the glass front panel.
- Clean Surfaces: Wipe the exterior surfaces and the glass panel with a soft, damp cloth. Do not use abrasive cleaners or solvents.
- Clean Fan Blades: Gently clean any dust or debris from the fan blades and interior housing using a soft brush or vacuum cleaner. Be careful not to bend the blades.
- Reassemble: Once clean and dry, reattach the front panel and restore power.
It is recommended to clean the unit every 3-6 months, depending on usage and environmental conditions.
Troubleshooting
If you experience issues with your CATA E-100 GTH ventilator, refer to the table below for common problems and solutions.
| Problem | Possible Cause | Solution |
|---|---|---|
| Fan does not turn on. | No power supply. Incorrect wiring. Humidity level below threshold. | Check circuit breaker and power connection. Verify wiring against diagram. Adjust humidity threshold or manually activate (if applicable). |
| Fan runs continuously. | Humidity level consistently above threshold. Timer set too long. Faulty humidity sensor/timer. | Check room humidity; ensure proper ventilation. Adjust timer setting. Contact qualified technician. |
| Excessive noise. | Fan blades dirty or obstructed. Loose mounting. Motor issue. | Clean fan blades and housing. Ensure unit is securely mounted. Contact qualified technician. |
| Digital display not working. | Power issue. Internal fault. | Check power connection. Contact qualified technician. |
If the problem persists after attempting these solutions, please contact a qualified technician or CATA customer support.
Specifications
| Feature | Detail |
|---|---|
| Brand | CATA |
| Model Number | E-100 GTH |
| Color | White |
| Dimensions (L x W x H) | 15 x 9.4 x 15 cm |
| Weight | 990 g |
| Power | 8 Watts |
| Voltage | 220-240 Volts |
| Material | Metal |
| Number of Speeds | 2 (Configurable) |
| Noise Level | 31 dB |
| Flow Rate | 115 m3/h |
| Humidity Control Range | 40-95% R.F. |
| Timer Range | 0-15 minutes |
| Protection Class | IP-44 |
| Insulation Class | B |
| Mounting Type | Wall Mount |
Warranty and Support
Warranty Information
The CATA E-100 GTH ventilator comes with a 2-year warranty from the date of purchase. This warranty covers defects in materials and workmanship under normal use. It does not cover damage resulting from improper installation, misuse, abuse, accident, or unauthorized repairs.
Please retain your proof of purchase for warranty claims.
Customer Support
For technical assistance, warranty claims, or spare parts inquiries, please contact your local CATA distributor or visit the official CATA website. Information regarding spare parts availability may vary by region.
Note: Information regarding spare parts availability is currently unavailable.


