1. Introduction
The SunSun CPA-5000 Pressure Pond Filter is designed to provide clear and healthy water for your pond. It combines mechanical and biological filtration with an integrated UV-C sterilizer to effectively remove suspended particles, harmful bacteria, and algae. Its compact design allows for flexible installation, either above ground or partially buried.
2. Safety Instructions
- Always disconnect the power supply before performing any maintenance or cleaning.
- Ensure all electrical connections are waterproof and protected from moisture.
- Do not operate the filter if the power cord or housing is damaged.
- The UV-C lamp emits harmful radiation. Never look directly at the lit UV-C lamp.
- Keep the filter out of reach of children and pets.
- Install the filter at a safe distance from the pond edge to prevent accidental immersion.
3. Product Components
Familiarize yourself with the components of your CPA-5000 filter. Refer to the diagram below for a visual representation of the parts.
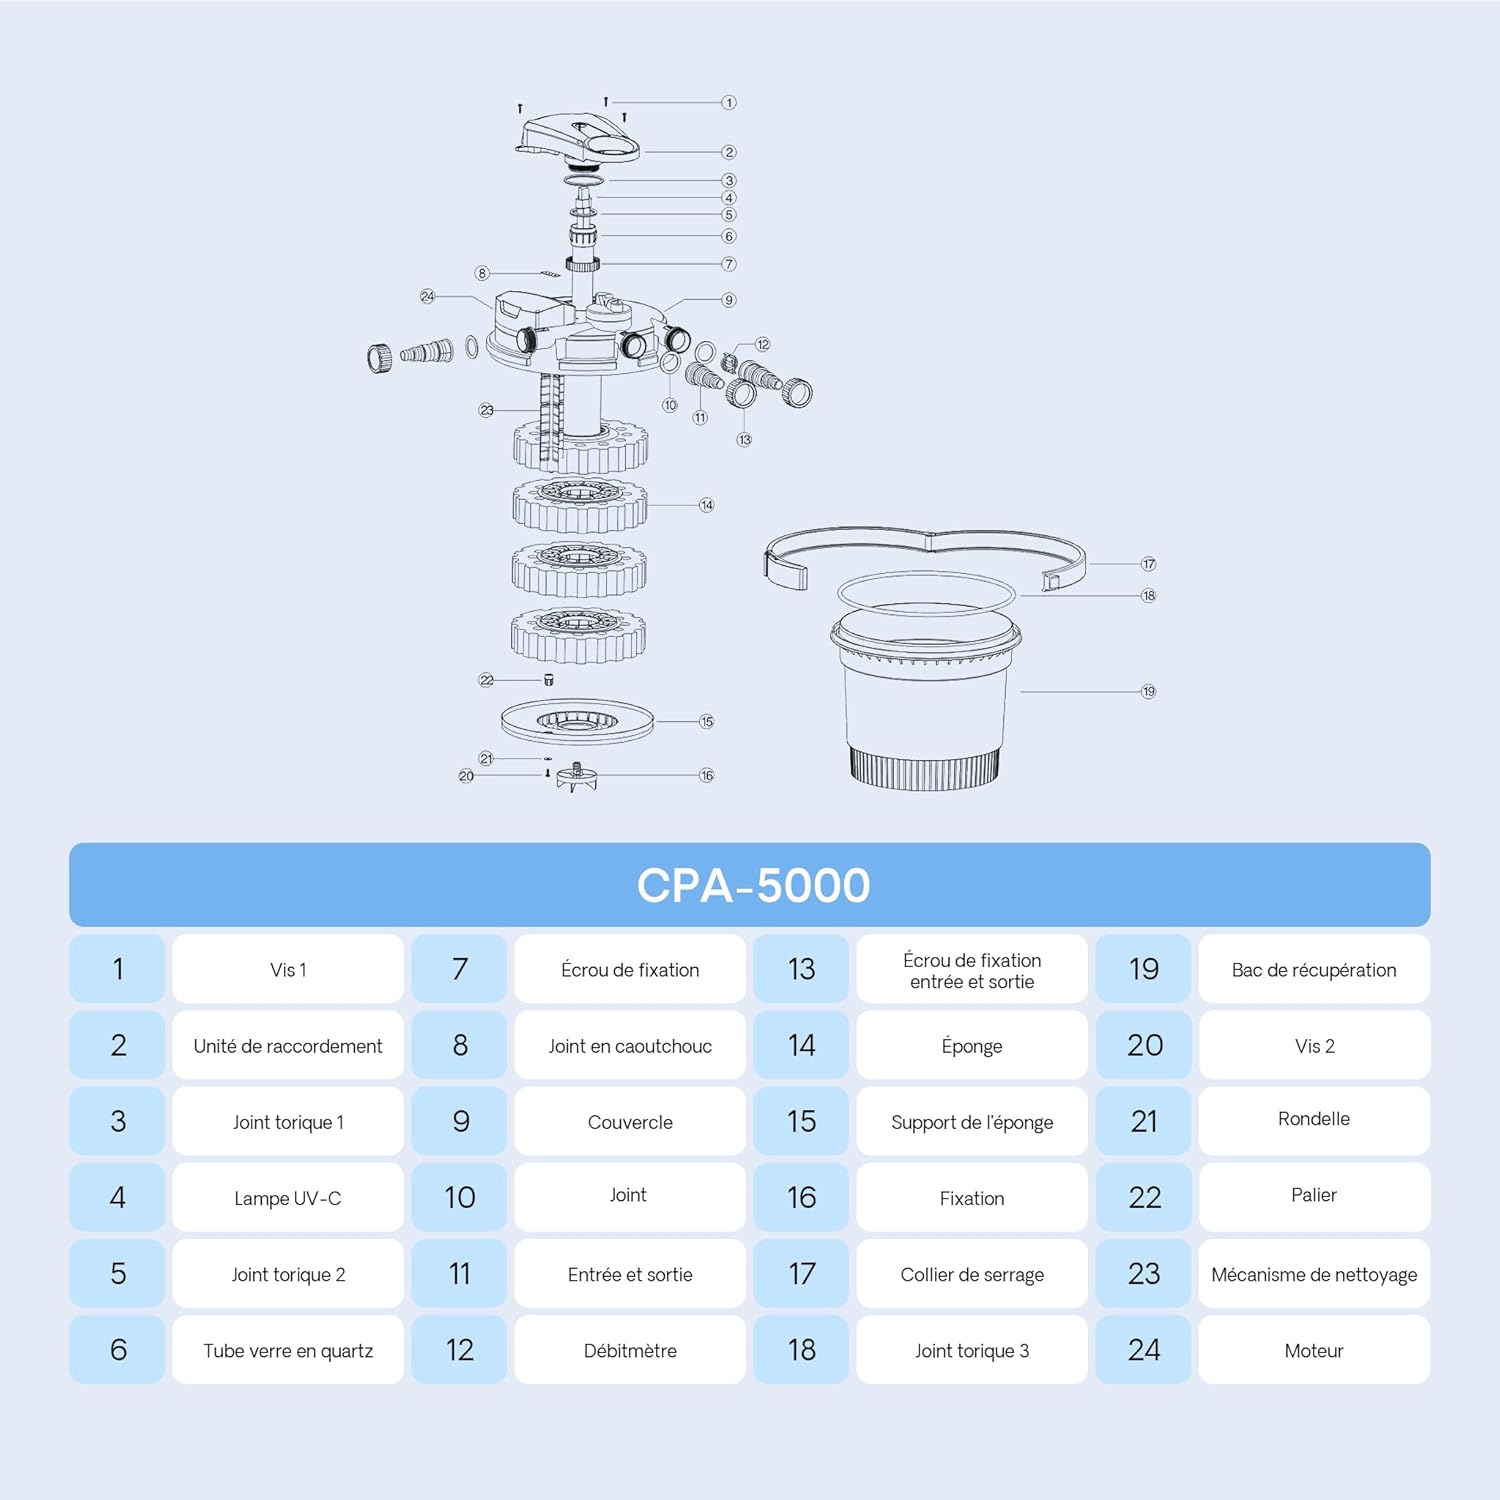
Figure 1: Exploded view of the CPA-5000 filter.
| No. | Component | No. | Component |
|---|---|---|---|
| 1 | Screw 1 | 13 | Inlet/Outlet Fixing Nut |
| 2 | Connection Unit | 14 | Sponge |
| 3 | O-ring 1 | 15 | Sponge Support |
| 4 | UV-C Lamp | 16 | Fixation |
| 5 | O-ring 2 | 17 | Clamping Collar |
| 6 | Quartz Glass Tube | 18 | O-ring 3 |
| 7 | Rubber Nut | 19 | Collection Tray |
| 8 | Rubber Gasket | 20 | Screw 2 |
| 9 | Cover | 21 | Washer |
| 10 | Joint | 22 | Bearing |
| 11 | Inlet and Outlet | 23 | Cleaning Mechanism |
| 12 | Flow Meter | 24 | Motor |
4. Setup
4.1 Placement
The CPA-5000 filter offers flexible installation options:
- Above Ground: Place the filter on a stable, level surface at least 2 meters away from the pond edge to prevent it from falling into the pond.
- Partially Buried: The filter can be partially buried in the ground for a discreet integration into your garden landscape. Ensure the lid remains accessible for maintenance.

Figure 2: Above-ground installation.

Figure 3: Partially buried installation.
4.2 Connecting Hoses
- Connect the pond pump outlet hose to the filter's inlet connection.
- Connect the filter's outlet connection to a return hose that directs purified water back into the pond.
- Ensure all hose connections are secure and leak-free.
4.3 Electrical Connection
Connect the filter's power cable to a suitable, protected outdoor power outlet. Ensure the power supply matches the filter's specifications (230V/50Hz).

Figure 4: Filter connected and ready for operation.
5. Operating Instructions
5.1 Initial Startup
- After installation and hose connections are complete, ensure the filter is filled with water.
- Switch on the pond pump first, allowing water to flow through the filter.
- Then, connect the filter's power supply. The UV-C indicator light should illuminate, confirming operation.
5.2 Normal Operation
The filter operates continuously to maintain water clarity. The integrated UV-C sterilizer works to eliminate harmful microorganisms and floating algae. The mechanical and biological filter media process the water as it passes through.

Figure 5: Water flow through the filter.
6. Maintenance
Regular maintenance ensures optimal performance and longevity of your filter.
6.1 EasyClean Automatic Cleaning System
The EasyClean system allows for convenient cleaning of the filter sponges without opening the housing.
- Connect a drainage hose to the dedicated waste outlet.
- Turn the handle on the filter lid to the 'Clean' position. This activates the internal motor, causing the sponges to rotate and release trapped debris. The indicator light may turn red.
- Allow the cleaning process to run for approximately 3 minutes. The dirty water will exit through the drainage hose and can be used for garden irrigation.
- Once cleaning is complete, turn the handle back to the 'Filter' position, close the waste outlet valve, and remove the drainage hose.

Figure 6: EasyClean process steps.
6.2 UVC Lamp Replacement
The UV-C lamp has an effective lifespan of approximately 6000-8000 operating hours. It is recommended to replace the lamp annually, ideally in spring, to ensure optimal performance for the new pond season.

Figure 7: Integrated UV-C sterilizer.
6.3 Filter Sponge Maintenance
Periodically inspect the filter sponges for excessive clogging. While the EasyClean system handles routine cleaning, manual inspection and occasional replacement may be necessary. The filter contains both coarse (blue) and fine (yellow) sponges for comprehensive filtration.

Figure 8: Coarse and fine filter sponges.
7. Troubleshooting
| Problem | Possible Cause | Solution |
|---|---|---|
| Cloudy water | Clogged filter sponges, worn UVC lamp, insufficient biological activity. | Perform EasyClean cycle. Check and replace UVC lamp if necessary. Ensure proper pond water parameters. |
| Reduced water flow | Clogged filter sponges, pump malfunction, kinked hoses. | Perform EasyClean cycle. Check pond pump for blockages. Inspect hoses for kinks or debris. |
| UVC indicator light off | UVC lamp faulty, power supply issue. | Check power connection. Replace UVC lamp. |
| Water leaking from filter | Loose connections, damaged O-rings or seals. | Tighten all connections. Inspect and replace O-rings or seals as needed. |
8. Specifications
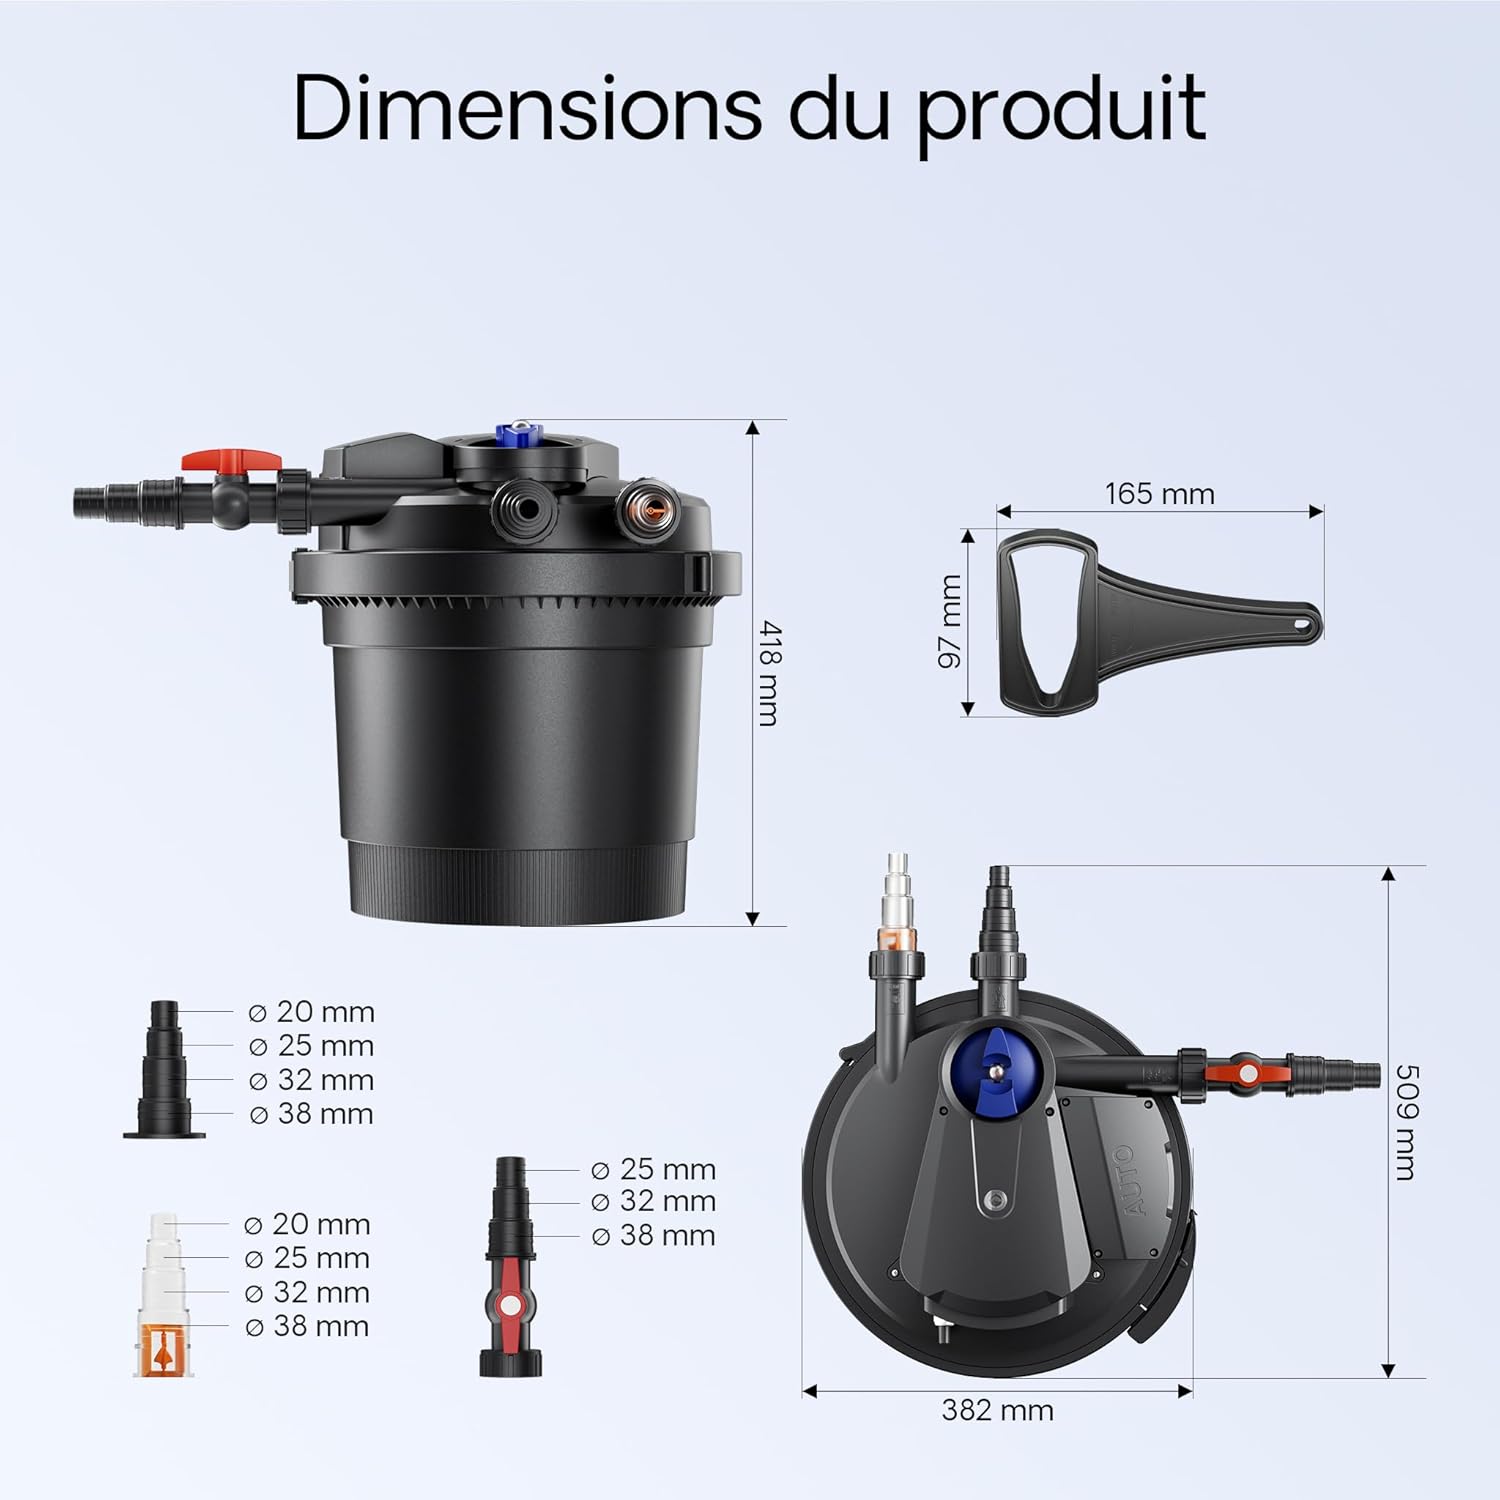
Figure 9: Product dimensions.
| Feature | Value |
|---|---|
| Model Number | 51628 |
| Dimensions (L x W x H) | 38.2 x 38.2 x 41.8 cm |
| Weight | 7.06 kg |
| Max Flow Rate | 8000 L/h |
| UVC Power | 11 W |
| Total Power Consumption | 60 W |
| Cable Length | 5 m |
| IP Code | IP44 |
| Recommended Pond Volume (with fish) | Up to 4 m³ |
| Recommended Pond Volume (without fish) | Up to 8 m³ |
9. Warranty and Support
This product comes with a standard manufacturer's warranty. For warranty claims, technical support, or spare parts, please contact your retailer or visit the official SunSun website. Keep your proof of purchase for any warranty-related inquiries.
For further assistance, you may visit the SunSun Brand Store.


