1. Introduction and Overview
This manual provides detailed instructions for the installation, operation, and maintenance of your Commax 6-Apartment Building Audio Intercom Set. This system is designed to facilitate clear audio communication between visitors at the building entrance and residents within their apartments, offering enhanced security and convenience. The set includes a robust 6-button lobby unit and six individual household handsets, powered by a single 12V power supply.

Image 1.1: Complete Commax 6-Apartment Building Audio Intercom Set.
2. Components Included
The Commax 6-Apartment Building Audio Intercom Set includes the following components:
- 1 x 6-button lobby unit (Model: DR-6UM)
- 6 x Household handsets (Model: DP-SS)
- 1 x 12V Power Supply (Model: RF-12015S)
- 1 x 4-pin connector
- 1 x 6-pin connector
Note: Wiring cable is not included and must be purchased separately.
3. Setup and Installation
3.1. Safety Precautions
- Ensure power is disconnected before beginning any installation or wiring.
- Follow all local electrical codes and regulations.
- Use appropriate tools and personal protective equipment.
- If unsure about any step, consult a qualified electrician.
3.2. Lobby Unit (DR-6UM) Installation
The DR-6UM lobby unit is designed for flush-mounted installation. It features a durable aluminum material construction.

Image 3.1: Front view of the DR-6UM Lobby Unit.
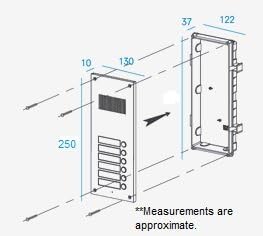
Image 3.2: DR-6UM Lobby Unit Dimensions and Flush-Mount Installation. Approximate dimensions: 142mm (width) x 250mm (height) x 50mm (depth).
3.3. Handset (DP-SS) Installation
The DP-SS handsets are designed for surface-mounted installation within each apartment.

Image 3.3: Front view of the DP-SS Handset.
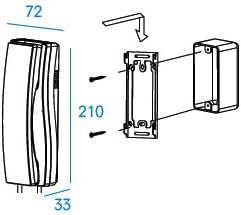
Image 3.4: DP-SS Handset Dimensions and Surface-Mount Installation. Approximate dimensions: 70mm (width) x 210mm (height) x 80mm (depth).

Image 3.5: Back view of the DP-SS Handset with Wiring Diagram.
3.4. Wiring Diagram
Proper wiring is crucial for the system's functionality. The lobby unit requires a DC12V, 1.5Amp power source and provides power to the handsets. The system uses a common 3-wire connection plus individual 1-wire for the lobby unit, and 6 wires for the handset (4 to door station, 2 to door lock).

Image 3.6: System Wiring Diagram. Ensure all connections are secure and follow the diagram precisely. An electric door strike and its power source are not included.
4. Operating Instructions
4.1. Visitor Calling a Resident
- The visitor presses the corresponding apartment button on the DR-6UM lobby unit.
- The DP-SS handset in the selected apartment will ring.
- The resident picks up the handset to establish two-way audio communication with the visitor.
4.2. Resident Opening the Door
- During an active call with a visitor, the resident can press the door release button on their DP-SS handset.
- This action will activate the connected electric door strike (not included), allowing the visitor to enter.
5. Maintenance
- Cleaning: Use a soft, dry cloth to clean the surfaces of the lobby unit and handsets. Avoid using abrasive cleaners, solvents, or harsh chemicals, as these can damage the finish.
- Connection Checks: Periodically inspect all wiring connections to ensure they are secure and free from corrosion or damage. Loose connections can lead to intermittent operation or system failure.
- Environmental Conditions: Ensure the units are not exposed to extreme temperatures, direct sunlight for prolonged periods, or excessive moisture, which can affect performance and lifespan. The lobby unit is designed for outdoor use but should be protected from direct heavy rain if possible.
6. Troubleshooting
| Problem | Possible Cause | Solution |
|---|---|---|
| No audio from handset or lobby unit. | Loose or incorrect wiring; power supply issue; faulty unit. | Check all wiring connections according to the diagram (Image 3.6). Verify the 12V power supply is active and connected. If issues persist, contact support. |
| Handset does not ring when button is pressed. | Incorrect wiring for specific apartment; faulty button on lobby unit; handset power issue. | Confirm the correct apartment button is pressed. Check the individual wiring for that specific handset. Ensure the handset is receiving power from the lobby unit. |
| Door release function not working. | Electric door strike not connected or powered; incorrect wiring to door lock terminals; faulty handset button. | Verify that an electric door strike is properly installed and has its own power source (if required). Check the 2-wire connection from the handset to the door lock. |
| Intermittent communication. | Loose connections; interference; damaged wiring. | Secure all wiring connections. Ensure wiring is not running parallel to high-voltage lines. Inspect cables for any physical damage. |
7. Specifications
Detailed specifications for the Commax DR-6UM Lobby Unit and DP-SS Handset are provided below:

Image 7.1: Detailed Specifications for DR-6UM and DP-SS.
7.1. Door Station DR-6UM
| Feature | Specification |
|---|---|
| Model Number | DR-6UM |
| Power Source | DC12V, 500mA |
| Communication Ways | Synchronous Communication |
| Wiring | Common 3 wires + individual 1 wire |
| Compatible Room Unit | Commax Handset: DP-SS, DP-MSS, DP-TS, DP-KSS |
| Transmission Distance | Ø0.5: 30m; Ø0.65: 50m; Ø0.8: 70m; Ø1.0: 100m |
| Temperature | -10°C (tested up to -40°C) to +50°C |
| Dimensions (mm) | 142x250x50 (mm) |
| Mount Type | Flush-mounted type |
7.2. Room Station DP-SS
| Feature | Specification |
|---|---|
| Model | DP-SS |
| Power Source | DC12V (from door station) |
| Mount Type | Surface mounted |
| Wiring | 6 wires: to door station: 4 wires; to door lock: 2 wires |
| Dimensions with Handset | 70x210x80 (mm) |
| Operating Temperature | 0°C ~ 50°C |
8. Warranty and Support
For technical assistance, warranty claims, or further inquiries regarding your Commax 6-Apartment Building Audio Intercom Set, please contact your authorized Commax dealer or the point of purchase. Retain your proof of purchase for warranty validation.
You may also find additional information and support resources on the official Commax website or through the retailer where the product was purchased. For general product information, you can visit the product page at amazon.com/Commax-6-Apartment-Building-Audio-Intercom/dp/B01N1X620E.


