1. Introduction
This manual provides detailed instructions for the installation, operation, and maintenance of your BONTEC Triple Monitor Arm, Model MDM003. This monitor arm is designed to support three monitors ranging from 13 to 24 inches, with a maximum weight capacity of 10 kg (22 lbs) per arm. It offers full motion adjustability, including tilt, swivel, and rotation, to optimize your viewing experience and workspace ergonomics.

Image 1.1: Overview of the BONTEC Triple Monitor Arm.
2. Safety Information
- Read all instructions carefully before installation. If you do not understand these instructions or have doubts about the safety of the installation, please contact a qualified installer.
- Ensure that the mounting surface can safely support the combined weight of the monitor arm and your monitors.
- Do not exceed the maximum weight capacity of 10 kg (22 lbs) per arm.
- Use only the provided hardware. Do not use damaged or missing parts.
- Keep children away from moving parts during adjustment.
3. Package Contents
Verify that all components are present and undamaged before proceeding with installation. If any parts are missing or defective, contact customer support.
- Main Pole and Base Assembly
- Monitor Arms (3 units)
- VESA Plates (3 units)
- Desk Clamp and Grommet Base Components
- Hardware Kit (screws, washers, Allen keys)
- Cable Management Clips
4. Setup and Installation
4.1 Choose Your Mounting Method
The BONTEC Triple Monitor Arm offers two installation options: Desk Clamp or Grommet Base.

Image 4.1: Illustration of Desk Clamp and Grommet Base installation methods.
4.2 Desk Clamp Installation
- Attach the desk clamp component to the main pole.
- Position the clamp on the edge of your desk.
- Tighten the clamp screw until the pole is securely fastened to the desk. Ensure it is stable and does not wobble.
4.3 Grommet Base Installation
- If your desk has a grommet hole, insert the grommet base through it. If not, you may need to drill a suitable hole (consult a professional if unsure).
- Secure the grommet base from underneath the desk using the provided plate and nut.
- Attach the main pole to the secured grommet base.
- Tighten all fasteners to ensure the pole is stable.
4.4 Attaching Monitor Arms and Monitors
- Slide the monitor arms onto the main pole at your desired height. Secure them with the provided screws.
- Attach the VESA plates to the back of your monitors using the appropriate screws from the hardware kit. The VESA plates are detachable for easier installation.
- Slide the monitors (with attached VESA plates) onto the monitor arms. Ensure they click into place securely.
- Adjust the height of each VESA plate slightly to achieve perfect alignment between your monitors.
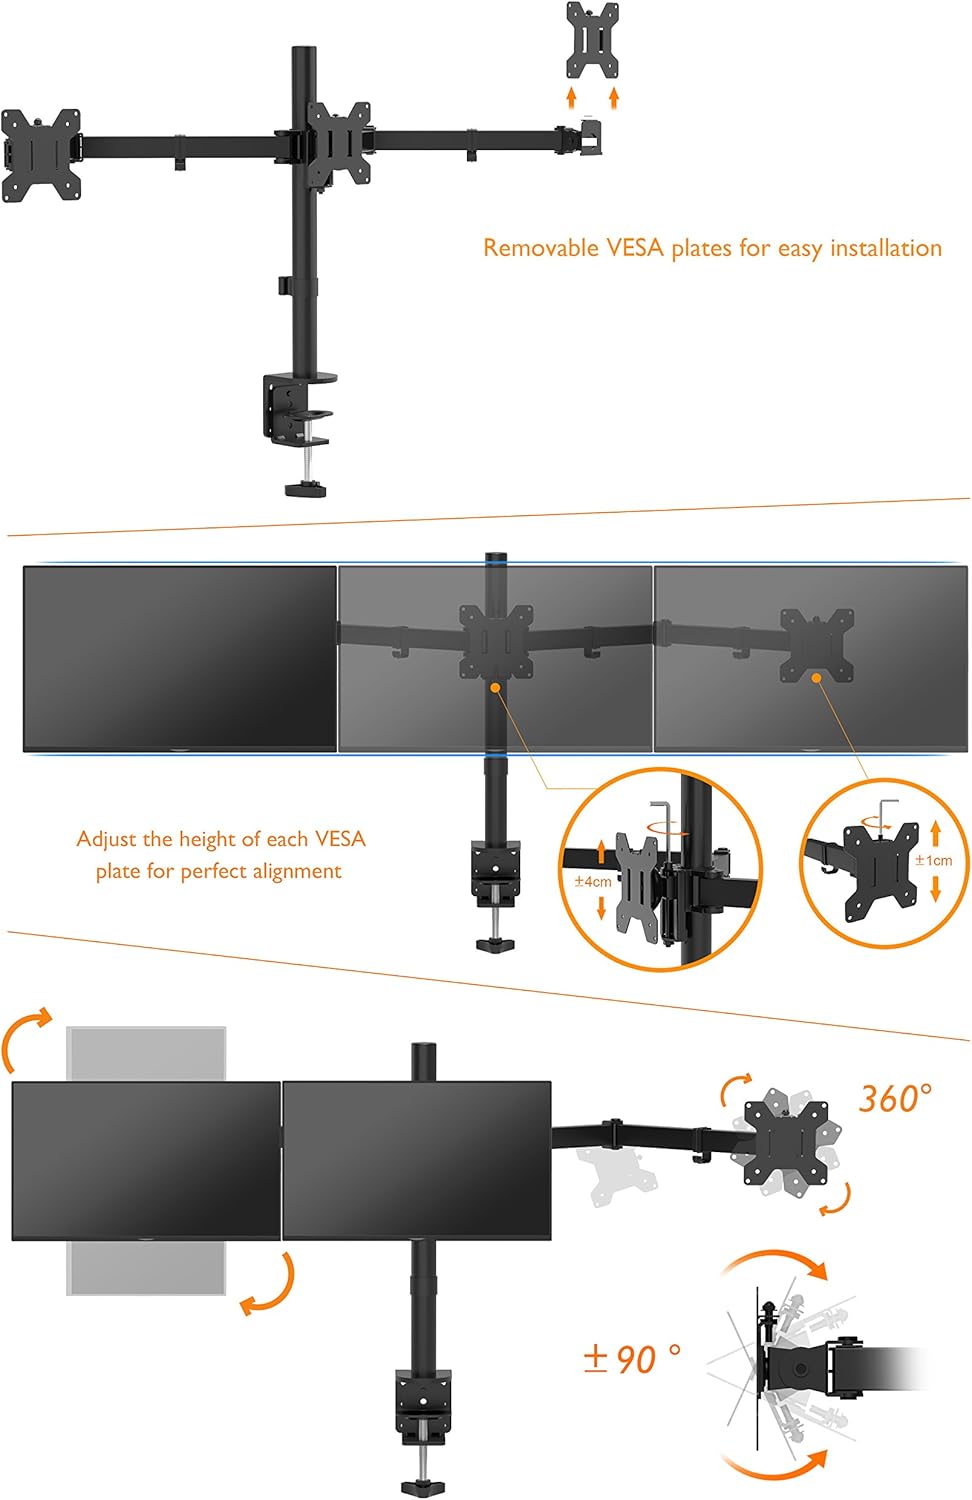
Image 4.2: Detachable VESA plates and height adjustment for monitor alignment.
5. Operating and Adjustments
5.1 Full Motion Adjustments
The monitor arm allows for extensive adjustments to achieve optimal viewing angles and ergonomic positioning.
- Tilt: Adjust the monitor screen vertically by tilting it up or down (up to ±45°).
- Swivel: Rotate the monitor horizontally (up to ±90°).
- Rotation: Rotate the monitor 360° to switch between landscape and portrait orientations.
- Height Adjustment: The entire arm assembly can be moved up or down the main pole, and individual VESA plates can be fine-tuned for height.

Image 5.1: Illustration of tilt, swivel, rotation, and height adjustment capabilities.
5.2 Arm Adjustments
Each arm segment can be adjusted up to 180° horizontally, allowing you to position your monitors precisely. Use the provided Allen keys to tighten or loosen joints as needed to achieve the desired tension for movement.
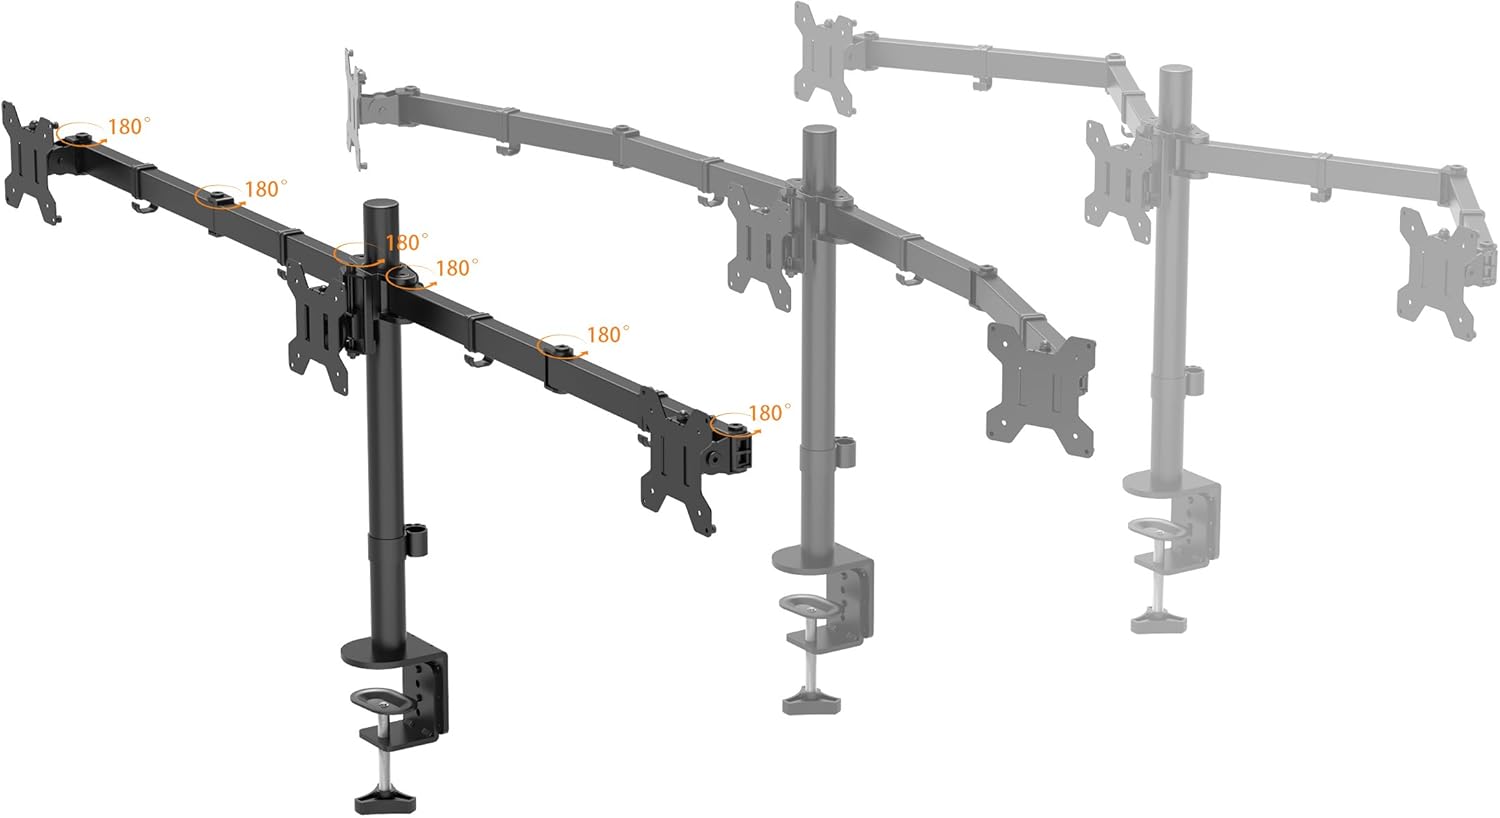
Image 5.2: Demonstrating the 180-degree articulation of the monitor arms.
5.3 Cable Management
Utilize the integrated cable management system to keep your workspace tidy. Route monitor cables through the clips located along the arms and down the main pole.

Image 5.3: Cable management clips and storage slot for Allen keys.
6. Maintenance
- Regularly check all screws and connections to ensure they remain tight and secure.
- Clean the monitor arm with a soft, damp cloth. Avoid abrasive cleaners or solvents.
- Periodically inspect the arms and VESA plates for any signs of wear or damage.
7. Troubleshooting
- Monitors are not stable or sag: Ensure all arm joints and VESA plate screws are tightened. Verify that the combined weight of your monitors does not exceed the 10 kg per arm capacity.
- Difficulty adjusting monitor position: Loosen the tension screws on the arm joints slightly using the provided Allen key. Adjust to your preferred tension.
- Monitors are not level: Use the fine-tuning height adjustment on the VESA plates to align monitors. Ensure the main pole is installed vertically.
8. Specifications
| Model Number | MDM003 |
| Brand | BONTEC |
| Material | Steel |
| Color | Black |
| Screen Size Compatibility | 13 - 24 inches |
| Weight Capacity (per arm) | 10 kg (22 lbs) |
| VESA Compatibility | 75x75mm, 100x100mm |
| Tilt Angle | ±45° |
| Swivel Angle | ±90° |
| Rotation | 360° |
| Mounting Type | Desk Clamp / Grommet Base |
9. Warranty and Support
For warranty information or technical support, please refer to the product packaging or contact BONTEC customer service through their official website or the retailer where the product was purchased. Keep your purchase receipt for warranty claims.


