Introduction
The Geemarc Wake 'n' Shake Curve is an advanced alarm clock designed to provide effective wake-up solutions for individuals, including those with hearing difficulties or heavy sleepers. It combines an extra-loud alarm, a powerful vibrating shaker pad, and a bright flashing light. Additionally, it features a large digital display and a USB port for charging external devices.
Package Contents
- Geemarc Wake 'n' Shake Curve Alarm Clock
- Vibrating Shaker Pad with cable
- Power Adapter
- User Manual (this document)
Product Overview
Familiarize yourself with the various components of your Wake 'n' Shake Curve alarm clock.
Front View

Image: Front view of the alarm clock, showing the large red digital display, the flashing light bar at the top, and the connected vibrating shaker pad on the left.

Image: Front view of the alarm clock, demonstrating a smartphone connected to the USB charging port on the back.
Top View (Control Buttons)

Image: Top panel of the alarm clock, displaying the control buttons: ▼ (Down), SET, Zz ☀ (Snooze/Light), AL (Alarm), and ▲ (Up).
Side View (Volume/Tone Control)

Image: Side view of the alarm clock, highlighting the rotating scroll wheel used for adjusting alarm volume and tone.
Rear View (Ports)
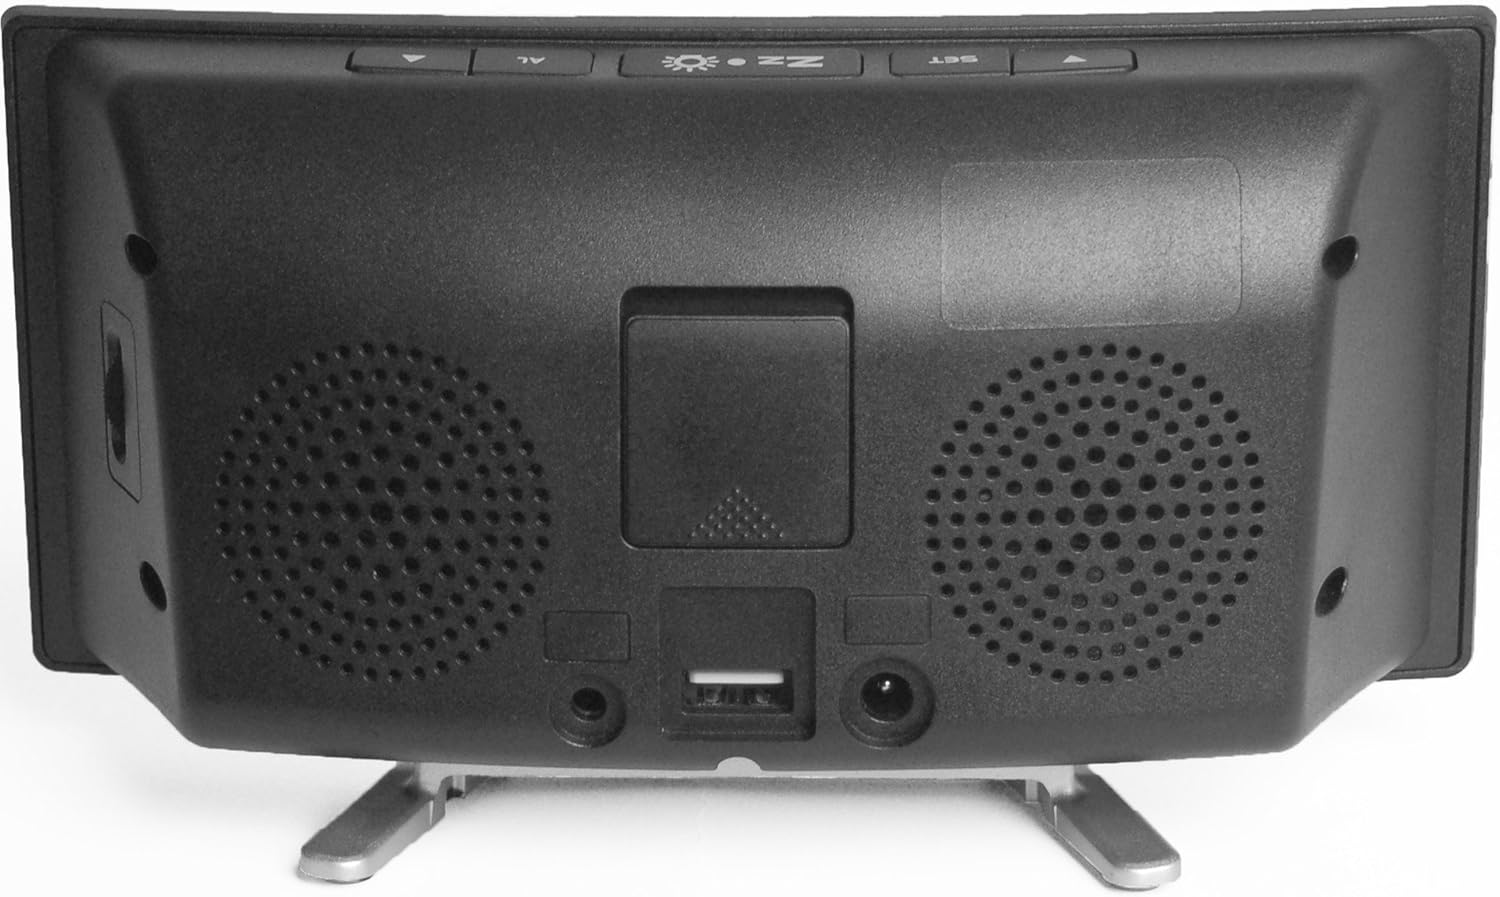
Image: Rear view of the alarm clock, showing the power adapter input, the USB charging port, and the port for the vibrating shaker pad.
Setup
- Connect Power: Plug the provided power adapter into the DC IN port on the back of the alarm clock, then plug the adapter into a standard wall outlet. The display will illuminate.
- Connect Vibrating Pad: Insert the cable of the vibrating shaker pad into the SHAKER port on the back of the alarm clock. Place the pad under your pillow or mattress for optimal vibration.
- Install Backup Battery (Optional): For power outage backup, open the battery compartment on the back and insert a 9V battery (not included). This battery will maintain time settings during a power interruption but will not power the alarm functions.
Operating Instructions
Setting the Time
- Press and hold the SET button until the hour digits begin to flash.
- Use the ▲ (Up) or ▼ (Down) buttons to adjust the hour.
- Press SET again to confirm the hour and move to the minute setting. The minute digits will flash.
- Use the ▲ (Up) or ▼ (Down) buttons to adjust the minutes.
- Press SET again to confirm the minutes and exit time setting mode.
- To switch between 12-hour and 24-hour format, press the SET button once while the time is displayed (not flashing).
Setting the Alarm
- Press and hold the AL button until the alarm hour digits begin to flash. An alarm icon will appear on the display.
- Use the ▲ (Up) or ▼ (Down) buttons to adjust the alarm hour.
- Press AL again to confirm the alarm hour and move to the alarm minute setting. The alarm minute digits will flash.
- Use the ▲ (Up) or ▼ (Down) buttons to adjust the alarm minutes.
- Press AL again to confirm the alarm minutes and exit alarm setting mode. The alarm icon will remain on the display, indicating the alarm is active.
- To deactivate the alarm, press the AL button once while the time is displayed. The alarm icon will disappear. Press AL again to reactivate.
Adjusting Alarm Volume and Tone
On the side of the alarm clock, there are rotating knobs. One controls the alarm volume, and the other controls the alarm tone frequency. Adjust these to your preferred settings. The maximum alarm volume is approximately 95dB.
Selecting Alarm Modes
The Wake 'n' Shake Curve offers four distinct alarm modes. Press the AL button repeatedly (while the alarm is active but not sounding) to cycle through the modes, indicated by icons on the display:
- Vibration Only: (Shaker icon) The vibrating pad will activate.
- Alarm Sound + Vibration: (Speaker + Shaker icons) The loud alarm sound and vibrating pad will activate.
- Flashing Light + Vibration: (Light + Shaker icons) The bright flashing light and vibrating pad will activate.
- All Three (Sound + Light + Vibration): (Speaker + Light + Shaker icons) All three wake-up methods will activate simultaneously.
Snooze Function
When the alarm sounds, press the large Zz ☀ (Snooze/Light) button on top of the clock to activate the snooze function. The alarm will pause and sound again after a set interval. The snooze duration is adjustable between 5 and 60 minutes. To adjust, press and hold the Zz ☀ button until the snooze time flashes, then use the ▲ (Up) or ▼ (Down) buttons to set the desired duration. Press Zz ☀ again to confirm.
Adjusting Display Brightness
The display has three brightness levels. Press the Zz ☀ (Snooze/Light) button once (when the alarm is not sounding) to cycle through the brightness settings: High, Medium, Low.
USB Charging Port
A USB port is located on the back of the alarm clock. You can use this port to charge your smartphone or other USB-powered devices while the alarm clock is connected to power. This port provides standard USB charging output.
Maintenance
- Cleaning: Use a soft, dry cloth to clean the surface of the alarm clock. Do not use liquid cleaners or abrasive materials.
- Storage: If storing the unit for an extended period, disconnect it from power and remove any backup battery. Store in a cool, dry place.
- Vibrating Pad: Ensure the vibrating pad cable is not kinked or damaged.
Troubleshooting
| Problem | Possible Cause | Solution |
|---|---|---|
| Clock display is off. | No power connection. | Ensure the power adapter is securely plugged into the clock and a working wall outlet. |
| Alarm does not sound/vibrate/flash. | Alarm is not set or deactivated. Incorrect alarm mode selected. | Verify the alarm time is set and the alarm icon is visible. Cycle through alarm modes using the AL button to select the desired wake-up method. Check alarm volume. |
| Vibrating pad not working. | Pad not connected or faulty. | Ensure the vibrating pad cable is fully inserted into the SHAKER port. Test with a different alarm mode. |
| Display shows 'PM' during AM hours. | This is a display characteristic. | The 'PM' indicator is a fixed part of the display and does not change for AM hours. The time displayed is accurate regardless of this indicator. |
| USB charging not working. | Device not compatible or cable faulty. | Ensure the alarm clock is powered. Try a different USB cable or device to confirm functionality. |
Specifications
- Brand: Geemarc
- Model: JWNS_CURVE
- Display Type: Digital, Large Red LED
- Alarm Volume: Up to 95dB
- Alarm Features: Extra Loud Alarm, Vibrating Shaker Pad, Bright Flashing Light
- Snooze Duration: Adjustable (5-60 minutes)
- Display Brightness: 3 levels
- Power Source: Corded Electric
- Backup Battery: Optional 9V (not included) for time retention during power cuts
- USB Charging Port: Yes
- Dimensions: Approximately 2.2 x 7.09 x 3.74 inches
- Weight: Approximately 10.6 ounces (0.3 kg)
Warranty and Support
For warranty information and customer support, please refer to the documentation provided at the time of purchase or contact your retailer. You may also visit the official Geemarc website for further assistance.


