
1. Introduction
This manual provides essential instructions for the safe and efficient operation, setup, and maintenance of your Yamata FY5318 Walking Foot Lockstitch Sewing Machine Head. This unit is designed for industrial sewing applications, particularly suited for heavy materials such as upholstery, leather, canvas, and denim. Please read this manual thoroughly before assembly and operation to ensure proper use and longevity of your machine.
Note: This product is the sewing machine head only. The table and motor are not included and must be acquired separately for full functionality.
2. Safety Instructions
- Always disconnect the power supply before cleaning, servicing, or making any adjustments to the machine.
- Keep fingers and hands away from the needle and moving parts during operation.
- Wear appropriate eye protection when operating the machine.
- Ensure the machine is placed on a stable, level surface.
- Do not operate the machine if any parts are damaged or missing.
- Keep the work area well-lit and free of clutter.
- Only use genuine replacement parts and accessories.
3. Package Contents
Upon unpacking, verify that all the following items are included with your Yamata FY5318 sewing machine head:
- Yamata FY5318 Sewing Machine Head
- Thread Stand
- Bobbin Winder
- Oil Pan
- Knee Lifter
- 5 Extra Bobbins
- 10 Extra Needles
- Instruction Manual (this document)
- Screw Driver
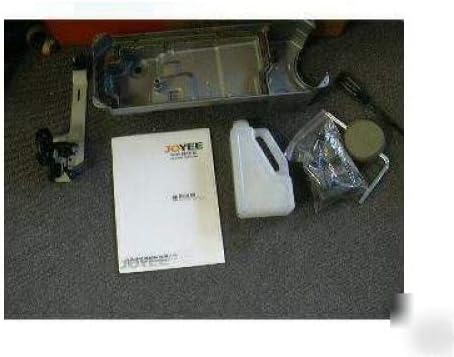
Figure 3.1: Included accessories such as bobbins, needles, screwdriver, and oil bottle.
4. Setup and Installation
The Yamata FY5318 is an industrial sewing machine head that requires assembly onto a suitable sewing machine table with an industrial motor. Follow these general steps for installation:
- Mounting the Machine Head: Carefully place the sewing machine head into the designated opening of your industrial sewing machine table. Ensure it is securely seated and aligned.
- Motor Installation: Install your industrial sewing machine motor according to its specific instructions, ensuring proper belt alignment with the machine head's pulley.
- Thread Stand Assembly: Assemble the thread stand and position it appropriately behind the machine.
- Knee Lifter Installation: Attach the knee lifter mechanism to the machine and table, ensuring it operates smoothly to raise the presser foot.
- Oil Pan Placement: Position the oil pan beneath the machine head to collect excess oil and maintain a clean workspace.
- Power Connection: Once all components are securely installed, connect the motor to a suitable power outlet.

Figure 4.1: The Yamata FY5318 sewing machine head, ready for installation onto a table and motor.
5. Operating Instructions
5.1. Threading the Machine
Refer to the threading diagrams typically found on the machine head or in the supplementary manual for detailed steps. General steps include:
- Place the thread spool on the thread stand.
- Guide the thread through the upper thread guides.
- Pass the thread through the tension discs.
- Thread the take-up lever.
- Guide the thread through the lower thread guides and needle bar thread guide.
- Thread the needle from front to back.
5.2. Winding the Bobbin
The machine includes a built-in bobbin winder. Place an empty bobbin onto the winder spindle, guide the thread from the spool through the tension disc of the winder, and then around the bobbin. Engage the winder and operate the machine until the bobbin is full. Disengage and remove the wound bobbin.
5.3. Adjusting Stitch Length
The stitch length can be adjusted using the dial type stitch regulator. The machine supports stitch lengths up to 8 mm (approximately 5-16 stitches per inch). Rotate the dial to achieve the desired stitch length for your material.
5.4. Reverse Sewing
To engage reverse sewing, depress the lever type reverse sewing mechanism. This is useful for reinforcing stitches at the beginning and end of seams.
5.5. Foot Lifting Clearance
The presser foot can be lifted by hand (1/4 inch clearance) or by using the knee lifter (1/2 inch clearance). This allows for sewing materials up to 3/8 inch thick.
5.6. Suitable Materials
This walking foot machine is designed for heavy-duty materials and is suitable for sewing car and boat seats, general upholstery, leather articles, belts, canvas, tents, awnings, handbags, outdoor wear, camping goods, jeans, and vinyl goods.

Figure 5.1: The machine in operation, demonstrating its capability to sew through thick materials like leather.
6. Maintenance
6.1. Lubrication
The Yamata FY5318 features an automatic lubrication system (centrifugal impeller pump system) with a plunger pump system for oil return. The hook lubrication control is managed via screw adjustment. Regularly check the oil level and ensure the system is functioning correctly to prevent wear and tear.
Use only recommended industrial sewing machine oil. Refer to the machine's oil pan for specific oil type recommendations if available.
6.2. Cleaning
Regularly clean lint and dust from the bobbin case area, feed dogs, and other accessible parts using a brush or compressed air. Ensure the machine is disconnected from power before cleaning.
7. Troubleshooting
This section provides general guidance for common issues. For complex problems, consult a qualified technician.
- Machine Not Starting: Check power connections, motor functionality, and ensure the machine is properly engaged with the motor.
- Skipped Stitches: Verify the needle is correctly inserted, not bent, and is the appropriate type and size (#22 DB x 1 recommended) for the material. Check threading tension.
- Thread Breakage: Inspect for burrs on thread guides, correct threading path, proper tension settings, and ensure the thread is suitable for heavy-duty sewing.
- Uneven Stitches: Adjust upper and lower thread tension. Ensure the material is feeding smoothly.
- Noise/Vibration: Check for loose parts, ensure proper lubrication, and verify the machine is securely mounted.
8. Specifications
| Feature | Detail |
|---|---|
| Model Number | FY5318 |
| Sewing Speed (max) | 1,350 stitches per minute (spm) |
| Stitch Length (max) | 8 mm (5-16 stitches per inch) |
| Needle Bar Stroke | 35.0 mm |
| Thread Take-up Stroke | 61.3 mm |
| Foot Lifting Clearance (Hand) | 1/4 inch |
| Foot Lifting Clearance (Knee) | 1/2 inch |
| Maximum Material Thickness | 3/8 inch |
| Recommended Needle | DB x 1 #22 |
| Hook Type | Rotating Large Hook, Heavy Duty |
| Feeding Mechanism | Walking Foot |
| Stitch Regulator | Dial Type |
| Reverse Sewing | Lever Type |
| Lubrication System | Automatic (Centrifugal impeller pump system) |
| Oil Return Device | Plunger pump system |
| Hook Lubrication Control | Screw adjustment type |
| Machine Table Type | NL type (Bed measurements 475x178mm) |
| Interchangeable Presser Feet | Juki 141, Brother 797, Chandler 337, Nakajima 181L, Mitsubishi DY350, LY3300 and others |
| Product Dimensions | 30 x 15 x 25 inches (approximate) |
| Item Weight | 132.3 pounds (approximate) |
| UPC | 760781218772 |
9. Warranty Information
The Yamata FY5318 Sewing Machine Head comes with a Six-month factory warranty. This warranty covers manufacturing defects under normal use. Please retain your proof of purchase for warranty claims. For specific terms and conditions, refer to the warranty documentation provided with your purchase or contact the manufacturer.
10. Support and Contact
For technical assistance, spare parts, or further inquiries regarding your Yamata FY5318 sewing machine, please contact your authorized dealer or the manufacturer's customer support. When contacting support, please have your model number (FY5318) and purchase information readily available.