1. Introduction
The Astromania Deluxe 9mm Illuminated Crosshair Eyepiece is designed to assist with precise guiding during astrophotography and for various observational tasks. Its illuminated double crosshairs facilitate accurate tracking of guide stars, field of view determination, mount alignment, and finding position angles of double stars. This manual provides detailed instructions for its proper use and care.
2. Key Features
- Illuminated Double Crosshairs: Provides clear visibility for precise guiding, allowing the guide star to remain centered without being obscured.
- Adjustable Red LED Illumination: Features a red LED light source with a steplessly adjustable knob for brightness control.
- Dioptre Adjuster: Allows independent focusing of the crosshairs and the observed star for optimal clarity.
- 9mm Focal Length: Offers sufficient magnification for accurate guiding.
- Plössl Design: Incorporates multi-coated lenses for a 40-degree low-reflection field of view.
- Standard 1.25-inch Barrel: Compatible with most telescopes and accessories.
- Threaded for Filters: Includes a thread for standard 1.25-inch astronomical filters.
3. Components Overview
Familiarize yourself with the main components of your Astromania Deluxe 9mm Illuminated Crosshair Eyepiece:
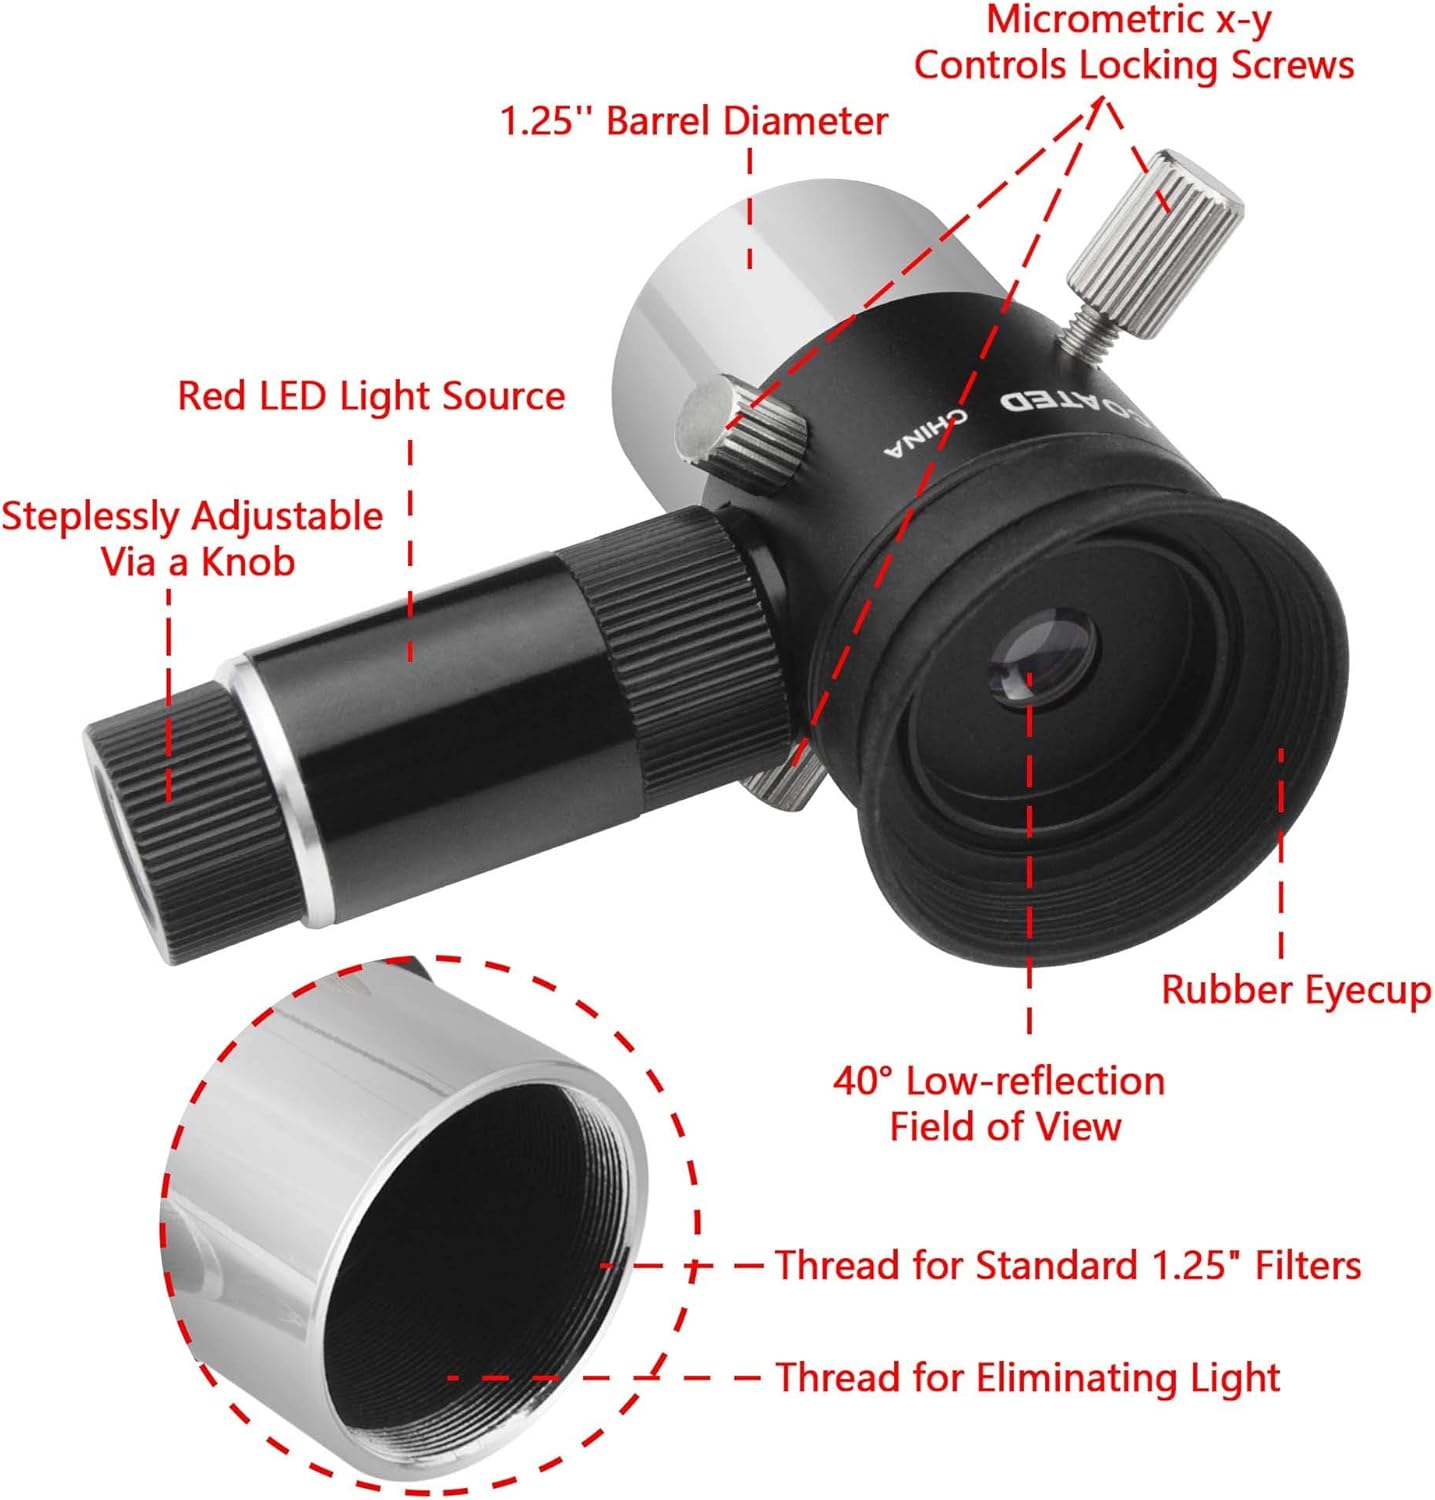
This diagram illustrates the key features of the eyepiece, including the 1.25-inch barrel diameter, micrometric X-Y controls locking screws, red LED light source, steplessly adjustable knob, rubber eyecup, 40-degree low-reflection field of view, and threads for standard 1.25-inch filters and light elimination.
- Eyepiece Barrel: The main body of the eyepiece, designed to fit into a 1.25-inch focuser.
- Illuminator Unit: Detachable unit containing the red LED light source and brightness control knob.
- Dioptre Adjustment Ring: Located near the eyecup, used to focus the crosshairs.
- Micrometric X-Y Controls Locking Screws: These screws allow for fine adjustment of the crosshair position within the field of view.
- Rubber Eyecup: Provides comfort and helps block stray light during observation.
4. Setup
4.1 Battery Installation
The illuminator requires three L1131 button cell batteries (not included). To install:
- Unscrew the illuminator unit from the side of the eyepiece.
- Carefully open the battery compartment.
- Insert three L1131 batteries, ensuring correct polarity.
- Close the battery compartment and reattach the illuminator unit to the eyepiece.

This image illustrates the process of installing three L1131 button cell batteries into the illuminator unit of the eyepiece.
4.2 Attaching to Your Telescope
Insert the 1.25-inch barrel of the eyepiece into your telescope's 1.25-inch focuser or diagonal. Secure it with the focuser's thumbscrew.

The eyepiece features a standard 1.25-inch threaded interface, allowing it to be inserted into a 1.25-inch zenith mirror, Barlow lens, or other compatible telescope accessories.
5. Operating Instructions
5.1 Focusing the Eyepiece and Crosshairs
- Look through the eyepiece and adjust your telescope's focuser until the celestial object is sharp.
- Rotate the dioptre adjustment ring on the eyepiece until the crosshairs appear sharp and in focus for your vision. This allows both the star and the crosshairs to be in focus simultaneously.
5.2 Adjusting Crosshair Illumination
The red LED illumination for the crosshairs is controlled by a knob on the side of the illuminator unit.
- Turn the knob to switch the illumination ON.
- Rotate the knob to steplessly adjust the brightness of the crosshairs. Select the lowest brightness setting that allows the crosshairs to be clearly visible without overpowering the faint guide star.
- Turn the knob to switch the illumination OFF when not in use to conserve battery life.

This image highlights the steplessly adjustable knob for dimmable LED lighting and the micrometric X-Y controls locking screws for precise crosshair positioning.
5.3 Guiding for Astrophotography
When used with an off-axis guider or guide scope, the illuminated double crosshairs allow for precise tracking of a guide star. Position the guide star within the center of the double crosshairs. Any deviation from this central position indicates tracking errors, which can then be corrected by adjusting your mount.
5.4 Other Applications
Beyond astrophotography guiding, this eyepiece is useful for:
- Determining Field of View: Use the crosshairs to measure the apparent field of view.
- Aligning a Mount: Aid in polar alignment or other mount calibration procedures.
- Finding Position Angles of Double Stars: The precise crosshairs can help in measuring the orientation of binary star systems.
6. Maintenance
Proper care will ensure the longevity and performance of your eyepiece.
- Cleaning Lenses: Use a soft, lint-free cloth specifically designed for optics. For stubborn smudges, use a small amount of optical cleaning fluid applied to the cloth, not directly to the lens. Avoid touching the lens surfaces with your fingers.
- Storage: Store the eyepiece in a clean, dry environment, preferably in its original case or a padded container, to protect it from dust and impacts. Use the provided rubber caps to cover both ends of the eyepiece when not in use.
- Battery Replacement: Replace batteries promptly when illumination becomes dim or inconsistent. Remove batteries if the eyepiece will not be used for an extended period to prevent leakage.
7. Troubleshooting
- Crosshairs Not Illuminating:
- Check if the batteries are correctly installed with the proper polarity.
- Ensure the batteries are fresh. Replace them if necessary.
- Verify that the illuminator unit is securely screwed into the eyepiece body.
- Crosshairs Too Bright/Dim:
- Adjust the brightness knob on the illuminator unit.
- If the lowest setting is still too bright for faint objects, consider using a red filter on the eyepiece or reducing ambient light.
- Crosshairs or Star Out of Focus:
- First, focus the telescope on the celestial object using the main focuser.
- Then, adjust the dioptre ring on the eyepiece to bring the crosshairs into sharp focus for your eye.
- Dust or Debris on Lenses:
- Use a blower brush to remove loose dust.
- For more persistent debris, gently clean with an optical cleaning cloth and solution as described in the Maintenance section.
8. Specifications
| Feature | Detail |
|---|---|
| Focal Length | 9mm |
| Barrel Diameter | 1.25 inches |
| Field of View | 40 degrees (low-reflection) |
| Lens Coating | Multi-coated |
| Illumination | Red LED, steplessly adjustable |
| Batteries Required | 3 x L1131 button cells (not included) |
| Product Dimensions | 0.35 x 0.2 x 0.28 inches |
| Item Weight | 5.1 ounces |
| Model Number | 51635 |
| Manufacturer | Astromania |
9. Warranty and Support
For warranty information and customer support, please refer to the official Astromania website or contact your retailer. You can also visit the Astromania Store on Amazon for additional product details and contact options.
