
1. Introduction
Thank you for choosing the Taylor Classic Digital Oven Thermometer, Model 1470N. This device is designed to provide accurate temperature readings for various foods, particularly meats, during cooking in an oven. Its digital display and alarm function help ensure your food is cooked to perfection and safely.
1.1 Key Features
- Precise digital temperature monitoring.
- Wide temperature range: 32°F to 392°F (0°C to 200°C).
- Fast 4-second response time.
- Programmable alarm function for target temperatures.
- Oven-safe probe and cable.
- Easy-to-read LCD display.
- NSF certified for safety and quality.
1.2 Package Contents
- 1 x Taylor Classic Digital Oven Thermometer (Model 1470N)
- 1 x AAA Battery
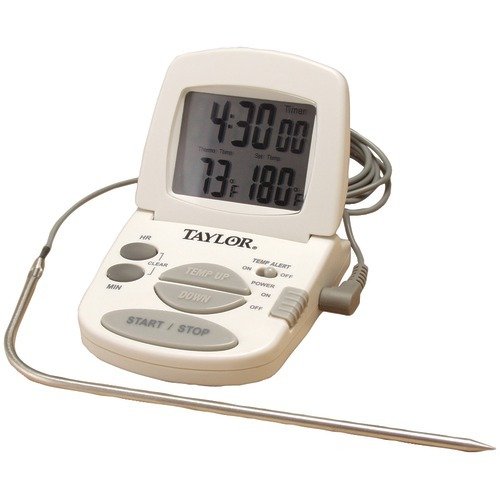
Image: The Taylor Classic Digital Oven Thermometer, showing the main display unit connected to the stainless steel probe via a heat-resistant cable.
2. Safety Information
Please read all safety instructions before using the thermometer to prevent injury or damage to the device.
- Probe is Sharp and Hot: The thermometer probe has a sharp tip. Handle with care. The probe and cable will become very hot during and after use in an oven. Always use oven mitts or heat-resistant gloves when handling the probe or cable.
- Do Not Immerse Main Unit: The main display unit is not waterproof. Do not immerse it in water or place it in a dishwasher. Only the stainless steel probe and its cable are designed for exposure to high temperatures and limited immersion (up to 5 feet for the probe tip).
- Keep Away from Children: This device is not a toy. Keep out of reach of children.
- Battery Safety: Do not mix old and new batteries. Do not mix alkaline, standard (carbon-zinc), or rechargeable (nickel-cadmium) batteries. Dispose of used batteries properly.
- Oven Use Only: This thermometer is designed for use in conventional ovens. Do not use in microwave ovens.
- Cable Placement: Ensure the probe cable is routed safely, avoiding direct contact with heating elements or open flames, and is not pinched by the oven door.
3. Setup
3.1 Battery Installation
- Locate the battery compartment on the back of the main display unit.
- Slide the battery compartment cover open.
- Insert one AAA battery, ensuring the polarity (+ and -) matches the diagram inside the compartment.
- Close the battery compartment cover securely.
The thermometer should power on automatically or be ready for use once the battery is installed.
4. Operating Instructions
4.1 Basic Operation
- Power On/Off: The thermometer typically powers on when a battery is inserted. Some models may have a dedicated ON/OFF button. Refer to the specific button layout on your device.
- Temperature Display: The LCD will display the current temperature measured by the probe in Fahrenheit (°F).
4.2 Using the Thermometer for Cooking
- Prepare Food: Insert the stainless steel probe into the thickest part of the meat or food item, avoiding bone or gristle. Ensure the probe tip is fully immersed to get an accurate reading.
- Route Cable: Carefully close the oven door, ensuring the probe cable is not pinched or damaged. The cable is designed to withstand oven temperatures.
- Monitor Temperature: Place the main display unit outside the oven, on a countertop or attached to a magnetic surface if your model has a magnet. The display will show the internal temperature of your food.
- Set Alarm (if applicable): If your model features an alarm, consult the buttons on the device to set your desired target temperature. Once the food reaches this temperature, an audible alarm will sound.
- Remove Probe: When cooking is complete, carefully remove the probe from the food and oven using oven mitts. The probe and cable will be extremely hot.
The thermometer provides a fast 4-second response time, allowing for quick and accurate temperature checks.
5. Care and Maintenance
Proper care will extend the life and accuracy of your thermometer.
- Cleaning the Probe: After each use, allow the probe and cable to cool. Wipe the stainless steel probe and cable with a damp cloth and mild detergent. Rinse thoroughly and dry completely.
- Cleaning the Main Unit: Wipe the main display unit with a soft, damp cloth. Do not use abrasive cleaners or immerse the unit in water.
- Storage: Store the thermometer in a clean, dry place at room temperature when not in use.
- Battery Replacement: Replace the AAA battery when the display becomes dim or the thermometer stops functioning correctly.
6. Troubleshooting
If you encounter issues with your thermometer, refer to the following common problems and solutions:
- No Display or Dim Display:
- Check battery installation. Ensure polarity is correct.
- Replace the AAA battery with a new one.
- Inaccurate Temperature Reading:
- Ensure the probe tip is fully inserted into the thickest part of the food, away from bone.
- Verify the probe cable is securely connected to the main unit.
- Test the thermometer in ice water (should read approximately 32°F / 0°C) or boiling water (should read approximately 212°F / 100°C at sea level) to check calibration.
- Alarm Not Sounding:
- Ensure the target temperature is set correctly and is below the current food temperature (if testing).
- Check battery level.
If problems persist, contact customer support.
7. Specifications
| Feature | Detail |
|---|---|
| Model Number | 1470N |
| Temperature Range | 32°F to 392°F (0°C to 200°C) |
| Response Time | 4 seconds |
| Power Source | 1 x AAA Battery (included) |
| Display Type | LCD |
| Outer Material (Probe) | Stainless Steel |
| Immersion Depth (Probe) | Up to 5 feet |
| Product Dimensions (Main Unit) | 3.4 x 8.9 x 6.5 inches |
| Item Weight | 5.8 ounces |
| Certification | NSF |
| Usage Environment | Indoor |
8. Warranty and Support
This Taylor Classic Digital Oven Thermometer is covered by a manufacturer's warranty against defects in materials and workmanship. Please refer to the warranty card included with your purchase or visit the manufacturer's official website for detailed warranty terms and conditions.
For technical support, troubleshooting assistance, or warranty claims, please contact Taylor customer service. Contact information can typically be found on the product packaging or the official Taylor website.


