1. Introduction
This manual provides essential information for the safe and efficient operation, maintenance, and troubleshooting of your Koblenz KCCP-1800 Equinox Bagless Canister Vacuum. Please read these instructions thoroughly before using the appliance and retain them for future reference.

Figure 1: Koblenz KCCP-1800 Equinox Bagless Canister Vacuum. This image displays the main unit of the vacuum cleaner, highlighting its gold finish and compact design.
2. Safety Instructions
To reduce the risk of fire, electric shock, or injury, observe the following safety precautions:
- Do not leave the vacuum cleaner unattended when plugged in. Unplug from outlet when not in use and before servicing.
- Do not use outdoors or on wet surfaces.
- Do not allow to be used as a toy. Close attention is necessary when used by or near children.
- Use only as described in this manual. Use only manufacturer’s recommended attachments.
- Do not use with damaged cord or plug. If appliance is not working as it should, has been dropped, damaged, left outdoors, or dropped into water, return it to a service center.
- Do not pull or carry by cord, use cord as a handle, close a door on cord, or pull cord around sharp edges or corners. Do not run appliance over cord. Keep cord away from heated surfaces.
- Do not unplug by pulling on cord. To unplug, grasp the plug, not the cord.
- Do not handle plug or vacuum cleaner with wet hands.
- Do not put any object into openings. Do not use with any opening blocked; keep free of dust, lint, hair, and anything that may reduce air flow.
- Keep hair, loose clothing, fingers, and all parts of body away from openings and moving parts.
- Do not pick up anything that is burning or smoking, such as cigarettes, matches, or hot ashes.
- Do not use to pick up flammable or combustible liquids, such as gasoline, or use in areas where they may be present.
- Do not use without dust cup and/or filters in place.
3. Components and Assembly
3.1 Package Contents
Your Koblenz KCCP-1800 vacuum includes the following components:
- Main Canister Unit
- Flexible Hose
- Telescopic Wand
- Floor Nozzle (with Pet Turbo Brush)
- Crevice Tool
- Dusting Brush

Figure 2: All included components. This image shows the main vacuum unit along with its flexible hose, telescopic wand, floor nozzle, crevice tool, and dusting brush.
3.2 Assembly Instructions
- Attach the Hose: Insert the end of the flexible hose into the suction inlet on the main canister unit until it clicks securely into place.
- Connect the Telescopic Wand: Attach the other end of the flexible hose to the telescopic wand. Ensure a firm connection.
- Attach the Floor Nozzle: Connect the floor nozzle (with the Pet Turbo Brush) to the end of the telescopic wand.
- Attach Accessories: The crevice tool and dusting brush can be attached directly to the end of the hose or the telescopic wand as needed for specific cleaning tasks.
4. Operating Instructions
4.1 Powering On/Off
Plug the power cord into a suitable electrical outlet. The vacuum features an ergonomic handle with integrated electronic controls. Press the power button on the handle to turn the vacuum on or off.
4.2 Adjusting Suction
The electronic controls on the handle allow for adjustment of suction power. Select the appropriate suction level for the surface being cleaned. Lower suction is suitable for delicate fabrics, while higher suction is ideal for carpets and heavily soiled areas.
4.3 Using Attachments
- Floor Nozzle with Pet Turbo Brush: This attachment is designed for effective cleaning on both carpets and hard floors. The turbo brush helps agitate and lift dirt and pet hair from surfaces.
- Crevice Tool: Use the crevice tool for cleaning tight spaces, corners, and along edges.
- Dusting Brush: The dusting brush is suitable for cleaning delicate surfaces, furniture, and curtains.
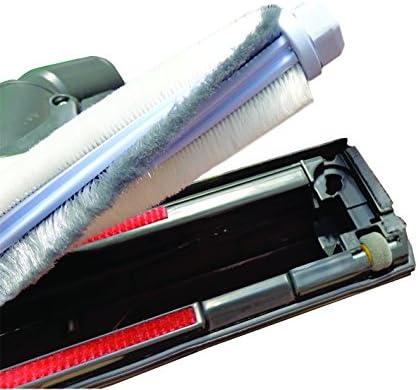
Figure 3: Pet Turbo Brush detail. This image shows the brush roll of the floor nozzle, designed to effectively pick up pet hair and debris.

Figure 4: Crevice tool in use. The crevice tool is shown cleaning a narrow gap between bed cushions, demonstrating its utility for hard-to-reach areas.

Figure 5: Dusting brush in use. This image illustrates the dusting brush being used to clean a sofa, highlighting its soft bristles for gentle cleaning.
5. Maintenance
Regular maintenance ensures optimal performance and extends the life of your vacuum cleaner.
5.1 Emptying the Dust Bin
The Koblenz KCCP-1800 features a bagless design with a 2-liter dust bin. Empty the dust bin when the dirt reaches the 'MAX' fill line or after each use for best performance.
- Ensure the vacuum is unplugged from the power outlet.
- Locate the dust bin release button on the canister unit.
- Press the button and carefully remove the dust bin.
- Position the dust bin over a trash receptacle and open the bottom flap to release the contents.
- Close the flap and reattach the dust bin to the canister unit, ensuring it clicks into place.

Figure 6: Emptying the dust bin. A hand is shown holding the open dust bin, ready to dispose of collected debris.
5.2 Cleaning Filters
The vacuum utilizes an advanced microfiber filtration system and cyclonic technology to separate dust. Regularly clean the filters to maintain suction power.

Figure 7: Cyclonic technology diagram. This illustration shows the internal airflow path within the dust bin, demonstrating how cyclonic action separates dust from the air before it reaches the filters.
- Unplug the vacuum.
- Remove the dust bin as described above.
- Access the filters (typically located within or near the dust bin). Refer to the diagrams on the unit for exact filter locations.
- Tap filters gently over a trash can to remove loose dirt. If washable, rinse under cool water until water runs clear.
- Allow filters to air dry completely for at least 24 hours before reinserting. Do not use the vacuum with wet filters.
5.3 Brush Roll Maintenance
Periodically check the Pet Turbo Brush for tangled hair or debris. Unplug the vacuum before performing any maintenance on the brush roll. Use scissors to carefully cut away any tangled hair or threads.
6. Troubleshooting
If your vacuum cleaner is not operating correctly, consult the table below for common issues and solutions.
| Problem | Possible Cause | Solution |
|---|---|---|
| Vacuum does not turn on | Not plugged in; no power at outlet; power button not pressed | Check plug and outlet; press power button firmly |
| Loss of suction | Dust bin full; filters clogged; hose/attachments blocked | Empty dust bin; clean/replace filters; check for and clear blockages |
| Unusual noise | Blockage in hose/nozzle; foreign object in brush roll | Inspect and clear blockages; remove foreign objects from brush roll |
| Brush roll not spinning | Tangled hair/debris; belt broken (if applicable) | Clean brush roll; contact customer support if belt is suspected to be broken |
7. Specifications
- Model: KCCP-1800
- Brand: Koblenz
- Special Feature: Bagless, Cyclonic Technology
- Motor: 1800 Watts / 2.41 Horsepower
- Amperage: 7 Amps
- Filter Type: Advanced Microfiber Filtration (Cloth)
- Dust Bin Capacity: 2 Liters
- Noise Level: 68 Decibels
- Power Source: Corded Electric
- Product Dimensions: 9.84 x 15.75 x 9.84 inches
- Item Weight: 10.78 pounds
- Surface Recommendation: Carpet, Hard Floors
- Control Method: Touch / Push Button (Ergonomic handle with integrated electronic control)
8. Warranty and Support
For warranty information, technical support, or to order replacement parts, please refer to the contact information provided with your purchase documentation or visit the official Koblenz website. Keep your proof of purchase for warranty claims.


