
Introduction
Thank you for choosing the Candy FCXP615X Built-In Electric Single Wall Oven. This manual provides essential information for the safe and efficient use of your new appliance. Please read these instructions carefully before installation and use, and keep them for future reference. Proper installation, operation, and maintenance will ensure optimal performance and longevity of your oven.
Safety Information
Your safety and the safety of others are paramount. Please observe all safety warnings and precautions.
- Electrical Safety: Ensure the oven is correctly earthed and connected to a suitable power supply. Do not use adapters or extension cords. Disconnect power before any maintenance or cleaning.
- Hot Surfaces: The oven and its accessible parts become hot during use. Exercise caution to avoid touching heating elements. Keep children away.
- Supervision: Never leave the oven unattended during operation, especially when cooking with oil or fat, as these can ignite.
- Cleaning: Always allow the oven to cool down before cleaning. Use appropriate cleaning agents and methods as described in the maintenance section.
- Ventilation: Ensure adequate ventilation around the appliance as specified in the installation instructions.
Product Overview
The Candy FCXP615X is a modern built-in electric oven designed for seamless integration into your kitchen. It features a sleek stainless steel finish and a user-friendly control panel.

Image Description: This image displays the front of the Candy FCXP615X oven. It features a dark glass door with a stainless steel handle and trim. Above the door is the control panel, which includes two rotary knobs (one for temperature, one for function selection) and a central digital display with touch controls for time and settings. The interior of the oven is visible through the glass, showing a single wire rack.
Key components include the control panel with rotary selectors and a digital display, the oven door with a large viewing window, and the spacious oven cavity equipped with a fan for even heat distribution.
Installation
Proper installation is crucial for the safe and efficient operation of your oven. It must be installed by a qualified technician in accordance with local regulations.
Pre-installation Checks
- Ensure the cabinet opening dimensions match the oven's requirements.
- Verify that the electrical supply meets the oven's specifications (220 Volts, dedicated circuit).
- Check for adequate ventilation space around the appliance.
Mounting the Oven
The oven is designed to be built into a standard kitchen cabinet. Refer to the diagram below for precise measurements and clearances.

Image Description: This diagram illustrates the typical installation of a built-in oven within a kitchen cabinet. It shows the oven being slid into a dedicated compartment. Key dimensions are indicated in millimeters: the oven itself measures 595mm in width and height, and 567mm in depth. The cabinet opening requires a width of 560mm, a height of 585mm, and a minimum depth of 560mm. A small gap of 22mm is shown at the bottom for ventilation or support.
- Carefully slide the oven into the prepared cabinet opening.
- Secure the oven to the cabinet using the screws provided, typically through holes located on the oven frame.
- Ensure the oven is level and stable.
Electrical Connection
Connect the oven to the main power supply according to the wiring diagram provided with the appliance and local electrical codes. This connection must be performed by a qualified electrician.
Controls and Display
The Candy FCXP615X oven features intuitive controls for easy operation.
- Function Selector Knob: Located on the right, this knob allows you to choose various cooking modes (e.g., Convection, Grill, Defrost).
- Temperature Selector Knob: Located on the left, this knob sets the desired cooking temperature.
- Digital Display: The central display shows the current time, cooking duration, and other settings. It also features touch controls for setting the timer and adjusting other parameters.
Operating Instructions
First Use (Setting the Clock)
- Upon first connection to power, the display will flash.
- Use the '+' and '-' touch buttons on the digital display to set the current time.
- Confirm the setting by pressing the 'Select' button or waiting a few seconds for it to set automatically.
Selecting a Cooking Function
- Turn the Function Selector Knob to the desired cooking mode. The corresponding symbol will appear on the display.
Setting the Temperature
- After selecting a function, turn the Temperature Selector Knob to the desired temperature. The display will show the set temperature.
Using the Timer
- Press the timer button on the digital display.
- Use the '+' and '-' buttons to set the desired cooking duration.
- The oven will automatically switch off once the set time has elapsed.
Preheating
For best results, preheat the oven to the desired temperature before placing food inside. The oven will indicate when the set temperature has been reached.
Cooking Modes
- Convection: Uses a fan to circulate hot air, ensuring even cooking and faster results. Ideal for roasting and baking multiple dishes.
- Grill: Provides intense heat from the top element, perfect for browning and toasting.
- Defrost: Circulates air at room temperature to gently thaw frozen foods.
Maintenance and Cleaning
Regular cleaning and maintenance will keep your oven in optimal condition.
General Cleaning
- Exterior: Clean the exterior surfaces with a soft cloth and mild detergent. Avoid abrasive cleaners or scourers.
- Interior: For light soiling, wipe the interior with a damp cloth after each use once the oven has cooled. For heavier grease, use a specialized oven cleaner, following the product instructions carefully.
- Oven Door: Clean the glass door with a non-abrasive glass cleaner.
- Accessories: Remove and wash oven racks and trays in warm soapy water or in a dishwasher.
Replacing the Oven Light
Ensure the oven is disconnected from the power supply before attempting to replace the oven light bulb. Unscrew the protective cover, replace the bulb with a new one of the same type (heat-resistant), and reattach the cover.
Troubleshooting
If you encounter any issues with your oven, refer to the table below for common problems and their solutions.
| Problem | Possible Cause | Solution |
|---|---|---|
| Oven does not heat | No power supply; incorrect settings; fuse tripped. | Check power connection; ensure correct function and temperature are set; check household fuse box. |
| Light not working | Bulb is faulty. | Replace the oven light bulb (see Maintenance section). |
| Uneven cooking | Incorrect rack position; overloaded oven; door not fully closed. | Use recommended rack positions; avoid overcrowding; ensure door is sealed properly. |
| Oven smokes during first use | Residue from manufacturing process. | This is normal. Run the oven empty at maximum temperature for 30 minutes to burn off residues. Ensure good ventilation. |
Specifications
Detailed technical specifications for the Candy FCXP615X Built-In Electric Single Wall Oven.
| Specification | Value |
|---|---|
| Brand | Candy |
| Model Number | FCXP615X |
| Product Dimensions (HxWxD) | 59.5 x 59.5 x 56.7 cm |
| Item Weight | 19 Kilograms |
| Fuel Type | Electric |
| Installation Type | Wall Mount |
| Heating Method | Convection |
| Voltage | 220 Volts |
| Wattage | 220 watts |
| Timer Function | Available |
| Finish Type | Brushed |
| Colour | Black |
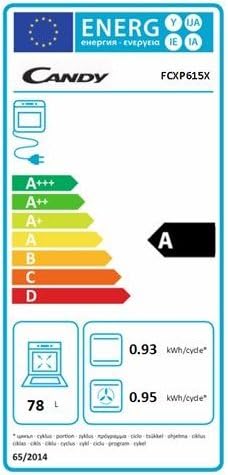
Image Description: This image displays the energy efficiency label for the Candy FCXP615X oven. It indicates an energy class rating of 'A', with energy consumption values of 0.93 kWh/cycle for conventional heating and 0.95 kWh/cycle for forced air convection. The usable volume of the oven cavity is stated as 78 liters.
Warranty and Customer Support
Your Candy FCXP615X oven comes with a manufacturer's warranty. Please refer to the warranty card included with your purchase for specific terms and conditions. For technical assistance, spare parts, or to schedule a service appointment, please contact Candy customer support. Contact details can typically be found on the manufacturer's website or in your purchase documentation.


