
1. Product Overview
The Yamata FY747A is an industrial-grade high-speed interlock serger overlock machine, specifically designed for professional sewing applications. It is ideal for overclocking and finishing edges on a variety of materials, ranging from light to medium weight. This machine is engineered for high productivity and delivers stable, clean, and beautiful stitch finishes even when operating at its maximum speed.
Key features include a low sewing tension system, ensuring consistent stitch quality, and an automatic lubrication device for smooth and reliable operation. The machine comes complete with a sewing machine table, a variable-speed servo motor (0-3000 RPM, 3/4 HP), and essential accessories, all packaged new in factory-sealed boxes.

Image 1.1: Complete setup of the Yamata FY747A Industrial Serger Overlock Machine, including the machine head, integrated table, and foot pedals.
2. Specifications
The Yamata FY747A model offers robust performance tailored for industrial use. Below are the detailed specifications:
| Specification | Value |
|---|---|
| Needle Gauge | 3 mm |
| Stitch Width | 5 mm |
| Stitch Length | 3.6 mm |
| Differential Ratio | 0.7-2 |
| Presser Foot Height | 5.5 mm |
| Needle Type | DCx27 #11-#18 |
| Motor Speed (Clutch Motor) | 3450 r.p.m. |
| Sewing Speed (Max) | 7500 spm |
| Product Dimensions (L x W x H) | 71.12 x 43.18 x 12.7 cm |
| Product Weight | 31.3 kg |
| Material | Plastic, Stainless Steel |
| Power Source | Corded Electric |
| UPC | 760781218888 |

Image 2.1: Comparison chart for Yamata FY737A, FY747A, and FY757A models, highlighting key specifications.
3. Setup
The Yamata FY747A machine requires assembly upon arrival. Professional assembly is recommended and often included with purchase. Follow these general steps for initial setup:
- Unpacking: Carefully unpack all components from their factory-sealed boxes. Verify that all parts, including the machine head, table, motor, and accessories, are present and undamaged.
- Table Assembly: Assemble the sewing machine table according to the provided diagrams. Ensure all bolts and fasteners are securely tightened for stability.
- Machine Head Installation: Mount the machine head onto the designated opening in the table. Secure it firmly using the provided mounting hardware.
- Motor and Pedal Installation: Install the variable-speed servo motor beneath the table. Connect the motor to the foot pedal mechanism. Ensure all electrical connections are secure and properly insulated.
- Initial Threading: Refer to the detailed threading diagrams in the complete instruction manual for proper initial threading of the machine. Correct threading is crucial for optimal stitch formation.

Image 3.1: Close-up view of the variable-speed servo motor, showing its speed adjustment dial.
4. Operating Instructions
Operating the Yamata FY747A is straightforward once assembled. This machine is designed for continuous, high-speed operation.
- Power On: Connect the machine to a suitable power outlet. Turn on the main power switch, usually located on the motor or control box.
- Speed Control: The variable-speed servo motor allows precise control over sewing speed. Use the foot pedal to regulate the speed from 0 to 3000 RPM. For delicate work or initial learning, start at a lower speed.
- Material Feeding: Place the fabric under the presser foot. Lower the presser foot using the lever. Gently guide the fabric as you press the foot pedal to begin sewing. The machine's differential feed mechanism helps manage various fabric types and prevent puckering or stretching.
- Stitch Quality: The machine's low sewing tension system contributes to clean and consistent stitches. If stitch quality issues arise, first check threading and needle condition.
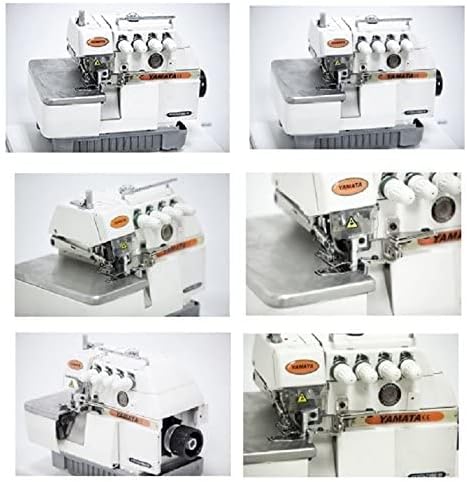
Image 4.1: Various detailed views of the Yamata FY747A machine head, highlighting different angles and components.
5. Maintenance
Regular maintenance ensures the longevity and optimal performance of your Yamata FY747A machine.
- Self-Lubrication: The machine features an automatic lubrication system. Ensure the oil reservoir is adequately filled with the recommended sewing machine oil. Check oil levels regularly.
- Cleaning: Periodically clean lint and dust from the machine's moving parts, especially around the needle plate, feed dogs, and loopers. Use a soft brush or compressed air.
- Needle Replacement: Replace needles (DCx27 #11-#18) regularly, especially when working with different fabric types or if you notice skipped stitches or fabric damage. Always use the correct needle type and size for your material.
- Belt Inspection: Check the motor belt for wear and tear. Replace if cracks or excessive looseness are observed.

Image 5.1: An included accessory, a flexible LED light, which can be attached to the machine for improved visibility during operation.
6. Troubleshooting
This section provides general guidance for common issues. For detailed troubleshooting, refer to the comprehensive manual.
- Skipped Stitches: Check if the needle is bent or dull. Ensure the needle is inserted correctly and is the appropriate type for the fabric. Verify proper threading.
- Thread Breakage: Inspect the thread path for snags or rough spots. Ensure the thread tension is correctly set. Use good quality thread. Check for burrs on the needle or loopers.
- Uneven Stitches/Puckering: Adjust the differential feed ratio according to the fabric type. Ensure presser foot pressure is appropriate. Verify correct threading and tension settings.
- Machine Noise/Vibration: Check for loose screws or components. Ensure the machine is properly lubricated. If the noise persists, consult a qualified technician.
7. Warranty and Support
The Yamata FY747A machine comes with a limited warranty:
- Machine Head: 6 months warranty
- Motor: 1 year warranty
For technical support, parts, or warranty claims, please contact your authorized Yamata dealer or the customer service department. Ensure you have your purchase receipt and machine model number (FY747A) available when contacting support.