
1. Product Overview
The NETGEAR 4G LTE Modem (LB1121) provides a reliable and instant broadband connection by utilizing 4G LTE or 3G fallback. It is designed for simple connectivity, offering download speeds up to 150 Mbps. This compact modem is ideal for various applications, including primary internet access, backup internet, or for use in remote locations where Power-over-Ethernet (PoE) can simplify power delivery.

Figure 1: Front view of the NETGEAR 4G LTE Modem (LB1121) showing the power and signal strength LEDs.
What's in the Box
- 4G LTE Modem (LB1121)
- Power adapter
- Ethernet cable
- Quick start guide
2. Setup
Follow these steps to set up your NETGEAR 4G LTE Modem.
System Requirements
- Compatible 3G/4G LTE Mobile Service (3FF Micro-SIM)
- Microsoft Windows 7, 8, 8.1, 10, Vista, XP, Mac OS (10.6.8 and newer) and other operating systems running a TCP/IP network (for accessing Web Management User Interface)
- Compatible browsers such as Microsoft Internet Explorer 5.0, Firefox 2.0, Safari 1.4, or Google Chrome 11.0 browsers or higher (for accessing Web Management User Interface)
SIM Card Installation
- Locate the SIM card slot on the bottom of the modem.
- Remove the SIM card cover by sliding it to the left until it clicks, then lift it up.
- Insert your 3FF Micro-SIM card into the slot with the gold contacts facing down.
- Push the SIM card gently until it locks into place.
- Replace the SIM card cover and slide it to the right until it clicks to secure it.

Figure 2: Bottom view of the modem, highlighting the SIM card slot and product information label.
Connecting Power and Ethernet
- Connect the provided power adapter to the modem's power input port (12V==1A).
- Plug the power adapter into a wall outlet.
- Connect one end of the Ethernet cable to the blue Ethernet port on the back of the modem.
- Connect the other end of the Ethernet cable to your router, switch, or computer.
- If using Power over Ethernet (PoE), ensure your connected device supports PoE and provides power to the modem via the Ethernet cable.
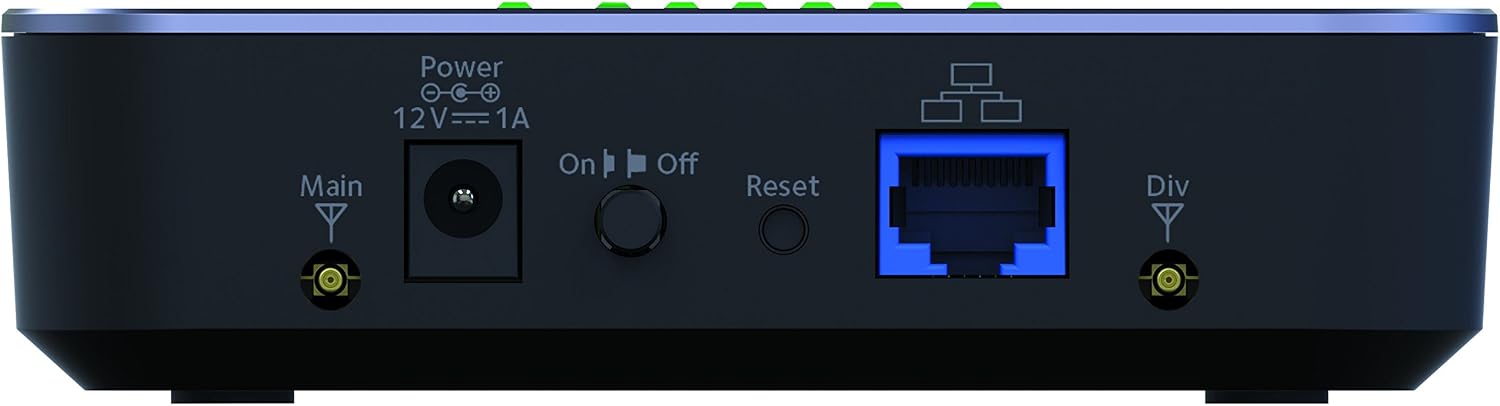
Figure 3: Rear view of the modem, detailing the power input, on/off switch, reset button, Ethernet port, and antenna connectors.
Optional: Connecting External Antennas
For improved signal reception, you can connect optional 4G/3G antennas to the two TS-9 connectors labeled 'Main' and 'Div' on the back of the modem.
- Carefully screw the external antennas onto the 'Main' and 'Div' ports.
- Position the antennas for optimal signal strength.
3. Operating the Modem
Once connected, power on the modem using the On/Off switch on the back. The modem will automatically attempt to connect to the 4G LTE or 3G network.
LED Indicators
The front panel LEDs provide status information:
- Power LED: Indicates power status.
- Signal Strength LEDs: Multiple bars indicate the strength of the 4G LTE/3G signal. More illuminated bars mean stronger signal.
- Ethernet LED: Illuminates when an active Ethernet connection is established.

Figure 4: The modem's front panel showing all signal strength LEDs illuminated, indicating optimal network connection.
Web Management User Interface
To access advanced settings and monitor your connection, open a web browser and navigate to the modem's default access IP address (usually 192.168.5.1). The default password is printed on the label on the bottom of the modem. From this interface, you can configure settings such as APN, network mode, and view data usage.
4. Maintenance
Regular maintenance ensures optimal performance of your modem.
Firmware Updates
The modem supports SMS message alerts for firmware updates. It is recommended to keep your modem's firmware up to date to ensure the latest features, security patches, and performance improvements.
Reset Button
A reset button is located on the back of the modem (refer to Figure 3). To perform a factory reset, use a paperclip to press and hold the reset button for approximately 10 seconds while the modem is powered on. This will restore the modem to its default factory settings.
5. Troubleshooting
If you encounter issues with your modem, refer to the following common troubleshooting steps.
No Signal or Weak Signal
- Check the signal strength LEDs on the front panel. If they are red or show few bars, the signal is weak.
- Relocate the modem to an area with better cellular reception, ideally near a window.
- Consider connecting optional external 4G/3G antennas to improve signal strength.
- Verify that your SIM card is properly inserted and active with your mobile service provider.
No Internet Connection via Ethernet
- Ensure the Ethernet cable is securely connected to both the modem and your device (router/computer). The Ethernet LED on the modem should be illuminated.
- Check the network settings on your connected device to ensure it is configured to obtain an IP address automatically (DHCP).
- Restart the modem by toggling the On/Off switch.
- Access the Web Management User Interface and verify the APN settings are correct for your mobile service provider. Some carriers may require manual APN configuration.
Modem Not Powering On
- Ensure the power adapter is securely connected to the modem and a working power outlet.
- Verify the On/Off switch is in the 'On' position.
- If using PoE, ensure the PoE source is active and providing sufficient power.
6. Specifications
| Brand | NETGEAR |
| Model Number | LB1121-100NAS |
| Wireless Type | Radio Frequency (4G LTE, 3G fallback) |
| Connectivity Technology | Ethernet |
| Total Ethernet Ports | 1 |
| Power Input | 12V==1A (Barrel Style) |
| Item Weight | 6.4 ounces |
| Product Dimensions (LxWxH) | 4.7 x 3.9 x 1.2 inches |
| Color | White |
7. Warranty and Support
For detailed warranty information and technical support, please refer to the official NETGEAR website or the quick start guide included with your product.
Additional resources, including a comprehensive User Guide, may be available for download from the NETGEAR support page for model LB1121.
No official seller videos were provided for this product that meet the embedding criteria.