
Intex 28712NP
Intex Prism Frame Pool Kit User Manual
Model: 28712NP
Introduction
This manual provides essential information for the safe and efficient setup, operation, and maintenance of your Intex Prism Frame Pool Kit. Please read all instructions carefully before assembly and use to ensure proper functioning and longevity of your pool.

Figure 1: The Intex Prism Frame Pool in use, showing its sturdy frame and spacious design for family enjoyment.
Safety Information
Always prioritize safety when using any swimming pool. Failure to follow these instructions can result in serious injury or death.
- Never leave children unattended in or around the pool.
- Ensure adequate supervision by a competent adult at all times.
- Do not dive or jump into the pool. The water depth is not sufficient for diving.
- Keep electrical cords and devices away from the pool area.
- Install appropriate fencing or barriers around the pool to prevent unsupervised access, especially by young children.
- Maintain proper water chemistry to prevent waterborne illnesses.
- Empty the pool completely when not in use for extended periods or for winter storage.
Setup
1. Site Preparation
Select a firm, level surface for your pool. The area must be free of sharp objects, debris, and excessive slopes. A slight incline can cause the pool to collapse or water to overflow unevenly.
- Clear the area of any rocks, roots, or other sharp objects.
- Ensure the ground is perfectly level. Use a spirit level if necessary.
- Consider placing a ground cloth (not included) under the pool for added protection.
2. Assembly Steps
Unpack all components and identify them using the parts list in your separate assembly guide. Follow the numerical sequence for connecting the frame pieces.

Figure 2: The assembled frame of the Intex Prism Frame Pool before filling, demonstrating the robust metal structure.
- Lay out the pool liner on the prepared, level ground.
- Assemble the horizontal beams by sliding them through the sleeves at the top of the liner.
- Connect the vertical legs to the horizontal beams using the provided pins. Ensure all connections are secure.
- Gently pull the liner outwards to ensure it is evenly spread and wrinkle-free at the bottom.
3. Pump Connection
The included filter pump is essential for maintaining water clarity. Connect it according to the instructions provided with the pump.
- Attach the hoses from the pool's inlet and outlet fittings to the corresponding ports on the filter pump.
- Ensure all connections are tightened to prevent leaks.
- Place the pump on a stable, level surface, at least 2 meters (6.5 feet) away from the pool.
4. Filling the Pool
Begin filling the pool with water. As the water level rises, gently smooth out any remaining wrinkles on the bottom of the liner by pushing them towards the center.
- Fill the pool to the indicated fill line, typically just below the top horizontal beam.
- Do not overfill the pool.
Operating
1. Water Treatment
Proper water chemistry is vital for a clean and safe swimming environment. Consult a pool chemical supplier for specific recommendations based on your local water conditions.
- Regularly test the water for pH, chlorine, and alkalinity levels.
- Add appropriate chemicals as needed to maintain balanced water.
- Always follow chemical manufacturer's instructions for dosage and safe handling.
2. Filter Pump Operation
The filter pump circulates and filters the pool water. Operate the pump daily for several hours to ensure proper filtration.

Figure 3: Detail of the Hydro Aeration Technology outlet, which helps improve water circulation and clarity by introducing air into the water.
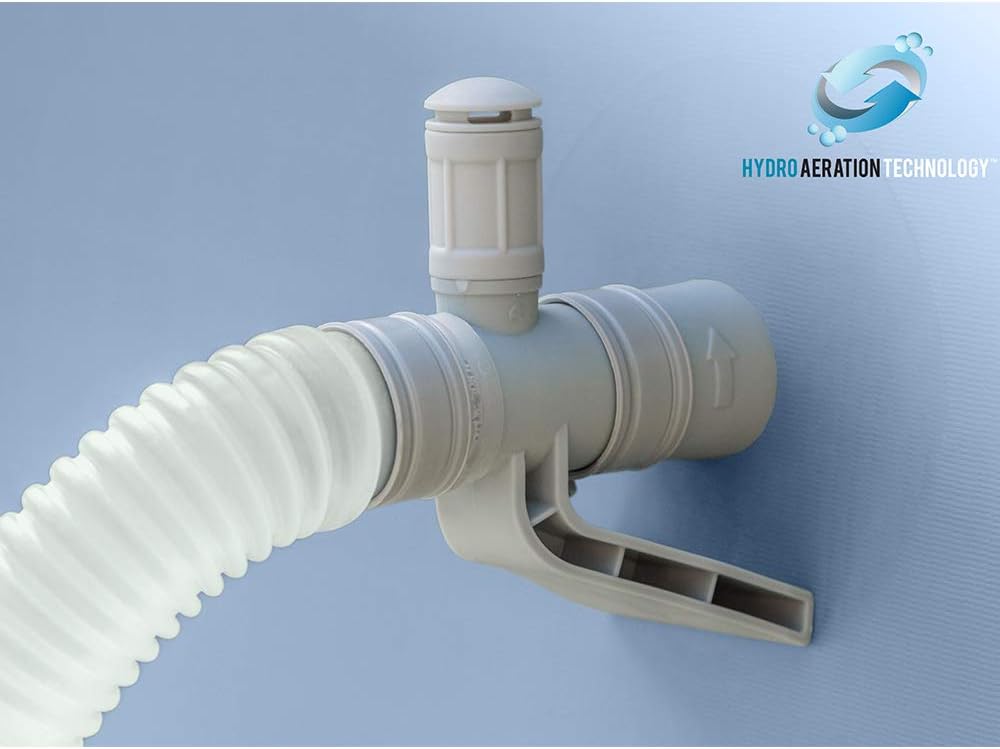
Figure 4: The Hydro Aeration Technology valve and hose connection, part of the filtration system for enhanced water quality.
- Ensure the pump is plugged into a grounded electrical outlet with a Ground Fault Circuit Interrupter (GFCI).
- Do not run the pump when people are in the pool.
- Refer to the pump's specific manual for detailed operating instructions and timer settings.
Maintenance
1. Cleaning the Pool
Regular cleaning prevents algae growth and keeps the pool inviting.
- Skim the surface daily to remove leaves and debris.
- Brush the pool walls and bottom weekly to dislodge dirt and algae.
- Vacuum the pool floor as needed using a pool vacuum (sold separately).
2. Filter Cartridge Cleaning and Replacement
The filter cartridge traps debris and should be cleaned frequently.
- Turn off and unplug the filter pump before cleaning or replacing the cartridge.
- Remove the filter housing cover and take out the cartridge.
- Rinse the cartridge thoroughly with a garden hose.
- Replace the cartridge every two weeks or sooner if it remains dirty after rinsing.
3. Patching Leaks
In the event of a small puncture, a repair patch kit (often included or sold separately) can be used.
- Locate the leak.
- Clean and dry the area around the puncture.
- Apply the patch according to the patch kit instructions. Allow sufficient time for the adhesive to cure.
4. Winterization and Storage
Proper winterization protects your pool during colder months and extends its lifespan.
- Completely drain the pool water. The drain plug is located near the bottom of the liner.
- Disassemble the frame and liner. Clean all components thoroughly.
- Ensure all parts are completely dry before folding the liner and storing the components in a dry, protected area, away from extreme temperatures and pests.
Troubleshooting
| Problem | Possible Cause | Solution |
|---|---|---|
| Water is cloudy or green | Improper water chemistry, insufficient filtration, algae growth. | Test water and adjust chemicals. Run filter pump longer. Clean or replace filter cartridge. Shock treat the pool. |
| Pump not running | Not plugged in, GFCI tripped, motor issue. | Check power connection. Reset GFCI. Consult pump manual or contact customer service. |
| Water leaking from pool | Puncture in liner, loose hose connection. | Locate and patch puncture. Tighten hose clamps. |
| Pool frame unstable | Uneven ground, incorrect assembly. | Drain pool and re-level ground. Re-check assembly instructions. |
Specifications
| Feature | Detail |
|---|---|
| Product Dimensions (L x W x H) | 366 cm (diameter) x 76 cm (height) |
| Capacity (90%) | 6,503 Liters |
| Model Number | 28712NP |
| Weight | 21.7 Kilograms |
| Material | STEEL (48%), PVC (34%), PET (9%), PP (5%), PE (4%) |
| Shape | Round |
| Color | Light Blue |
| Components Included | Pool and pump |
| Assembly Required | Yes |
| International Article Code (EAN) | 06941057405087 |
Warranty and Support
While specific warranty details are not provided in this manual, Intex products typically come with a manufacturer's warranty covering defects in materials and workmanship. Please retain your proof of purchase for any warranty claims.
For technical assistance, missing parts, or warranty inquiries, please contact Intex customer service directly. Refer to the contact information provided on the product packaging or the official Intex website.
Return Policy: This product may be eligible for a refund or replacement within 30 days of purchase, subject to the retailer's return policy.
Related documents28712NP


Ask a question about this manual
Ask about setup, troubleshooting, compatibility, parts, safety, or missing instructions. Manuals+ will review the question and use this page’s manual context to help answer it.