1. Product Overview
This document provides comprehensive instructions for the installation, operation, and maintenance of the Mopar 56038978AL Genuine Rear View Back Up Camera. This camera is an Original Equipment Manufacturer (OEM) part designed to provide clear rearward visibility for safe vehicle operation.
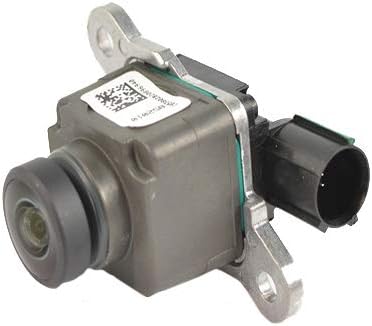
Figure 1.1: Angled view of the Mopar 56038978AL Rear View Back Up Camera, showing the lens and connector.
Key Features:
- Vehicle Specific Fit: Engineered for precise fitment in compatible vehicles.
- Genuine Mopar Part: Ensures compatibility and performance as per manufacturer standards.
- Compact Design: Product dimensions are approximately 3 x 2 x 2 inches.
- Lightweight: Weighs approximately 1.44 ounces.
2. Compatibility
The Mopar 56038978AL Rear View Back Up Camera is compatible with the following vehicle models:
- 2013-2015 Dodge RAM 1500
- 2013-2015 Dodge RAM 2500
- 2013-2015 Dodge RAM 3500
- 2013-2015 Dodge RAM 4500
- 2013-2013 Dodge RAM 5500
- 2013-2015 Dodge Viper
- 2015 Chrysler 200
For verification of application, it is recommended to consult a Mopar service center or provide your Vehicle Identification Number (VIN) to a certified dealer.
3. Safety Information
Always prioritize safety during installation and operation. Failure to follow these guidelines may result in injury or damage to the vehicle.
- Ensure the vehicle's ignition is off and the battery is disconnected before beginning any electrical work.
- Wear appropriate personal protective equipment, such as safety glasses and gloves.
- Refer to your vehicle's service manual for specific instructions regarding tailgate removal or access.
- Do not force connectors; ensure proper alignment before pushing them together.
- After installation, verify that all components are securely fastened and that the camera functions correctly before driving.
4. Package Contents
The package for the Mopar 56038978AL Rear View Back Up Camera typically includes:
- 1 x Mopar 56038978AL Rear View Back Up Camera unit
Inspect the package upon receipt to ensure all components are present and undamaged.
5. Setup and Installation
This section outlines the general steps for replacing the rear view camera. Specific vehicle configurations may vary. It is recommended to consult a professional if you are unsure about any step.
Tools Required:
- T25 Hexagonal Screwdriver (Torx bit)
- T15 Hexagonal Screwdriver (Torx bit) or small socket wrench with T15 bit
- 8mm Socket Wrench (for some models)
- Magnetic retrieval tool (optional, but recommended for small screws)
- Trim removal tools (optional)
Installation Steps:
- Prepare the Vehicle: Park the vehicle on a level surface, engage the parking brake, and turn off the ignition. Disconnect the negative terminal of the vehicle's battery for safety.
- Access Tailgate Interior: Lower the tailgate. Using a T25 hexagonal screwdriver, remove the approximately 8 screws securing the inner access panel on the tailgate. Carefully remove the access panel.
- Locate and Remove Old Camera: The camera unit is typically mounted near the tailgate handle. It is usually secured by two T15 Torx screws. Use a T15 bit (or an 8mm socket wrench if applicable for tailgate handle removal) to unscrew these. A magnetic bit or retrieval tool can prevent screws from falling into inaccessible areas.
- Disconnect Wiring: Once the screws are removed, carefully pull the old camera unit out. Disconnect the electrical connector from the back of the camera. Note the orientation of the connector, often indicated by a green line for proper alignment.
- Install New Camera: Connect the electrical plug to the new Mopar 56038978AL camera, ensuring the green alignment line (if present) matches. Insert the new camera into its mounting position and secure it with the two T15 Torx screws.
- Reassemble Tailgate: Reattach the inner access panel to the tailgate using the T25 hexagonal screws. Ensure all screws are tightened securely.
- Reconnect Battery and Test: Reconnect the negative terminal of the vehicle's battery. Start the vehicle and shift into reverse to test the new camera's functionality. Verify that the image is clear and displays correctly on your vehicle's screen.

Figure 5.1: Rear view of the camera, highlighting the mounting brackets and electrical connector for installation reference.
6. Operating Instructions
The Mopar 56038978AL Rear View Back Up Camera operates automatically in conjunction with your vehicle's transmission system.
- When the vehicle is shifted into REVERSE, the camera automatically activates and displays the rearward view on your vehicle's infotainment screen.
- The display may include dynamic guidelines that assist with parking and maneuvering, depending on your vehicle's factory configuration.
- When the vehicle is shifted out of REVERSE, the camera display will typically revert to the previous screen or turn off.
Always use the rear view camera as an aid and not as a sole means of rearward visibility. Always check your surroundings visually before backing up.
7. Maintenance
To ensure optimal performance and longevity of your Mopar Rear View Back Up Camera, follow these maintenance guidelines:
- Lens Cleaning: Periodically clean the camera lens with a soft, damp cloth and mild soap solution. Avoid abrasive cleaners or harsh chemicals that could scratch the lens.
- Inspection: Regularly inspect the camera unit and its wiring for any signs of damage, corrosion, or loose connections.
- Environmental Factors: Protect the camera from extreme temperatures, direct impacts, and prolonged exposure to harsh weather conditions.
8. Troubleshooting
If you experience issues with your rear view camera, consider the following troubleshooting steps:
| Problem | Possible Cause | Solution |
|---|---|---|
| No image on screen when in reverse | Loose or disconnected wiring; faulty camera unit; vehicle system issue. | Check all electrical connections. Ensure the camera is properly seated. Consult a professional for system diagnostics. |
| Blurry or distorted image | Dirty lens; moisture inside lens; faulty camera unit. | Clean the camera lens. If moisture is present, the unit may need replacement. |
| Image too bright/washed out | Exposure settings (less common for OEM); faulty camera unit. | Ensure the lens is clean. If the issue persists, the camera may be defective. |
| Incorrect or missing guidelines | Vehicle system calibration; non-OEM camera (not applicable here). | This OEM camera should provide correct guidelines if your vehicle supports them. If not, consult a Mopar service center for system recalibration. |
If these steps do not resolve the issue, contact a certified Mopar service technician for further assistance.
9. Specifications
| Specification | Detail |
|---|---|
| Model Number | 56038978AL |
| Brand | Mopar |
| Manufacturer | MOPAR |
| Item Weight | 1.44 ounces |
| Product Dimensions | 3 x 2 x 2 inches |
| Voltage | 12 Volts |
| Installation Type | Surface Mount |
| Compatible Devices | Monitor |
| Optical Sensor Technology | CCD, CMOS |
| Lens Type | Wide Angle |
| Real Angle of View | 120 Degrees |
| Connector Type | RCA |
| Optical Sensor Size | 1/3 inch |
10. Warranty and Support
As a genuine Mopar part, this product is typically covered by Mopar's standard parts warranty. Warranty terms and conditions may vary based on purchase location and installation method (e.g., dealer installed vs. self-installed).
For specific warranty details, claims, or technical support, please contact your authorized Mopar dealer or visit the official Mopar website. Ensure you have your proof of purchase and vehicle information available.

Figure 10.1: Mopar brand logo, representing genuine parts for Chrysler, Dodge, Jeep, and RAM vehicles.


