1. Introduction
Welcome to your new GRAVITY VGR-640BT car media player. This manual provides detailed instructions for installation, operation, and maintenance to ensure optimal performance and user satisfaction. Please read this manual thoroughly before using the product.
2. Safety Information
For your safety and to prevent damage to the unit, please observe the following:
- Electrical Safety: All connectors are restricted to plug in or plug out only when the unit is disconnected from electricity. Failure to do so may result in electrical shock or damage to the unit.
- Driving Safety: Do not operate complex functions or watch videos while driving. Always prioritize road safety.
- Installation: Ensure professional installation to prevent improper wiring, which can lead to malfunction or damage.
- Ventilation: Do not block ventilation openings. Ensure adequate airflow around the unit.
3. Package Contents
Please check that all items are present in the package:
- GRAVITY VGR-640BT Head Unit
- Wiring Harness
- Mounting Hardware (screws, brackets)
- User Manual
Note: Please refer to your product packaging for a complete and accurate list of included accessories, as contents may vary.
4. Installation
Proper installation is crucial for the performance and longevity of your car media player. It is highly recommended to have this unit installed by a qualified professional.
4.1 Pre-Installation Checklist
- Disconnect the vehicle's negative battery terminal to prevent electrical shorts.
- Ensure you have all necessary tools and mounting hardware.
- Review your vehicle's specific dashboard disassembly instructions.
4.2 Mounting the Unit
The VGR-640BT is a standard double-DIN unit. Use the provided mounting brackets and screws to secure the unit firmly into your vehicle's dashboard opening. Ensure the unit is flush and stable.
4.3 Wiring Connections
Carefully connect the wiring harness to the corresponding ports on the unit and your vehicle's wiring system. Refer to the diagram below for common connections.

Image: Rear view of the GRAVITY VGR-640BT unit, displaying the array of input and output ports for power, speakers, video, and auxiliary connections. This includes the main power harness, RCA outputs for amplifiers, video inputs for rearview cameras, and antenna input.
- Power Connections:
- Yellow Wire: Constant 12V (Battery)
- Red Wire: Accessory 12V (Ignition Switched)
- Black Wire: Ground
- Speaker Outputs: Connect to your vehicle's speakers (Front Left, Front Right, Rear Left, Rear Right). Ensure correct polarity.
- Antenna: Connect your vehicle's radio antenna.
- Rearview Camera Input: Connect the video output from your rearview camera to the designated input.
- Steering Wheel Control: Connect to your vehicle's steering wheel control interface (if applicable).
- AV Outputs/Inputs: Utilize for external monitors or auxiliary audio/video sources.
5. Controls and Functions
The VGR-640BT features a responsive touchscreen interface and physical buttons for intuitive control.
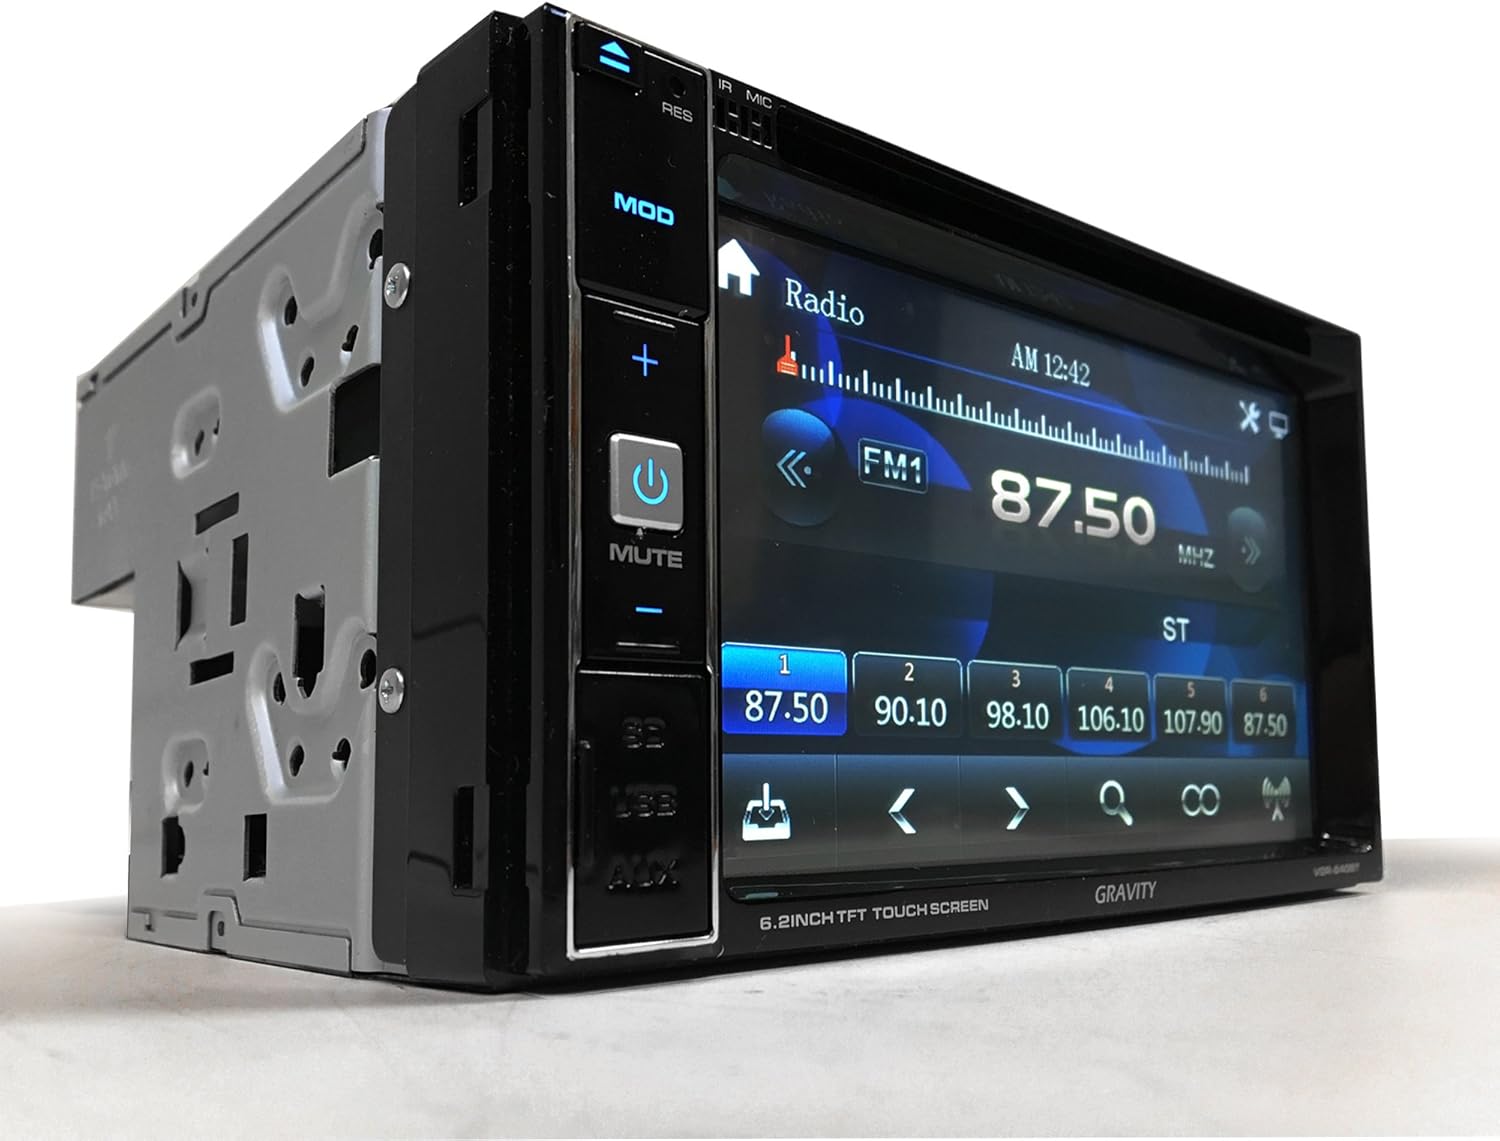
Image: A front three-quarter view of the GRAVITY VGR-640BT car media player, showcasing its 6.5-inch touchscreen display currently showing the radio interface. Physical buttons for 'MOD', volume control, 'MUTE', 'SD', 'USB', and 'AUX' are visible on the left bezel.
5.1 Front Panel Overview
- Touchscreen Display: Primary interface for navigation and control.
- MOD Button: Cycles through available audio/video sources (Radio, DVD/CD, USB, SD, AUX, Bluetooth).
- Power/MUTE Button: Press to power on/off, short press to mute/unmute audio.
- Volume +/- Buttons: Adjusts the audio output level.
- SD/USB/AUX Ports: Front-facing inputs for media and auxiliary devices.
5.2 Basic Operation
- Power On/Off: Press the Power button.
- Source Selection: Press the MOD button or tap the source icon on the touchscreen to switch between functions.
- Volume Adjustment: Use the physical Volume +/- buttons or the on-screen volume control.
5.3 Radio Tuner
- Band Selection: Select AM or FM band on the touchscreen.
- Auto Scan: Initiates an automatic scan for strong stations and saves them to presets.
- Manual Tuning: Use the on-screen arrows to fine-tune frequencies.
- Preset Stations: Tap and hold a preset number to save the current station. Tap to recall. The unit supports 30 radio presets.
5.4 Media Playback (DVD/CD, USB, SD)
- Disc Playback: Insert a DVD, CD, or VCD into the disc slot. The unit will automatically switch to disc mode.
- USB/SD Playback: Insert a USB drive or SD card into the respective slot. Select USB or SD source. The unit supports MP3, MP4, and DIVX formats.
- Navigation: Use the touchscreen controls to browse files, play/pause, skip tracks, and fast forward/rewind.
5.5 Bluetooth Operation
The VGR-640BT features built-in Bluetooth A2DP for music streaming and hands-free calling.
- Pairing:
- Enable Bluetooth on your mobile device (e.g., iPhone, iPad, Android smartphone).
- Select the Bluetooth source on the VGR-640BT.
- Search for available devices on your mobile phone and select "VGR-640BT".
- Confirm pairing if prompted.
- Hands-free Calling: Once paired, you can make and receive calls directly through the unit using the built-in internal microphone.
- Audio Streaming (A2DP): Play music from your paired device wirelessly through the car stereo system.
5.6 Rearview Camera Function
When a rearview camera is connected and the vehicle is shifted into reverse gear, the unit will automatically display the camera feed on the screen, aiding in safe parking and maneuvering.
5.7 Equalizer Settings
Access the equalizer settings from the audio menu to adjust sound characteristics. Preset EQ modes include Rock, POP, and Classic.
6. Setup
Customize your unit's settings to suit your preferences.
6.1 System Settings
- Time and Date: Set the current time and date for accurate display.
- Language: Select your preferred display language.
6.2 Display Settings
- Screen Background: The screen background can be changed easily through the display settings menu.
7. Maintenance
To ensure the longevity and optimal performance of your VGR-640BT, follow these maintenance guidelines:
- Cleaning the Screen: Use a soft, dry, lint-free cloth to clean the touchscreen. Do not use abrasive cleaners or solvents, as they may damage the display.
- General Cleaning: Wipe the unit's exterior with a soft, damp cloth. Avoid getting moisture into any openings.
- Environmental Care: Protect the unit from extreme temperatures, direct sunlight for prolonged periods, and excessive moisture.
8. Troubleshooting
If you encounter issues with your VGR-640BT, refer to the following common problems and solutions:
| Problem | Possible Cause | Solution |
|---|---|---|
| No power | Incorrect wiring, blown fuse, vehicle battery issue | Check power connections (Yellow, Red, Black wires). Inspect vehicle fuses. Ensure battery is charged. |
| No sound | Volume too low, incorrect source, speaker wiring issues, mute activated | Increase volume. Select correct audio source. Check speaker connections. Deactivate mute function. |
| Bluetooth connection fails | Device not discoverable, interference, previous pairing issue | Ensure Bluetooth is enabled on both devices and discoverable. Delete previous pairings and re-pair. Move closer to the unit. |
| Disc/USB/SD read error | Unsupported format, damaged media, dirty disc | Ensure media is in a supported format (MP3, MP4, DIVX). Try a different disc/USB/SD card. Clean the disc. |
| Touchscreen unresponsive | Temporary software glitch | Perform a soft reset by turning the unit off and then on again. If issue persists, consult support. |
If the problem persists after attempting these solutions, please contact customer support.
9. Specifications
Technical specifications for the GRAVITY VGR-640BT:
- Display: 6.5-inch HD Digital TFT LCD Touch Screen
- Resolution: 800 x 480 pixels
- Max Power Output: 4 x 50W
- Media Compatibility: DVD, CD, VCD, MP3, MP4, DIVX
- Connectivity: Bluetooth (A2DP Music Streaming), USB 2.0, Micro SD Card Slot, AUX Input, Rearview Camera Input, Additional AV Output
- Tuner: AM/FM Radio with 30 Presets
- Equalizer: Preset EQ modes (Rock, POP, Classic)
- Anti-Shock: Electronic and Mechanical Anti-Shock System
- Item Weight: Approximately 6 pounds
- Product Dimensions: Approximately 9 x 5.5 x 12 inches (L x W x H)
10. Warranty and Support
For warranty information, please refer to the documentation provided at the time of purchase or contact your retailer. For technical support or service inquiries, please reach out to the manufacturer or the authorized seller.