1. Introduction
This manual provides detailed instructions for the installation, operation, and maintenance of your Commax Doorphone and Vandal-Proof Doorbell system, model DP-2S/DR-2GN. Please read this manual thoroughly before installation and use to ensure proper function and safety.

Image 1.1: The Commax DP-2S Doorphone (left) and DR-2GN Doorbell (right) units.
2. Package Contents
Verify that all components are present in the package:
- 1 x Commax DP-2S Doorphone Unit
- 1 x Commax DR-2GN Doorbell Unit
- Mounting Screws and Anchors
- User Manual (this document)
3. Specifications
Detailed technical specifications for the Commax DP-2S/DR-2GN system:
| Component | Specification | Value |
|---|---|---|
| DP-2S Doorphone | Power Source | AC 110V 50/60Hz |
| Wiring (Call) | 2 wires | |
| Wiring (Door Release) | 2 wires (1.6Ø Copper wire) | |
| Mount Type | Surface-mounted type | |
| Connection Distance (0.65Ø) | 100m | |
| Connection Distance (0.8Ø) | 50m | |
| Dimensions (W×H×D) | 4.25" × 8.3" × 1.3" (2.4") | |
| DR-2GN Doorbell | Power Source | 9V (from monitor) |
| Mount Type | Surface-mounted type | |
| Dimensions (W×H×D) | 93.5mm × 126mm × 18mm | |
| General | Item Weight | 2.11 pounds |
| Country of Origin | Korea, Republic of |
4. Setup and Installation
Follow these steps for proper installation of your Commax Doorphone system. Professional installation is recommended for electrical wiring.
4.1. Safety Precautions
- Ensure power is disconnected before beginning any wiring.
- Do not expose units to excessive moisture or direct water spray. The DR-2GN doorbell is not waterproof.
- Handle all components with care to prevent damage.
4.2. Mounting the DR-2GN Doorbell Unit
The DR-2GN doorbell unit is surface-mounted. Choose a suitable location near your entrance, ensuring it is protected from direct heavy rain if possible, as it is not waterproof.
- Mark the drilling points on the wall using the doorbell unit as a template.
- Drill holes and insert wall anchors if necessary.
- Secure the DR-2GN unit to the wall using the provided screws.

Image 4.1: Diagram showing the mounting dimensions and screw points for the DR-2GN doorbell unit.
4.3. Mounting the DP-2S Doorphone Unit
The DP-2S doorphone unit is also surface-mounted and designed for indoor use.
- Choose a convenient indoor location for the DP-2S unit, typically near the main entrance or in a central living area.
- Mark the drilling points for the mounting bracket.
- Drill holes and secure the mounting bracket to the wall.
- Attach the DP-2S unit to the mounted bracket.
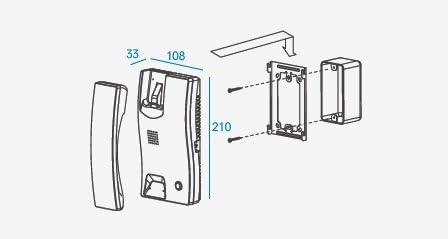
Image 4.2: Exploded view diagram illustrating the mounting process for the DP-2S doorphone unit.
4.4. Wiring Diagram
The system requires 2-wire connections for call and 2-wire connections for door release (if an electric strike is used). Refer to the following diagrams for correct wiring.

Image 4.3: Wiring diagram label found on the back of the DP-2S doorphone unit, showing connections for room station, sub station, adapter power, and electric door key.

Image 4.4: Rear view of the DP-2S doorphone unit, showing the wiring terminals and power cord connection.
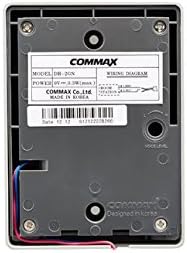
Image 4.5: Wiring diagram label found on the back of the DR-2GN doorbell unit, indicating power input from the monitor and connection points.
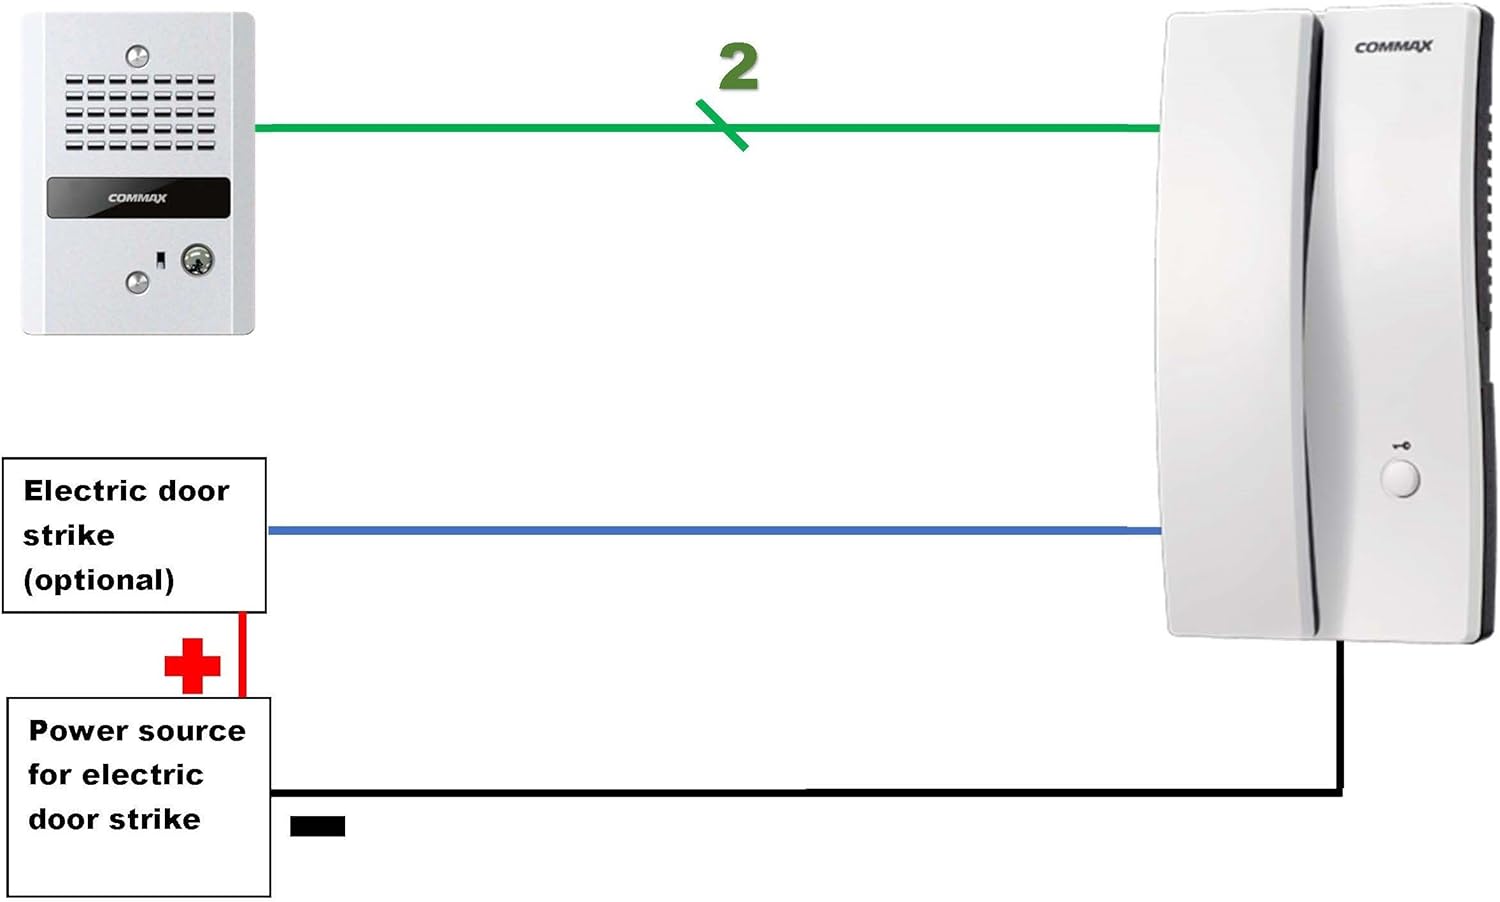
Image 4.6: Comprehensive wiring diagram showing the connection between the DR-2GN doorbell, DP-2S doorphone, and optional electric door strike with its power source.
Wiring Steps:
- Connect the 2-wire call line from the DR-2GN doorbell unit to the corresponding terminals on the DP-2S doorphone unit.
- If using an electric door strike (not included), connect its 2 wires to the designated door release terminals on the DP-2S unit. Ensure the electric strike has its own power source.
- Connect the DP-2S doorphone unit to an AC 110V 50/60Hz power outlet.
5. Operating Instructions
Once installed and powered, your Commax Doorphone system is ready for use.
5.1. Receiving a Call
- When a visitor presses the call button on the DR-2GN doorbell unit, the DP-2S doorphone unit will ring.
- Lift the handset of the DP-2S doorphone to answer the call and communicate with the visitor.
5.2. Door Release Function
If an electric door strike is connected:
- During a conversation with a visitor, press the door release button on the DP-2S doorphone unit.
- This will activate the electric door strike, allowing the visitor to enter.
- The door will remain unlocked for a brief period, then automatically re-lock (depending on the electric strike type).
6. Maintenance
To ensure the longevity and optimal performance of your Commax Doorphone system, follow these simple maintenance guidelines:
- Cleaning: Wipe the units with a soft, dry cloth. Do not use abrasive cleaners, solvents, or strong chemicals.
- Environmental Protection: While the DR-2GN doorbell is vandal-proof, it is not waterproof. Avoid direct exposure to heavy rain or prolonged moisture. The DP-2S doorphone is for indoor use only.
- Wiring Check: Periodically inspect wiring connections for any signs of wear or damage. Ensure all connections remain secure.
- Functionality Test: Regularly test the call and door release functions to ensure they are working correctly.
7. Troubleshooting
If you encounter issues with your Commax Doorphone system, refer to the following table for common problems and solutions:
| Problem | Possible Cause | Solution |
|---|---|---|
| No ring when doorbell button is pressed. | No power to DP-2S unit. Loose or incorrect wiring between DR-2GN and DP-2S. Faulty DR-2GN doorbell unit. | Check if DP-2S is plugged in and receiving power. Verify all 2-wire connections are secure and correct. Contact customer support if unit is suspected faulty. |
| Cannot hear visitor or visitor cannot hear you. | Loose wiring. Microphone or speaker issue. | Check all wiring connections. Ensure handset is properly seated. Contact customer support. |
| Door release function not working. | Electric strike not connected or faulty. No power to electric strike. Loose wiring for door release. | Verify electric strike is properly installed and functional. Ensure electric strike has its own dedicated power source. Check the 2-wire door release connections on DP-2S. |
| Interference or static during conversation. | Electrical interference. Wiring too long or incorrect gauge. | Ensure wiring is not running parallel to high-voltage lines. Refer to specifications for maximum wiring distance and gauge. |
If the problem persists after attempting these solutions, please contact Commax customer support.
8. Warranty and Support
For warranty information and technical support, please refer to the official Commax website or contact their customer service department directly. Keep your purchase receipt as proof of purchase for warranty claims.
Commax Contact Information:
- Website: www.commax.com (Please check for regional websites)
- Customer Service: Refer to the website for local contact numbers or email support.


