1. Important Safety Instructions
Please read all safety instructions carefully before using the Vivitek Qumi Q3 Plus-RD projector. Failure to follow these instructions may result in electric shock, fire, or damage to the device.
- Power Source: Use only the supplied AC power adapter. Ensure the voltage matches the projector's requirements.
- Ventilation: Do not block ventilation openings. Maintain adequate space around the projector for proper airflow to prevent overheating.
- Moisture: Do not expose the projector to rain, moisture, or operate it near water.
- Heat: Avoid placing the projector near heat sources such as radiators, heat registers, stoves, or other apparatus that produce heat.
- Cleaning: Unplug the projector from the power outlet before cleaning. Use a dry cloth for cleaning. Do not use liquid cleaners or aerosol cleaners.
- Servicing: Do not attempt to service this product yourself. Refer all servicing to qualified service personnel.
- Eye Safety: Do not look directly into the projector lens when the lamp is on. The bright light can cause eye damage.
2. Package Contents
Verify that all items listed below are included in your Vivitek Qumi Q3 Plus-RD package:
- Vivitek Qumi Q3 Plus-RD Projector
- AC Power Adapter with Cable
- HDMI Cable
- Documentation Kit (Quick Start Guide, Warranty Card)

Image: The AC power adapter and cable for the Vivitek Qumi Q3 Plus-RD projector.
3. Product Overview
Familiarize yourself with the components and ports of your Vivitek Qumi Q3 Plus-RD projector.
3.1 Front View

Image: Front view of the Vivitek Qumi Q3 Plus-RD projector, showing the projection lens and speaker grille.
3.2 Rear View (Ports and Connections)

Image: Rear view of the Vivitek Qumi Q3 Plus-RD projector, displaying various input/output ports including AV IN, USB 1, USB 2, HDMI, DC IN power input, microSD card slot, and the power button.
3.3 Side View

Image: Side view of the Vivitek Qumi Q3 Plus-RD projector, showing the ventilation grilles and the integrated kickstand for angle adjustment.
3.4 Remote Control
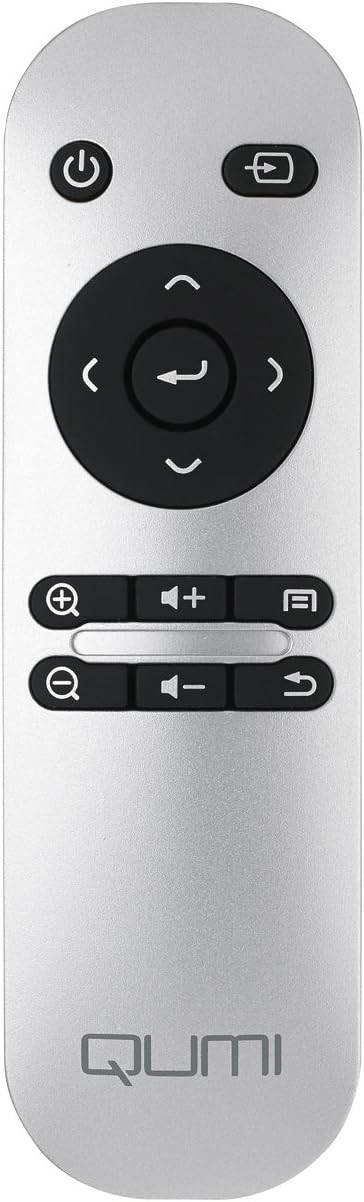
Image: The remote control for the Vivitek Qumi Q3 Plus-RD projector, featuring power, navigation, volume, and focus adjustment buttons.
4. Setup
Follow these steps to set up your Vivitek Qumi Q3 Plus-RD projector for first use.
- Power Connection: Connect the supplied AC power adapter to the 'DC IN' port on the projector and then plug it into a power outlet. The projector can also operate on its internal battery.
- Placement: Place the projector on a stable, flat surface. Use the integrated kickstand to adjust the projection angle if needed. Ensure there are no obstructions to the lens or ventilation openings.
- Power On: Press and hold the power button on the projector or the remote control to turn on the device.
- Focus Adjustment: Once powered on, use the focus buttons on the remote control to adjust the image sharpness. The Qumi Q3 Plus-RD features motorized focus for precise adjustment.
- Keystone Correction: The projector features digital auto keystone correction. If the image appears trapezoidal, the projector will automatically adjust it. Manual adjustment options may be available in the settings menu.
5. Operating Instructions
This section details how to operate your Vivitek Qumi Q3 Plus-RD projector.
5.1 Powering On/Off
- To Power On: Press and hold the power button on the projector or the remote control until the device starts.
- To Power Off: Press the power button on the projector or the remote control. A shutdown prompt will appear. Select 'Power Off' to shut down the system safely.
5.2 Navigating the Android OS
The Qumi Q3 Plus-RD runs on an Android operating system. Use the remote control's navigation buttons (up, down, left, right, OK) to move through menus and select options. A Bluetooth keyboard/mouse can also be paired for easier navigation.
5.3 Media Playback
- USB Drive: Insert a USB flash drive into one of the USB ports. The system will typically detect it and prompt you to open the file browser or media player.
- MicroSD Card: Insert a microSD card into the microSD slot. Similar to USB, the system will allow you to access its contents.
- Internal Storage: The projector has 5.1 GB of available on-board memory for storing files and applications.
5.4 Connecting External Devices (HDMI)
To connect an external device such as a laptop, Blu-ray player, or gaming console:
- Connect one end of an HDMI cable to the HDMI port on the projector.
- Connect the other end of the HDMI cable to the HDMI output port on your external device.
- On the projector's home screen, navigate to the input selection and choose 'HDMI'.
6. Connectivity
The Vivitek Qumi Q3 Plus-RD offers various connectivity options for seamless integration with your devices.
6.1 Wi-Fi Setup
- From the home screen, navigate to 'Settings'.
- Select 'Wi-Fi' and turn it on.
- Choose your desired Wi-Fi network from the list of available networks.
- Enter the network password if prompted and connect.
6.2 Bluetooth Pairing
You can pair Bluetooth devices such as external speakers, headphones, or a keyboard/mouse with your projector.
- From the home screen, navigate to 'Settings'.
- Select 'Bluetooth' and turn it on.
- Put your Bluetooth device into pairing mode.
- Select your device from the list of available devices on the projector and confirm pairing.
6.3 Wireless Content Sharing
The projector supports wireless content sharing from Android and iOS devices. Refer to the projector's specific application (e.g., HappyCast or similar pre-installed app) for detailed instructions on mirroring your device's screen.
7. Maintenance
Proper maintenance ensures the longevity and optimal performance of your projector.
- Lens Cleaning: Gently wipe the projector lens with a soft, lint-free cloth specifically designed for optical surfaces. Do not use abrasive materials or harsh chemicals.
- Ventilation: Regularly check that the ventilation openings are clear of dust and debris. Use a soft brush or compressed air to clean them.
- Battery Care: For models with an internal battery, avoid fully discharging the battery frequently. If storing the projector for an extended period, charge the battery to approximately 50% to prolong its lifespan.
- Storage: Store the projector in a cool, dry place away from direct sunlight and extreme temperatures.
8. Troubleshooting
If you encounter issues with your Vivitek Qumi Q3 Plus-RD, refer to the following common problems and solutions.
- No Image Projected:
- Ensure the projector is powered on and the lens cap is removed.
- Check the input source selection to ensure it matches the connected device (e.g., HDMI, USB).
- Verify that the external device is powered on and outputting a signal.
- No Sound:
- Adjust the volume on the projector and the connected source device.
- Check if external speakers are connected via Bluetooth or AV IN, and ensure they are powered on and functioning.
- Ensure the audio output settings on the source device are correctly configured.
- Remote Control Not Responding:
- Ensure there are no obstructions between the remote and the projector's IR receiver (located at the rear).
- Replace the remote control battery (typically a coin cell battery).
- Wi-Fi/Bluetooth Connectivity Issues:
- Ensure Wi-Fi/Bluetooth is enabled in the projector's settings.
- Restart the projector and the device you are trying to connect.
- Check for interference from other wireless devices.
- Image is Blurry:
- Use the remote control's focus buttons to adjust the image sharpness.
- Ensure the projection surface is flat and the projector is stable.
9. Specifications
Key technical specifications for the Vivitek Qumi Q3 Plus-RD projector:
| Feature | Specification |
|---|---|
| Model Number | Q3 PLUS-RD |
| Display Type | DLP |
| Native Display Resolution | 1280 x 720 (HD 720p) |
| Brightness | Up to 500 Lumens |
| Contrast Ratio | 5,000:1 |
| Connectivity Technology | Bluetooth, HDMI, Wi-Fi |
| Special Features | Bluetooth, Portable, Android OS |
| Operating System | Android V.4.42 |
| CPU | Quad-core CPU at 1.5GHz |
| Internal Storage | 5.1 GB available |
| Battery | 1 Lithium Polymer battery (included) |
| Product Dimensions | 6.9 x 4 x 1.1 inches |
| Item Weight | 1 pound |
10. Warranty and Support
The Vivitek Qumi Q3 Plus-RD projector comes with a standard manufacturer's warranty. For detailed warranty information, please refer to the documentation kit included with your product or visit the official Vivitek website.
For technical support, troubleshooting assistance, or service inquiries, please contact Vivitek customer support through their official channels. Keep your product's model number (Q3 PLUS-RD) and serial number handy when contacting support.