Introduction
This manual provides detailed instructions for the safe and efficient use of your De'Longhi Dinamica ECAM 350.35.W fully automatic espresso machine. Please read all instructions carefully before operating the appliance and keep this manual for future reference. This machine is designed to prepare a variety of coffee and milk-based beverages from whole coffee beans or pre-ground coffee.

Figure 1: De'Longhi Dinamica ECAM 350.35.W espresso machine in a kitchen environment.
1. Setup
1.1 Unpacking
Carefully remove the machine from its packaging. Ensure all components are present: the machine, drip tray, water tank, milk frother, and power cord. Remove all protective films and packaging materials.
1.2 Filling the Water Tank
- Remove the water tank from the side of the machine.
- Rinse the tank with fresh water.
- Fill the tank with fresh, cold tap water up to the MAX level indicator.
- Replace the water tank securely into the machine.
1.3 Filling the Bean Hopper
- Open the bean hopper lid located on top of the machine.
- Pour fresh coffee beans into the hopper. Do not overfill.
- Close the lid securely.
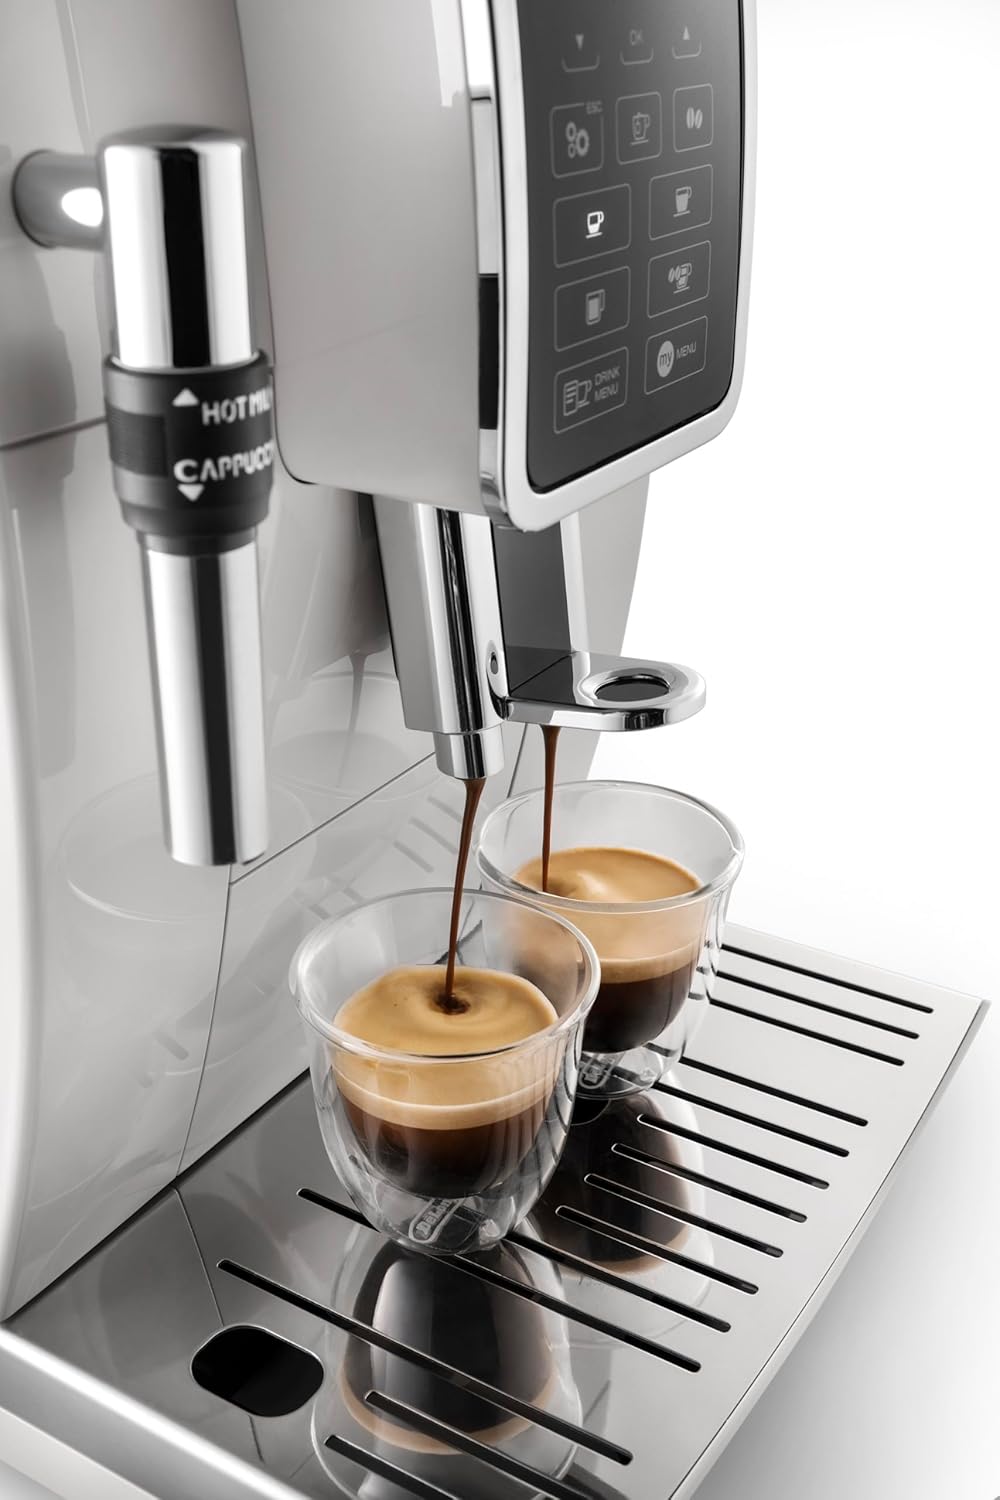
Figure 2: Filling the water tank and coffee bean hopper.
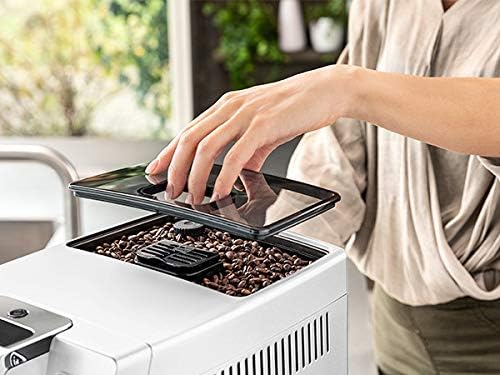
Figure 3: Detail of filling the coffee bean hopper.
1.4 Initial Rinse Cycle
Before first use, or if the machine has been unused for a long period, perform an initial rinse cycle to clean the internal circuits.
- Plug the machine into a power outlet.
- Place a container under the coffee spouts.
- Follow the on-screen prompts to initiate the rinse cycle. This process flushes hot water through the system.
- Empty the container once the cycle is complete.
2. Operation
2.1 Control Panel Overview
The machine features an intuitive control panel with a display and various buttons for beverage selection and settings adjustment.

Figure 4: The machine's control panel displaying beverage options.
2.2 Making Coffee
- Ensure the water tank is filled and the bean hopper contains coffee beans.
- Place one or two cups under the coffee spouts.
- Select your desired coffee beverage (e.g., Espresso, Coffee) from the control panel.
- The machine will automatically grind the beans, brew, and dispense the coffee.
- To use pre-ground coffee, open the pre-ground coffee funnel, add one scoop of ground coffee, then select the pre-ground coffee option on the panel.

Figure 5: Selecting a beverage from the control panel.

Figure 6: Espresso being dispensed into cups.
2.3 Preparing Milk-Based Beverages
The machine is equipped with a manual frother for preparing milk for cappuccinos and lattes.
- Fill a milk jug with cold milk (dairy or non-dairy).
- Position the milk frother nozzle into the milk.
- Turn the steam dial or press the steam button (refer to your specific model's interface) to start frothing.
- Move the jug up and down to achieve desired froth consistency.
- Turn off the steam once frothing is complete.
- Clean the frother immediately after use.

Figure 7: Frothing milk using the manual steam wand.
3. Maintenance
Regular cleaning and maintenance ensure optimal performance and longevity of your espresso machine.
3.1 Cleaning the Brewing Unit
The brewing unit should be cleaned monthly or as indicated by the machine.
- Turn off and unplug the machine.
- Open the service door (usually on the right side).
- Press the two red release buttons and pull out the brewing unit.
- Rinse the brewing unit thoroughly under running tap water. Do not use detergents.
- Allow it to air dry completely before reinserting.
3.2 Emptying Drip Tray and Grounds Container
Empty and clean these components daily or when the machine indicates they are full.
- Pull out the drip tray from the front of the machine.
- Remove the grounds container and empty the used coffee grounds.
- Rinse both the drip tray and grounds container with warm water and mild detergent.
- Dry thoroughly before reassembling and reinserting.
3.3 Descaling
The machine will prompt you when descaling is required. Use only De'Longhi descaling solution.
- Follow the on-screen instructions precisely.
- Typically, this involves emptying the water tank, pouring in the descaling solution mixed with water, and placing a large container under the spouts.
- The machine will run a cycle, then prompt for rinsing with fresh water.
3.4 Water Filter Replacement
Replace the water filter approximately every two months, or as indicated by the machine.
- Remove the old filter from the water tank.
- Insert a new De'Longhi water filter, ensuring it is properly seated.
- Follow the machine's instructions to activate the new filter.
4. Troubleshooting
Refer to the table below for common issues and their solutions.
| Problem | Possible Cause | Solution |
|---|---|---|
| Machine does not turn on. | Not plugged in; power switch off. | Ensure power cord is securely plugged into an outlet and the machine's power switch is on. |
| Coffee is too weak or watery. | Coffee beans are stale; grind setting too coarse; insufficient coffee dose. | Use fresh beans; adjust grind setting finer; increase coffee strength setting. |
| No coffee dispensed. | Water tank empty; brewing unit blocked; descaling needed. | Fill water tank; clean brewing unit; perform descaling cycle. |
| Milk frother not producing foam. | Frother nozzle blocked; milk not cold enough; incorrect milk type. | Clean frother nozzle; use cold milk; try different milk types (e.g., whole milk). |
| "Descale" message appears. | Machine requires descaling. | Perform a descaling cycle as per instructions in Section 3.3. |
5. Specifications
| Feature | Detail |
|---|---|
| Brand | De'Longhi |
| Model Number | ECAM 350.35.W (0132220020) |
| Color | White |
| Dimensions (L x W x H) | 23.6 x 42.9 x 34.8 cm |
| Weight | 9.5 Kilograms |
| Capacity (Water Tank) | 1.8 Liters |
| Power | 1450 Watts |
| Voltage | 220 Volts |
| Material | Stainless Steel |
| Special Features | Anti-drip system, LCD display, Integrated grinder, Cappuccino function, Coffee beans/Ground coffee input, Lungo/Ristretto preparation. |
6. Warranty and Support
Your De'Longhi Dinamica ECAM 350.35.W machine comes with a manufacturer's warranty. Please refer to the warranty card included in your product packaging for specific terms and conditions, including warranty duration and coverage details.
For technical support, spare parts, or service inquiries, please visit the official De'Longhi website or contact their customer service department. Keep your proof of purchase handy when contacting support.
- Official Website: www.delonghi.com
- Spare Parts Availability: 10 Years (as per product specifications)


