1. Introduction
Thank you for choosing the Soundmaster FUR 5005 PLL-FM Clock Radio. This device combines a modern clock radio with essential features for your daily routine. It includes a PLL-FM radio with automatic station storage, dual alarm settings, snooze function, sleep timer, and a clear LED display with adjustable brightness. This manual will guide you through the setup, operation, and maintenance of your new clock radio.
2. Important Safety Information
- Power Source: Use only the specified power adapter. Ensure the voltage matches your local power supply.
- Water and Moisture: Do not expose the device to rain, moisture, or dripping/splashing liquids. Do not place objects filled with liquids, such as vases, on the apparatus.
- Ventilation: Ensure adequate ventilation. Do not block ventilation openings.
- Heat: Keep the device away from heat sources such as radiators, heat registers, stoves, or other apparatus (including amplifiers) that produce heat.
- Cleaning: Unplug the device before cleaning. Use a soft, dry cloth. Do not use liquid cleaners or aerosol cleaners.
- Servicing: Do not attempt to service this product yourself. Refer all servicing to qualified service personnel.
3. Package Contents
Please check that the following items are included in your package:
- Soundmaster FUR 5005 PLL-FM Clock Radio
- Power Adapter (AC)
- Instruction Manual
- Note: CR2032 backup battery is not included and must be purchased separately.
4. Product Overview
Familiarize yourself with the components and controls of your Soundmaster FUR 5005.

Figure 4.1: Front view of the Soundmaster FUR 5005 Clock Radio, showing the large LED display and control knobs.

Figure 4.2: Detailed view of the control panel, including buttons for 'Mem. Set', 'Preset', 'Dimmer', 'Snooze', 'Sleep', 'AL1', 'AL2', and rotary knobs for tuning and volume.
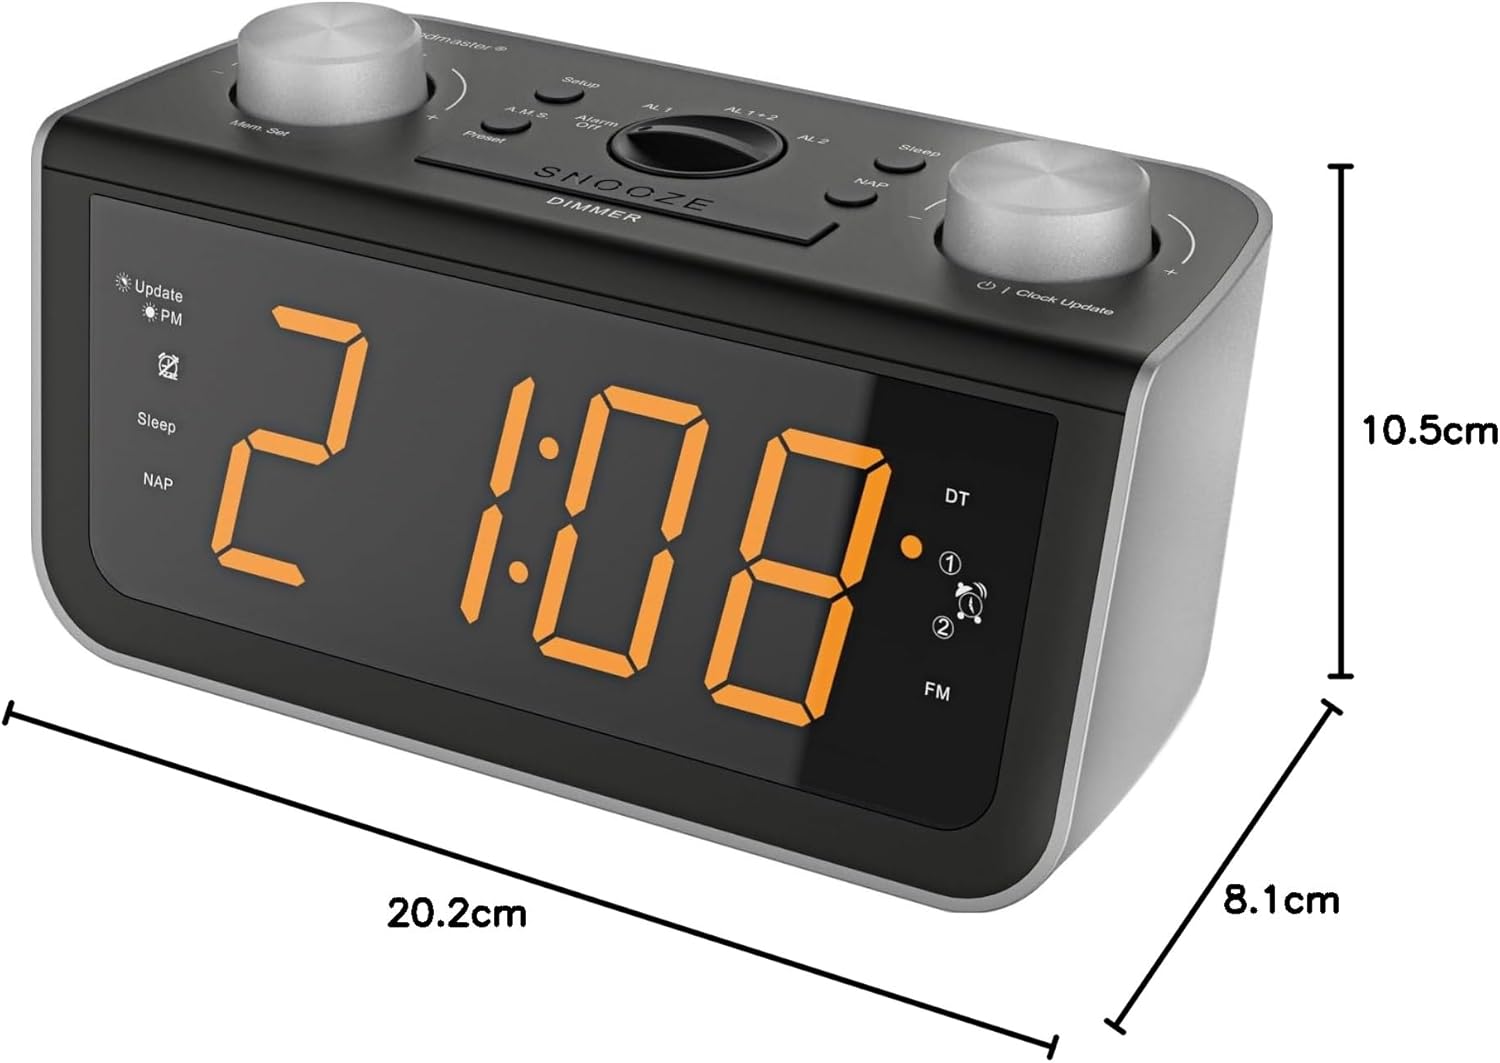
Figure 4.3: Side view of the clock radio illustrating its compact dimensions.
4.1 Front Panel Controls
- LED Display: Shows time, frequency, and alarm status.
- Rotary Knobs (Left & Right): Typically for tuning/setting and volume/adjusting.
- Mem. Set / Preset: For storing and recalling radio stations.
- Dimmer: Adjusts LED display brightness (3-step).
- Snooze / Sleep: Activates snooze during an alarm or sets the sleep timer.
- AL1 / AL2: Buttons for setting and activating Alarm 1 and Alarm 2.
4.2 Rear Panel
- Power Input: Connects to the AC power adapter.
- FM Antenna: Wire antenna for FM reception.
- Battery Compartment: For CR2032 backup battery (not included).
5. Setup
5.1 Power Connection
- Uncoil the FM wire antenna located at the back of the unit for optimal reception.
- Insert a CR2032 button cell battery (not included) into the battery compartment on the rear of the unit. This battery provides backup power for time and alarm settings during power outages.
- Connect the supplied AC power adapter to the DC IN jack on the rear of the clock radio.
- Plug the power adapter into a standard wall outlet. The display will light up.
5.2 Automatic Time Setting (RDS)
The clock radio features automatic time and calendar day setting via RDS (Radio Data System) signal. Once powered on and receiving a strong FM signal with RDS, the time and date should set automatically.
- Ensure the FM antenna is fully extended.
- The clock will attempt to synchronize with the RDS time signal. This may take a few minutes.
- If the time does not set automatically, you may need to manually set it (refer to section 6.1).
6. Operating Instructions
6.1 Manual Time Setting
- Press and hold the SET TIME button until the hour digits flash.
- Use the HR (Hour) and MIN (Minute) buttons to adjust the time.
- Press SET TIME again to confirm and exit.
6.2 Radio Operation (PLL-FM)
- Press the POWER button to turn on the radio.
- Use the TUN +/- buttons or the rotary tuning knob to select your desired FM station.
- Adjust the volume using the VOL +/- buttons or the rotary volume knob.
- To automatically scan and store stations, press and hold the MEM. SET button. The radio will scan and save available stations to presets.
- To recall a preset station, press the PRESET button repeatedly.
6.3 Setting Alarms (Dual Alarm)
The device features two independent alarms (AL1 and AL2).
- Press and hold the AL1 or AL2 button until the alarm time flashes.
- Use the HR and MIN buttons to set the desired alarm time.
- Press AL1 or AL2 again to select the alarm source: Radio or Buzzer.
- Press AL1 or AL2 one more time to confirm and activate the alarm. An alarm icon will appear on the display.
6.4 Snooze Function
When an alarm sounds, press the SNOOZE button to temporarily silence it. The alarm will sound again after a short interval (typically 9 minutes, check specific model for exact duration).
6.5 Sleep Timer
The sleep timer allows you to fall asleep to the radio, which will automatically turn off after a set period.
- While the radio is playing, press the SLEEP button repeatedly to cycle through available sleep times (e.g., 10, 20, 30, 60, 90 minutes, or OFF).
- The radio will play for the selected duration and then automatically turn off.
6.6 Display Dimmer
Adjust the brightness of the LED display to your preference.
- Press the DIMMER button repeatedly to cycle through the 3 brightness levels (High, Medium, Low).
7. Maintenance
- Cleaning: Always unplug the device from the power outlet before cleaning. Use a soft, dry, lint-free cloth to wipe the surfaces. Do not use abrasive cleaners, waxes, or solvents as they may damage the finish.
- Antenna Care: Handle the FM wire antenna carefully. Do not pull or excessively bend it.
- Battery Replacement: If the backup battery (CR2032) is depleted, replace it with a new one to ensure time and alarm settings are retained during power interruptions. Dispose of old batteries responsibly.
8. Troubleshooting
| Problem | Possible Cause | Solution |
|---|---|---|
| No power / Display off | Power adapter not connected or faulty. Power outlet not active. | Ensure the power adapter is securely connected to both the unit and a working wall outlet. Try a different outlet. |
| Poor FM reception | FM antenna not fully extended or positioned incorrectly. Interference from other electronic devices. | Fully extend and reposition the FM wire antenna. Move the unit away from other electronic devices. |
| Alarm does not sound | Alarm not activated. Alarm volume too low. Incorrect alarm time set. | Verify that the alarm icon is displayed. Check alarm volume. Re-set the alarm time. |
| Time/Date not setting automatically (RDS) | Weak FM signal with RDS. No RDS signal available in your area. | Ensure good FM reception. Manually set the time if RDS is unavailable or unreliable. |
| Settings lost after power outage | Backup battery (CR2032) is missing or depleted. | Install a new CR2032 backup battery. |
9. Specifications
| Brand | Soundmaster |
| Model | FUR5005 |
| Tuner Technology | PLL-FM |
| Supported Radio Bands | FM, PLL |
| Display Technology | LED |
| Display Type | Digital |
| Special Features | Adjustable brightness, Radio |
| Power Source | AC (Mains Power) |
| Backup Battery | CR2032 (not included) |
| Material Type | Plastic |
| Connectivity Technology | AUX (3.5mm Audio) |
| Dimensions (approx.) | 20.2 cm (W) x 8.1 cm (D) x 10.5 cm (H) |
10. Warranty and Support
Soundmaster products are designed and manufactured to the highest quality standards. In the unlikely event that you experience any problems with your product, please refer to the warranty information provided with your purchase or contact Soundmaster customer support for assistance.
For further support, visit the official Soundmaster website or contact your local retailer.