1. Introduction
This manual provides detailed instructions for the setup, operation, and maintenance of your GAN XIN S-GS6T-5R-Tripod Portable LED Race Clock. This device is designed for various timing applications, including running events, gym activities, classrooms, and studios. It features a large, bright LED display and supports multiple modes: 12/24-hour clock, countdown timer, count-up timer, and stopwatch, all controllable via an infrared remote.

Image 1.1: The GAN XIN Portable LED Race Clock with its included tripod and remote control.
2. Package Contents
Please verify that all the following items are included in your package:
- 1 x 25x6.2 inch LED Race Timer
- 1 x IR Remote Control
- 1 x Tripod Stand
- 1 x Power Adapter
- 1 x Wall Bracket
- 1 x User Manual

Image 2.1: All components included in the GAN XIN Portable LED Race Clock package.
3. Product Features
- Big & Bright Display: Equipped with premium red LED lamp beads, ensuring readability from up to 98 feet (approximately 30 meters) even in bright conditions.
- Accuracy & Versatility: Utilizes high-quality, precision timing chips for accurate timekeeping. Supports four operational modes: Clock (12/24-hour), Countdown, Count-up, and Stopwatch.
- Remote Control: Features an IR remote controller with an effective distance of up to 30 feet (approximately 9 meters) for easy operation, including start, stop, and reset functions.
- Premium Material & Design: The frame case is constructed from aluminum alloy, providing a lightweight yet durable structure. Designed for easy wall mounting or tripod stand installation.

Image 3.1: Visual representation of the clock's key features and capabilities.
4. Specifications
| Model Number | S-GS6T-5R-Tripod |
| Display Type | 6-Digit LED |
| Display Color | Red |
| Screen Size | 5 Inches (digit height) |
| Product Dimensions | 27"W x 7.4"H x 1.6"D (68.6cm W x 18.8cm H x 4.1cm D) |
| Item Weight | 6.18 pounds (2.81 kg) |
| Material | Aluminum Alloy |
| Control Method | IR Remote Control |
| Power Source | Power Adapter (included) |
| UPC | 743401626706 |
5. Setup
5.1 Tripod Assembly
- Unfold the tripod legs and extend them to a stable position.
- Extend the central pole of the tripod to your desired height. The tripod is retractable and can extend up to 70 inches (approximately 178 cm).
- Attach the LED Race Clock to the top of the tripod stand using the provided mounting mechanism. Ensure it is securely fastened.
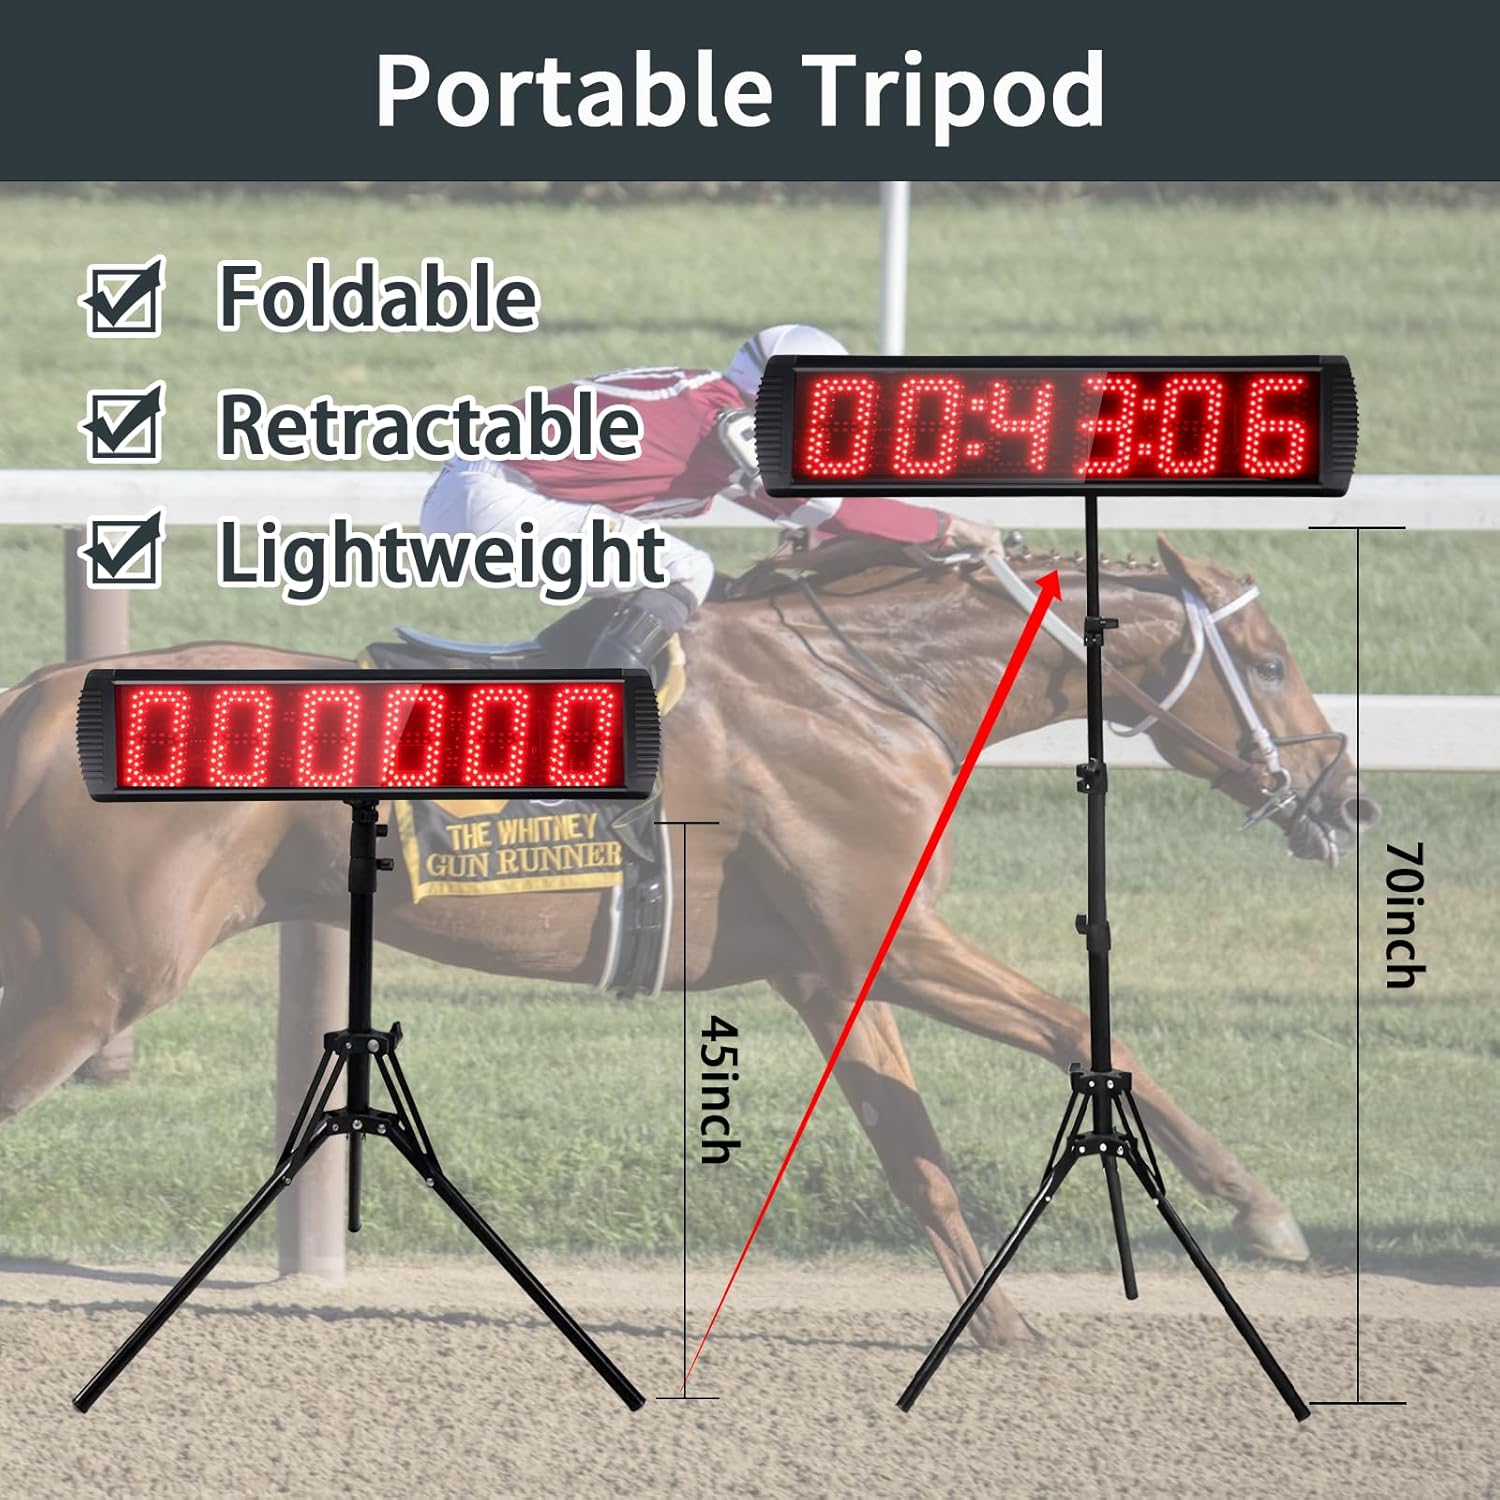
Image 5.1: The portable tripod, illustrating its adjustable height and compact design.
5.2 Power Connection
Connect the included power adapter to the clock's power input port. Plug the adapter into a standard electrical outlet. The clock will power on automatically.
5.3 Wall Mounting (Optional)
If you prefer to wall-mount the clock, use the provided wall bracket. Mark the desired position on the wall, drill appropriate holes, and secure the bracket using screws. Then, attach the clock to the bracket.

Image 5.2: Illustration of the wall mounting method for the LED Race Clock.
6. Operating Instructions
The GAN XIN LED Race Clock is operated using the included IR remote control. Ensure the remote has fresh batteries and is pointed towards the clock's IR receiver.
6.1 Remote Control Overview
Familiarize yourself with the buttons on the remote control. Key functions include:
- Power Button: Turns the clock on/off.
- Mode Buttons (e.g., CLOCK, COUNT UP, COUNT DOWN, STOPWATCH): Selects the desired operating mode.
- START/STOP: Initiates or pauses timing functions.
- RESET: Resets the timer or clock settings.
- Number Buttons (0-9): Used for setting specific times in countdown or clock modes.
- Brightness Buttons: Adjusts display brightness.
6.2 Setting Time (Clock Mode)
- Press the CLOCK button on the remote to enter clock mode.
- Press the EDIT button (or similar, refer to remote labels) to enter time setting mode. The digits will flash.
- Use the number buttons (0-9) to input the current time (HH:MM:SS).
- Press ENTER to confirm the setting.
- To switch between 12-hour and 24-hour format, press the dedicated 12/24H button if available, or cycle through options in setting mode.
6.3 Countdown Timer
- Press the COUNT DOWN button.
- Press EDIT to set the desired countdown time (HH:MM:SS).
- Use the number buttons to input the time.
- Press ENTER to confirm.
- Press START to begin the countdown.
- Press STOP to pause, and START again to resume.
- Press RESET to return to the initial set time.
6.4 Count Up Timer
- Press the COUNT UP button. The display will show 00:00:00.
- Press START to begin counting up.
- Press STOP to pause, and START again to resume.
- Press RESET to clear the count and return to 00:00:00.
6.5 Stopwatch Mode
- Press the STOPWATCH button. The display will show 00:00:00.
- Press START to begin the stopwatch.
- Press STOP to pause.
- Press RESET to clear the stopwatch and return to 00:00:00.
6.6 Brightness Adjustment
Use the BRIGHTNESS UP and BRIGHTNESS DOWN buttons on the remote to adjust the LED display's intensity to suit ambient lighting conditions.
7. Maintenance
7.1 Cleaning
To clean the clock's display and casing, use a soft, dry, lint-free cloth. For stubborn marks, slightly dampen the cloth with water. Avoid using harsh chemicals, abrasive cleaners, or solvents, as these can damage the display or finish.
7.2 Storage
When not in use, store the clock and its accessories in a cool, dry place, away from direct sunlight and extreme temperatures. If storing for an extended period, consider removing batteries from the remote control to prevent leakage.
7.3 Remote Control Battery Replacement
If the remote control becomes unresponsive, replace its batteries. Refer to the remote's battery compartment for the correct battery type (typically AAA or button cell) and polarity.
8. Troubleshooting
| Problem | Possible Solution |
|---|---|
| Clock does not power on. | Ensure the power adapter is securely connected to both the clock and a working electrical outlet. Check if the outlet is functional. |
| Remote control is unresponsive. | Check the remote control batteries and replace them if necessary. Ensure there are no obstructions between the remote and the clock's IR receiver. Point the remote directly at the clock. |
| Display is dim or flickering. | Adjust the brightness using the remote control. Ensure the power supply is stable. |
| Tripod feels unstable, especially outdoors. | The tripod is lightweight. For outdoor use or in windy conditions, consider adding weight to the tripod base or securing it to a heavier object to prevent tipping. |
| Incorrect time or timer function. | Perform a reset using the remote control. Re-enter the desired time or timer settings carefully following the operating instructions. |
9. Warranty and Support
For warranty information or technical support, please refer to the documentation provided at the time of purchase or contact GAN XIN customer service. Contact details can typically be found on the manufacturer's official website or through your retailer.


