
1. Introduction
This manual provides essential information for the safe and efficient installation, operation, and maintenance of your Schneider METSEPM1200 Power Meter. The METSEPM1200 is designed for accurate measurement of electrical parameters and features Modbus RS485 communication for integration into monitoring systems. Please read this manual thoroughly before attempting any installation or operation.
1.1 Safety Information
- Installation and servicing must be performed by qualified personnel only.
- Always disconnect power before installing or servicing the device.
- Observe all local and national electrical codes and regulations.
- Do not operate the device if it appears damaged.
2. Setup and Installation
2.1 Unpacking and Inspection
Carefully unpack the power meter and inspect it for any signs of damage. Verify that all components are present according to the packing list.
2.2 Mounting
The METSEPM1200 is typically designed for panel mounting. Ensure the mounting location provides adequate ventilation and is free from excessive vibration, moisture, and extreme temperatures. Secure the meter firmly in the panel cutout using the provided mounting clips or screws.
2.3 Wiring Connections
All wiring must comply with applicable electrical standards. Use appropriate wire gauges for power, voltage, and current connections.
- Power Supply: Connect the auxiliary power supply to the designated terminals. Ensure the voltage is within the specified operating range.
- Voltage Inputs: Connect the phase and neutral voltage inputs to the corresponding terminals. Ensure correct phase rotation.
- Current Inputs: Connect the secondary wires from the current transformers (CTs) to the current input terminals. Observe correct polarity (P1/K and P2/L). Never open the secondary circuit of an energized CT.
- Modbus RS485 Communication: Connect the A and B data lines of the RS485 network to the communication terminals. Ensure proper termination resistors are used if the meter is at the end of the bus.
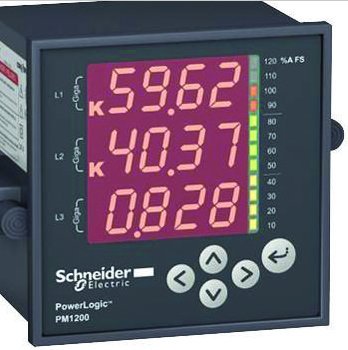
A front view of the Schneider Electric PowerLogic PM1200 Power Meter. The device features a dark gray casing and a prominent digital display showing three large numerical readings, likely representing electrical parameters for phases L1, L2, and L3. To the right of the digital readings, a vertical bar graph indicates percentage of full scale. Below the display, four arrow buttons (up, down, left, right) are arranged in a diamond pattern for navigation and control. The 'Schneider Electric' logo and 'PowerLogic PM1200' model name are clearly visible on the lower part of the meter's face.
3. Operating Instructions
3.1 Display Overview
The METSEPM1200 features a clear digital display that shows various electrical parameters. The display typically shows three main values (e.g., voltage, current, power for each phase) and may include a bar graph for percentage of full scale (e.g., %A FS).
3.2 Navigation Buttons
Four arrow buttons (Up, Down, Left, Right) located below the display are used for navigating through menus and parameters.
- Up/Down Arrows: Scroll through different measurement screens (e.g., voltage, current, power, energy, frequency).
- Left/Right Arrows: Access sub-menus or change settings within a menu.
- Enter (often combined with one of the arrows): Confirm selections or enter configuration mode. Refer to the detailed wiring diagram for specific button functions.
3.3 Reading Parameters
Once powered on, the meter will display default parameters. Use the navigation buttons to cycle through available measurements such as:
- Line-to-Neutral and Line-to-Line Voltages (V)
- Phase Currents (A)
- Active, Reactive, and Apparent Power (W, VAR, VA)
- Power Factor (PF)
- Frequency (Hz)
- Active and Reactive Energy (kWh, kVARh)
3.4 Configuration Settings
The meter allows configuration of various settings, including CT/VT ratios, Modbus address, baud rate, and display preferences. Access to the configuration menu typically involves pressing and holding a specific button combination. Consult the full technical documentation for detailed instructions on accessing and modifying these settings.
4. Maintenance
The Schneider METSEPM1200 Power Meter is designed for reliable operation with minimal maintenance. Regular checks can help ensure its longevity and accuracy.
- Cleaning: Periodically clean the meter's display and casing with a soft, dry, non-abrasive cloth. Do not use harsh chemicals or solvents.
- Connection Inspection: Annually inspect all wiring connections to ensure they are secure and free from corrosion or damage.
- Calibration: For applications requiring high accuracy, periodic professional calibration is recommended. Refer to Schneider Electric's guidelines for calibration intervals.
5. Troubleshooting
This section provides solutions to common issues you might encounter with your METSEPM1200 Power Meter.
| Problem | Possible Cause | Solution |
|---|---|---|
| No display or meter not powering on | No auxiliary power supply; Incorrect wiring; Blown fuse (external) | Check power supply connections; Verify voltage at terminals; Check external fuses. |
| Incorrect or erratic readings | Incorrect CT/VT ratios configured; Incorrect wiring polarity (CTs/VTs); Loose connections | Verify CT/VT ratio settings in configuration; Check CT/VT wiring polarity; Tighten all connections. |
| Modbus communication failure | Incorrect Modbus address or baud rate; Wiring issues (A/B swapped, loose); Missing termination resistor | Verify Modbus address and baud rate settings; Check RS485 wiring for correct polarity and continuity; Ensure proper termination. |
| Meter displays an error code | Internal fault or specific operational issue | Note the error code and consult the comprehensive technical manual or contact Schneider Electric support. |
If the problem persists after attempting these solutions, contact Schneider Electric technical support or a qualified service technician.
6. Specifications
The following are key specifications for the Schneider METSEPM1200 Power Meter:
| Specification | Value |
|---|---|
| Model Number | METSEPM1200 |
| Manufacturer | Schneider Electric |
| Item Weight | 3.3 Pounds |
| ASIN | B01LWQI6KD |
| Date First Available | September 30, 2016 |
7. Warranty and Support
7.1 Warranty Information
The Schneider METSEPM1200 Power Meter is covered by a manufacturer's warranty. For specific details regarding warranty terms, duration, and conditions, please refer to the documentation provided with your purchase or visit the official Schneider Electric website. Keep your proof of purchase for warranty claims.
7.2 Technical Support
For technical assistance, product inquiries, or service requests, please contact Schneider Electric customer support. Support contact information can typically be found on the manufacturer's website or in the product packaging. When contacting support, please have your product model number (METSEPM1200) and any relevant error messages ready.


