1. Introduction
This manual provides detailed instructions for the installation, configuration, and operation of your TP-Link Archer VR400 Dual-Band Gigabit VDSL/ADSL Modem Router. Please read this manual thoroughly before using the device to ensure proper setup and optimal performance.
The Archer VR400 is a versatile networking device designed to provide high-speed internet access and a robust wireless network. It supports VDSL2/ADSL2+/ADSL2/ADSL standards, as well as fiber, cable, and 3G/4G internet services via its EWAN and USB ports.
2. Package Contents
Verify that your package contains the following items:
- TP-Link Archer VR400 Modem Router
- Power Adapter
- Ethernet Cable
- DSL Splitter (may vary by region)
- RJ11 DSL Cable
- Quick Installation Guide
3. Hardware Overview
3.1 Front Panel: LED Indicators
The front panel features several LED indicators that display the device's status. Refer to the Quick Installation Guide for a detailed explanation of each LED's behavior.

Image: Front view of the TP-Link Archer VR400 modem router. The front panel displays several LED indicators for power, internet, Wi-Fi, and LAN status. Two external antennas are visible on the sides.
3.2 Rear Panel: Ports and Buttons
The rear panel contains all the physical connection ports and control buttons.
- Power Port: Connects to the provided power adapter.
- Power On/Off Button: Turns the device on or off.
- WPS/Reset Button: Press briefly for WPS function. Press and hold for 5-10 seconds to reset the device to factory defaults.
- USB Port: Supports storage and print service sharing, FTP, media servers, and 3G/4G dongles.
- LAN Ports (x3): Connect to wired devices like computers or gaming consoles. These are 100Mbit ports.
- LAN/WAN Port (x1): Functions as a Gigabit LAN port or as a WAN port for fiber/cable connections.
- DSL Port: Connects to your DSL line via the RJ11 cable.
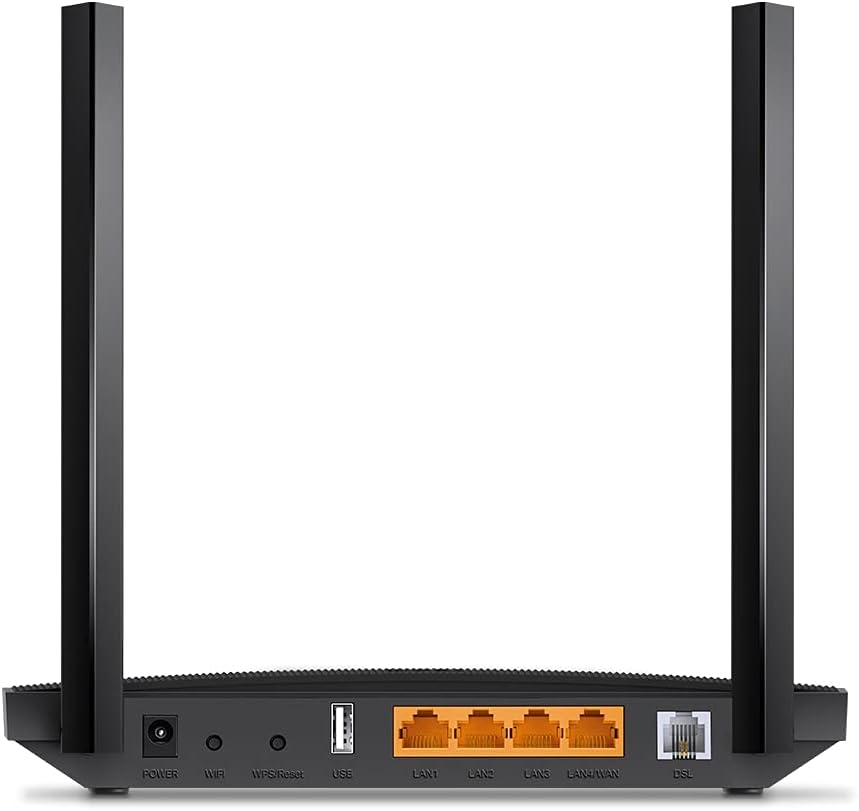
Image: Rear view of the TP-Link Archer VR400 modem router. From left to right, it shows the power port, power button, WPS/Reset button, USB port, four Ethernet ports (three LAN, one LAN/WAN), and the DSL port.
4. Setup
4.1 Hardware Connection
- Power Off: Ensure your computer and the modem router are powered off.
- Connect DSL Line: Connect the DSL port on the modem router to your telephone wall jack using the provided RJ11 DSL cable. If you have a telephone connected to the same line, use the DSL splitter.
- Connect Computer (Optional): Connect your computer to one of the LAN ports on the modem router using an Ethernet cable.
- Power On: Connect the power adapter to the modem router's power port and plug it into a power outlet. Press the Power On/Off button if necessary.
- Verify LEDs: Wait for the Power, DSL, and Wi-Fi LEDs to become stable, indicating a successful connection.
4.2 Quick Setup via Web Browser
- Access Management Page: Open a web browser (e.g., Chrome, Firefox) on a connected computer or mobile device. Enter tplinkmodem.net or 192.168.1.1 in the address bar and press Enter.
- Login: A login window will appear. The default username and password are admin (all lowercase). It is recommended to change this password immediately after logging in for security.
- Run Quick Setup: Follow the on-screen instructions of the Quick Setup Wizard. You will need to select your region, time zone, and enter your Internet Service Provider (ISP) details, including connection type (e.g., VDSL, ADSL, Ethernet WAN) and account credentials.
- Configure Wireless Settings: Set up your Wi-Fi network name (SSID) and password for both 2.4 GHz and 5 GHz bands.
- Save Settings: Review your settings and save them. The router will restart.
4.3 Setup via TP-Link Tether App
The TP-Link Tether app provides an alternative method for setting up and managing your router from your iOS or Android device.
- Download App: Download the TP-Link Tether app from the Apple App Store or Google Play Store.
- Connect to Wi-Fi: Connect your mobile device to the router's default Wi-Fi network (SSID and password are on the label at the bottom of the router).
- Launch App: Open the Tether app and log in with your TP-Link ID or create a new one.
- Follow Instructions: Select your Archer VR400 from the device list and follow the in-app instructions to complete the setup. Note that some advanced ISP settings might require using the web interface.
5. Operating the Router
5.1 Connecting to the Wireless Network
To connect your wireless devices (laptops, smartphones, tablets) to the Archer VR400's Wi-Fi network:
- Scan for Networks: On your device, open the Wi-Fi settings and scan for available networks.
- Select Network: Choose the SSID (network name) you configured during setup (e.g., "TP-Link_VR400_2.4GHz" or "TP-Link_VR400_5GHz").
- Enter Password: Enter the Wi-Fi password (security key) you set.
- Connect: Confirm the connection.
5.2 Using the USB Port
The USB 2.0 port on the Archer VR400 offers several functionalities:
- Storage Sharing: Connect a USB storage device (e.g., flash drive, external hard drive) to share files over your network. Configure sharing settings via the web management interface.
- Printer Sharing: Connect a USB printer to make it accessible to all devices on your network.
- 3G/4G Dongle Support: Use a compatible 3G/4G USB dongle as a backup internet connection or primary connection if DSL/EWAN is unavailable.
5.3 Advanced Settings (Web Interface)
Access the web management interface (tplinkmodem.net or 192.168.1.1) for advanced configuration options, including:
- Network settings (LAN, WAN, DHCP, NAT)
- Wireless settings (SSID broadcast, security, channel, guest network)
- Parental Controls
- Quality of Service (QoS)
- Security features (Firewall, Access Control)
- System Tools (Firmware Upgrade, Backup & Restore, System Log)
6. Maintenance
- Firmware Updates: Regularly check the TP-Link website for firmware updates. Updating the firmware can improve performance, add new features, and fix security vulnerabilities. Download the correct firmware for your model and follow the instructions provided on the TP-Link support page for safe installation.
- Regular Reboots: Periodically rebooting the router (unplugging the power for 10 seconds and plugging it back in) can help clear temporary issues and maintain optimal performance.
- Physical Cleaning: Keep the router in a well-ventilated area. Dust accumulation can lead to overheating. Gently clean the device with a soft, dry cloth. Do not use liquid cleaners.
- Secure Placement: Place the router in a central location, away from obstructions and sources of interference (e.g., microwaves, cordless phones) to maximize Wi-Fi coverage.
7. Troubleshooting
7.1 No Internet Access
- Check Cables: Ensure all cables (DSL, Ethernet, Power) are securely connected.
- LED Status: Verify that the Power, DSL, and Internet LEDs are solid green. If the DSL LED is blinking or off, there might be an issue with your DSL line or ISP connection.
- Reboot: Power cycle the modem router and your computer.
- ISP Settings: Confirm that your ISP settings (VPI/VCI, connection type, username/password) are correctly configured in the router's web interface.
- Contact ISP: If the DSL LED remains problematic after checking connections and settings, contact your Internet Service Provider.
7.2 Slow Wireless Speed or Dropped Connections
- Router Placement: Move the router to a central location, away from obstacles and interference.
- Interference: Other electronic devices (microwaves, cordless phones, Bluetooth devices) can interfere with Wi-Fi signals. Try changing the wireless channel in the router's settings.
- Signal Strength: Ensure your devices are within a reasonable range of the router.
- Firmware: Ensure the router's firmware is up to date.
- Band Selection: For faster speeds, connect devices to the 5 GHz band if they support it.
7.3 Cannot Access Web Management Page
- IP Address: Ensure your computer is set to obtain an IP address automatically (DHCP).
- Correct Address: Verify you are typing tplinkmodem.net or 192.168.1.1 correctly.
- Browser Cache: Clear your browser's cache and cookies, or try a different browser.
- Firewall/Antivirus: Temporarily disable any firewall or antivirus software on your computer that might be blocking access.
- Reset: If all else fails, perform a factory reset by pressing and holding the WPS/Reset button for 5-10 seconds. Note that this will erase all your custom settings.
8. Specifications
| Feature | Detail |
|---|---|
| Model | Archer VR400 |
| Dimensions (W x D x H) | 6.59 x 1.29 x 9.59 inches (approx. 16.7 x 3.3 x 24.4 cm) |
| Weight | 1.89 pounds (approx. 0.86 kg) |
| Interface | 3x 10/100Mbps LAN Ports, 1x 10/100/1000Mbps LAN/WAN Port, 1x RJ11 DSL Port, 1x USB 2.0 Port |
| Button | Power On/Off Button, WPS/Reset Button |
| External Power Supply | 12V/1A |
| Wireless Standards | IEEE 802.11ac/n/a 5 GHz, IEEE 802.11b/g/n 2.4 GHz |
| Frequency | 2.4 GHz and 5 GHz (Dual-Band) |
| Signal Rate | 300 Mbps (2.4 GHz), 867 Mbps (5 GHz) |
| DSL Standards | Full-rate ANSI T1.413 Issue 2, ITU-T G.992.1(G.DMT), ITU-T G.992.2(G.Lite), ITU-T G.994.1 (G.hs), ITU-T G.995.1, ITU-T G.992.3 (G.DMT.bis), ITU-T G.992.4 (G.Lite.bis), ITU-T G.992.5 (ADSL2+), ITU-T G.993.2 (VDSL2) |
| Operating Temperature | 0℃~40℃ (32℉ ~104℉) |
| Storage Temperature | -40℃~70℃ (-40℉ ~158℉) |
9. Warranty and Support
For warranty information, technical support, and product registration, please visit the official TP-Link website:
You can also find FAQs, updated firmware, and community forums on the support page.


