
HoldPeak 90EPD
HOLDPEAK 90EPD Digital Auto-ranging Mobile APP DMM Multimeter User Manual
Model: 90EPD | Brand: HoldPeak
1. Introduction
The HOLDPEAK 90EPD is a versatile digital auto-ranging multimeter designed for a wide range of electrical testing applications, including commercial, home repair, and automotive use. It offers precise measurements of AC/DC current and voltage, resistance, capacitance, frequency, temperature, and duty cycles. Key features include non-contact voltage detection, a large backlit LCD display, Data Hold, Auto Back-Light, Relative Measurement, and Mobile APP connectivity for enhanced functionality.
Key Features:
- Measures AC/DC voltage and AC/DC current, resistance, capacitance, frequency, duty cycle, and temperature.
- Performs diode and continuity tests.
- Features Data Hold, Auto Back-Light, Relative Measurement, and Mobile APP DMM function.
- Auto-ranging scales simplify electronic measurements.
- Equipped with a super large Backlit LCD display for visibility in low light conditions.
- Automatically enters sleep mode after 15 minutes of inactivity to conserve power.

Figure 1.1: HoldPeak 90EPD Digital Multimeter shown with its mobile application interface on a smartphone.
2. Safety Information
Always adhere to safety precautions when using the multimeter to prevent electric shock or personal injury. Read all safety information before operating the device.
- IEC61010 CAT.III 1000V, CAT.IV 600V: This meter is rated for CAT.III 1000V and CAT.IV 600V overvoltage protection. Always ensure the measurement category is appropriate for the circuit being tested.
- Double Insulation: The meter features double insulation for enhanced safety.
- Inspect Before Use: Before each use, inspect the meter, test leads, and accessories for any damage. Do not use if damaged.
- Proper Terminal Connection: Always connect the test leads to the correct terminals for the desired measurement function.
- Voltage Measurement: Never apply voltage to the meter when it is set to a current, resistance, or continuity range.
- Current Measurement: Ensure the circuit is de-energized before connecting the meter in series for current measurements.
- Working Environment: Use the meter in a dry environment and avoid extreme temperatures.
- Battery Replacement: Replace the battery promptly when the low battery indicator appears to ensure accurate readings.
3. Package Contents
Verify that all items listed below are included in your package:
- 1 x HOLDPEAK 90EPD Digital Mobile APP DMM Multimeter
- 1 x Test Leads (Red and Black)
- 1 x Temperature Test Probe
- 1 x PC Link Software CD
- 1 x USB Cable
- 1 x Carrying Case
- 1 x Operating Manual
- 1 x 9V 6F22 battery

Figure 3.1: Contents included in the HoldPeak 90EPD Multimeter package.
4. Product Components and Features
Familiarize yourself with the various components and functions of the HOLDPEAK 90EPD Multimeter.

Figure 4.1: Labeled components of the HoldPeak 90EPD Multimeter.
Key Function Icons:

Figure 4.2: Visual representation of the multimeter's measurement capabilities and features.
5. Setup
5.1 Battery Installation
The HOLDPEAK 90EPD Multimeter requires one 9V 6F22 battery for operation. To install or replace the battery:
- Ensure the multimeter is turned OFF.
- Locate the battery compartment on the back of the unit.
- Use a screwdriver to open the battery cover.
- Insert the 9V battery, observing the correct polarity (+/-).
- Replace the battery cover and secure it with the screw.
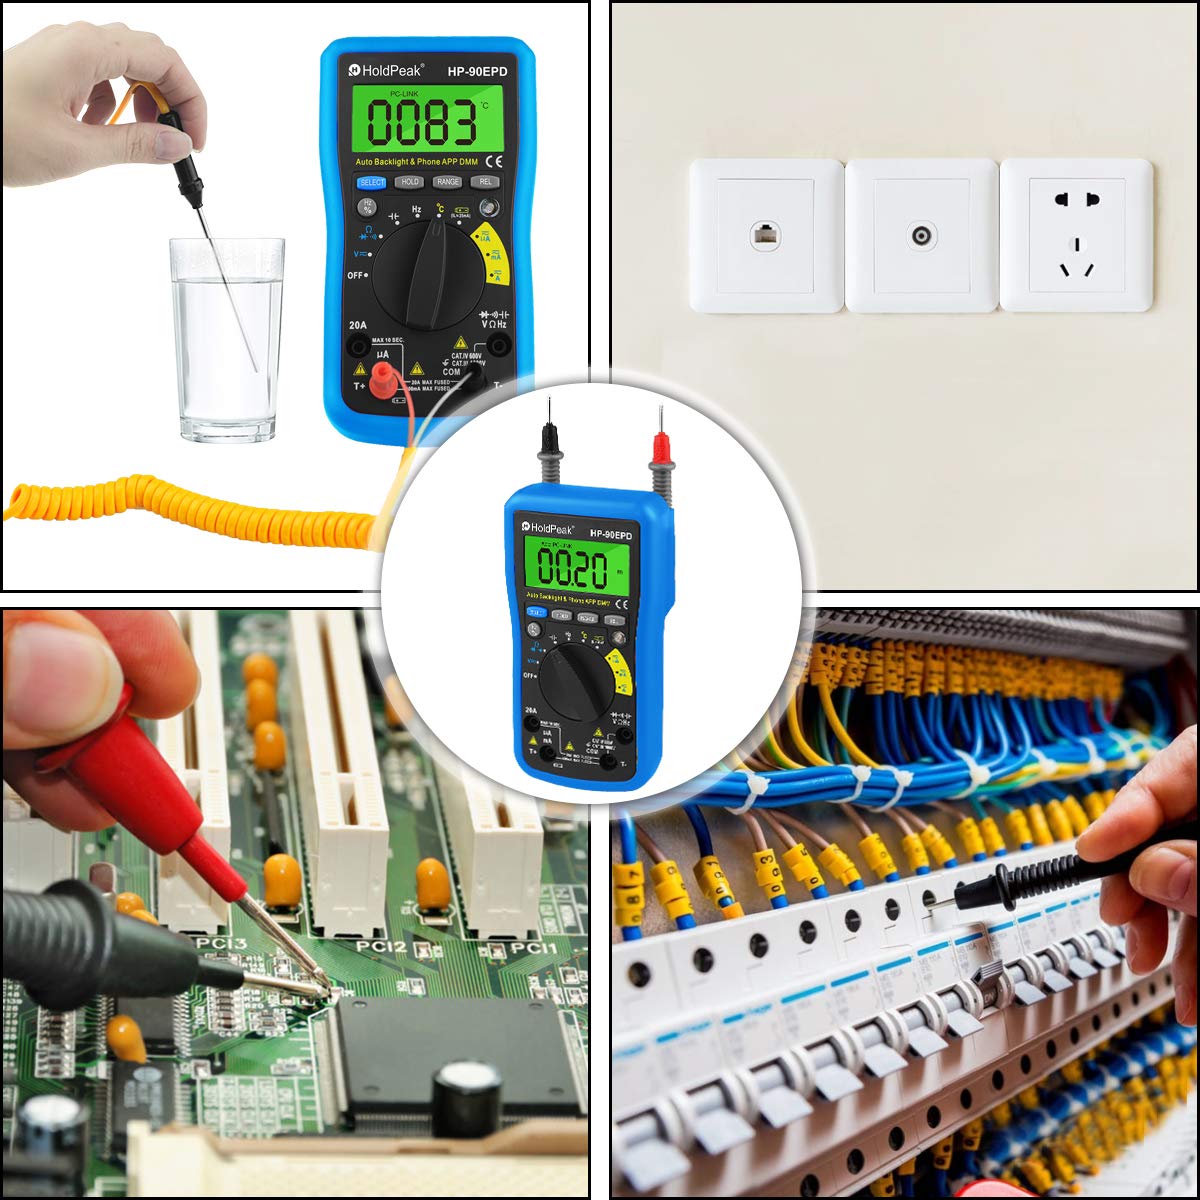
Figure 5.1: Location of the removable 9V battery compartment.
5.2 Mobile APP Connection
The HOLDPEAK 90EPD can connect to a mobile application for enhanced data logging and display features.
- Step 1: Scan the QR code provided in the manual (or on the product packaging) or search for "intelligent multimeter" in your phone's app store to download the application.
- Step 2: Open your phone's Bluetooth settings and ensure Bluetooth is enabled. Then, launch the downloaded application.
- Step 3: Turn on the multimeter. Your phone should automatically detect and connect to the multimeter via Bluetooth.
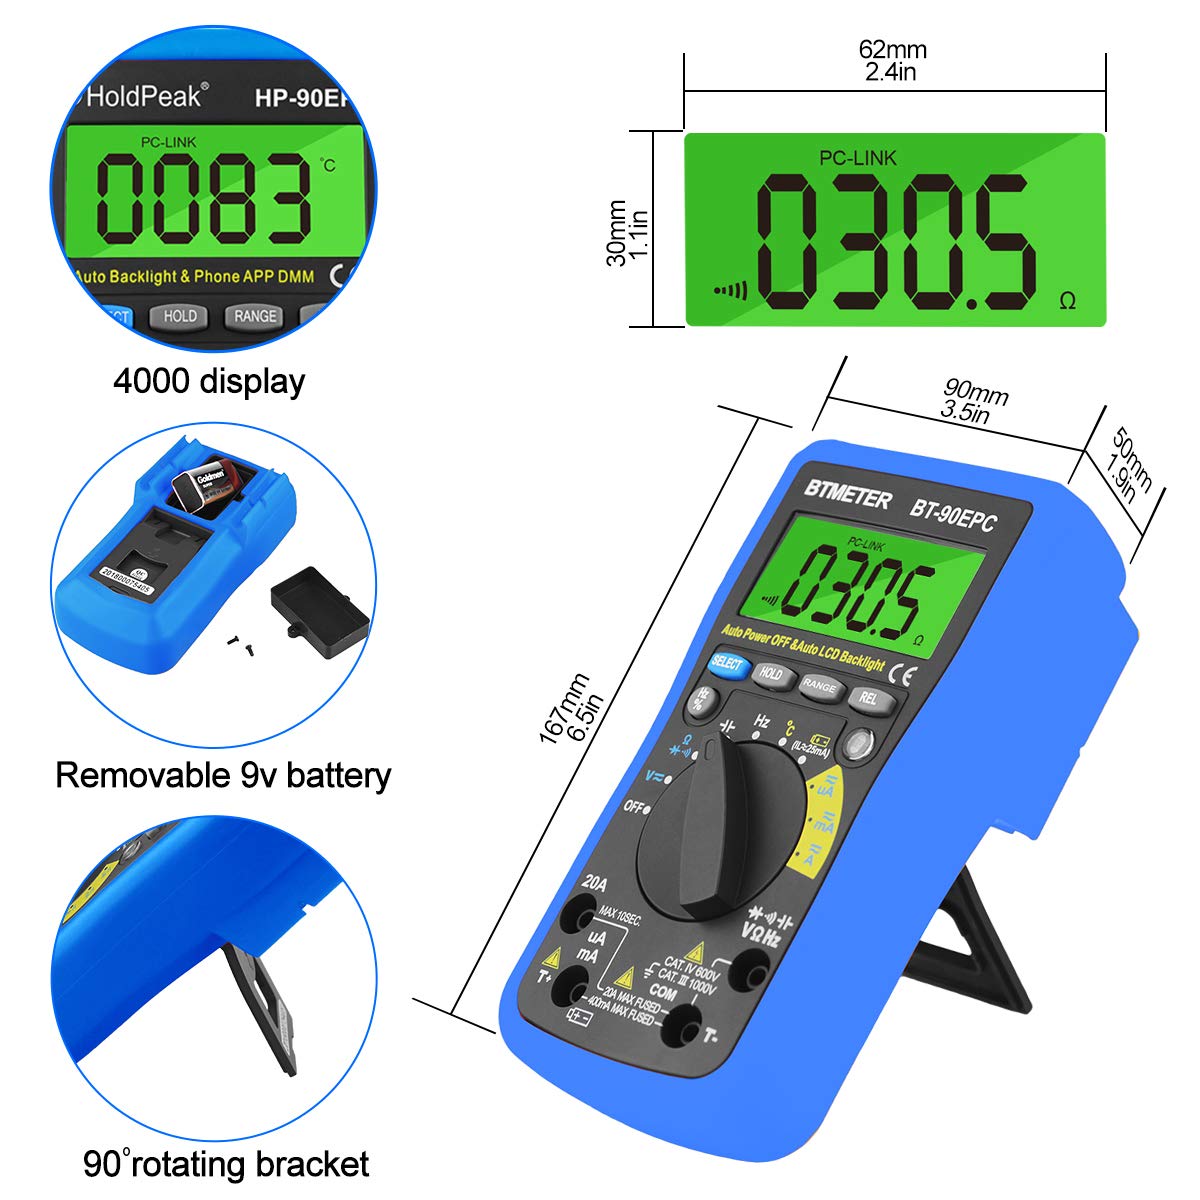
Figure 5.2: Steps for connecting the multimeter to a mobile phone application.
6. Operating Instructions
This section provides general guidance for using the HOLDPEAK 90EPD Multimeter for various measurements. Always refer to the specific function details in the full operating manual for precise instructions.
General Operation:
- Power On/Off: Rotate the central rotary switch to the desired measurement function to turn the meter on. Turn it to 'OFF' to power off.
- Auto-Ranging: The meter automatically selects the appropriate range for most measurements, simplifying operation.
- Data Hold: Press the 'HOLD' button to freeze the current reading on the display. Press again to release.
- Auto Back-Light: The display features an auto backlight for improved visibility in low-light conditions.
- Relative Measurement (REL): Press the 'REL' button to store the current reading as a reference value. Subsequent readings will be displayed as a deviation from this reference.
- Function Selection (SELECT): For ranges with multiple functions (e.g., AC/DC voltage, diode/continuity), press the 'SELECT' button to toggle between them.
Measurement Functions:
- AC/DC Voltage (V~ / V-): Connect test leads in parallel to the circuit. Select the appropriate voltage range.
- AC/DC Current (A~ / A-): Connect the meter in series with the circuit. Ensure the circuit is de-energized before connecting. Select the appropriate current range (µA, mA, A).
- Resistance (Ω): Ensure the circuit is de-energized. Connect test leads across the component.
- Capacitance (F): Ensure the capacitor is discharged before testing. Connect test leads across the capacitor.
- Frequency (Hz) / Duty Cycle (%): Connect test leads to the signal source.
- Diode Test (→|): Use to check the forward voltage drop of a diode.
- Continuity Test (•))): Use to check for open or closed circuits. An audible buzzer indicates continuity.
- Temperature (°C/°F): Connect the temperature test probe to the appropriate input jacks.
- Non-Contact Voltage (NCV): Use the NCV sensor to detect the presence of AC voltage without direct contact.
Figure 6.1: Examples of the HoldPeak 90EPD Multimeter in various measurement scenarios.
7. Maintenance
7.1 Cleaning
To clean the multimeter, use a soft cloth dampened with mild detergent. Do not use abrasives or solvents. Ensure the meter is powered off and disconnected from any circuits before cleaning.
7.2 Storage
When not in use for extended periods, remove the battery to prevent leakage. Store the multimeter in its carrying case in a cool, dry place, away from direct sunlight and extreme temperatures.
8. Troubleshooting
If you encounter issues with your HOLDPEAK 90EPD Multimeter, refer to the common problems and solutions below:
- No Display/Power:
- Check if the battery is installed correctly and has sufficient charge. Replace the 9V battery if necessary.
- Ensure the rotary switch is turned to an ON position.
- Incorrect Readings:
- Verify that the test leads are properly connected to the correct input jacks for the selected function.
- Ensure the correct measurement function is selected on the rotary switch.
- Check the battery level; low battery can affect accuracy.
- Ensure the circuit being tested is within the meter's specified range.
- Mobile APP Connection Issues:
- Ensure Bluetooth is enabled on your smartphone.
- Make sure the multimeter is powered on and within Bluetooth range.
- Restart both the multimeter and the mobile application.
- Check if the app is updated to the latest version.
- "OL" Displayed (Overload):
- The measured value exceeds the selected range. The auto-ranging feature should typically handle this, but if manually ranged, switch to a higher range.
- Ensure the meter is not connected to a voltage or current exceeding its maximum input ratings.
9. Specifications
| Specification | Value |
|---|---|
| Safety/Compliances | IEC61010 CAT.III 1000V, CAT.IV 600V overvoltage and double insulation standard |
| Display | Maximum reading 4000, analogue bar graph 41 segments |
| Range selection | Auto |
| Overload display | Display OL |
| DC voltage | 400mV/4V/40V/400V (±0.5%), 1000V (±0.8%) |
| AC voltage | 400mV (±1.2%), 4/40/400V (±0.8%), 750V (±1.2%) |
| DC current | 400uA/4000uA/40mA/400mA (±1.2%), 4/20A (±2.0%) |
| AC current | 400uA/4000uA/40mA/400mA (±1.5%), 4/20A (±2.5%) |
| Capacitance | 51.2nF (±3.0%), 512nF/5.12uF/51.2uF (±2.5%), 100uF (±5.0%) |
| Resistance | 400ohm/4k/40k/400k/4Mohm (±1.0%), 40Mohm (±1.5%) |
| Frequency range | 5.12Hz ~ 5.12MHz (±0.1%) |
| Diode test | Yes |
| Continuity test | Yes |
| Non-contact voltage detection | Yes |
| Relative Value | Yes |
| Mobile APP | Yes |
| Dimensions | 16.7 x 9 x 5 cm (6.6" x 3.48" x 2.36") |
| Power | 9V 6F22 battery |
| Weight | 0.71 lb (approx. 322g) |
| Manufacturer | Zhuhai Jida Huapu Instrument Co.,Ltd |
| Item model number | 90EPD |
| Date First Available | Sept. 1 2016 |
10. Warranty and Support
For detailed warranty information, technical support, or service inquiries, please refer to the official HoldPeak website or the warranty card included with your product. Keep your purchase receipt as proof of purchase for warranty claims.
Related documents90EPD


Ask a question about this manual
Ask about setup, troubleshooting, compatibility, parts, safety, or missing instructions. Manuals+ will review the question and use this page’s manual context to help answer it.