Introduction
The Laney GH50R is a 50-watt guitar amplifier head designed to provide versatile tube tone. It allows musicians to balance preamp distortion (RED) and output tube distortion (BLACK) to achieve a wide range of sounds. This manual provides essential information for the safe and effective operation of your GH50R amplifier head.
Safety Information
- Always connect the amplifier to a grounded power outlet.
- Ensure proper ventilation to prevent overheating. Do not block ventilation openings.
- Do not expose the amplifier to rain or moisture.
- Before connecting or disconnecting speakers, ensure the amplifier is turned off and unplugged.
- Use speaker cables with appropriate gauge and connectors. Never use instrument cables for speaker connections.
- Refer all servicing to qualified service personnel.
Product Overview
The Laney GH50R is a 50-watt RMS tube amplifier head featuring an EL34 loaded output section. It offers two channels that can be configured for clean or driven tones, a 3-band tone stack with a Pull Shift function for mid-range flexibility, and a master output control to balance preamp and power amp distortion. A studio-quality digital reverb with a Pull Focus function is also integrated.
Front Panel Controls

Figure 1: Front view of the Laney GH50R amplifier head, showing the input, channel controls, EQ section, master output, reverb, standby, and power switches.
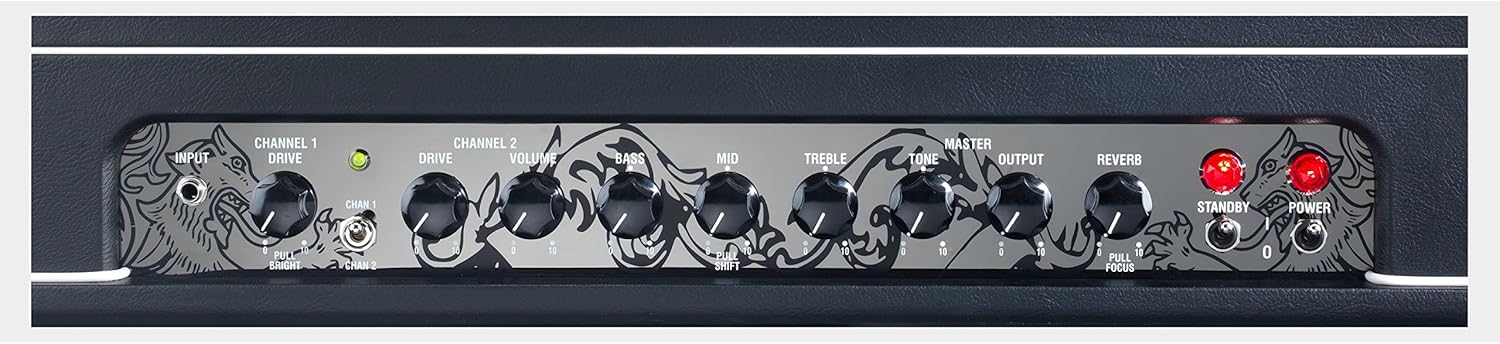
Figure 2: Close-up view of the Laney GH50R amplifier head's front panel controls, highlighting the detailed labels and knob positions for input, channel 1 drive, channel 2 drive, volume, bass, mid, treble, master tone, master output, reverb, standby, and power.
Rear Panel Connections
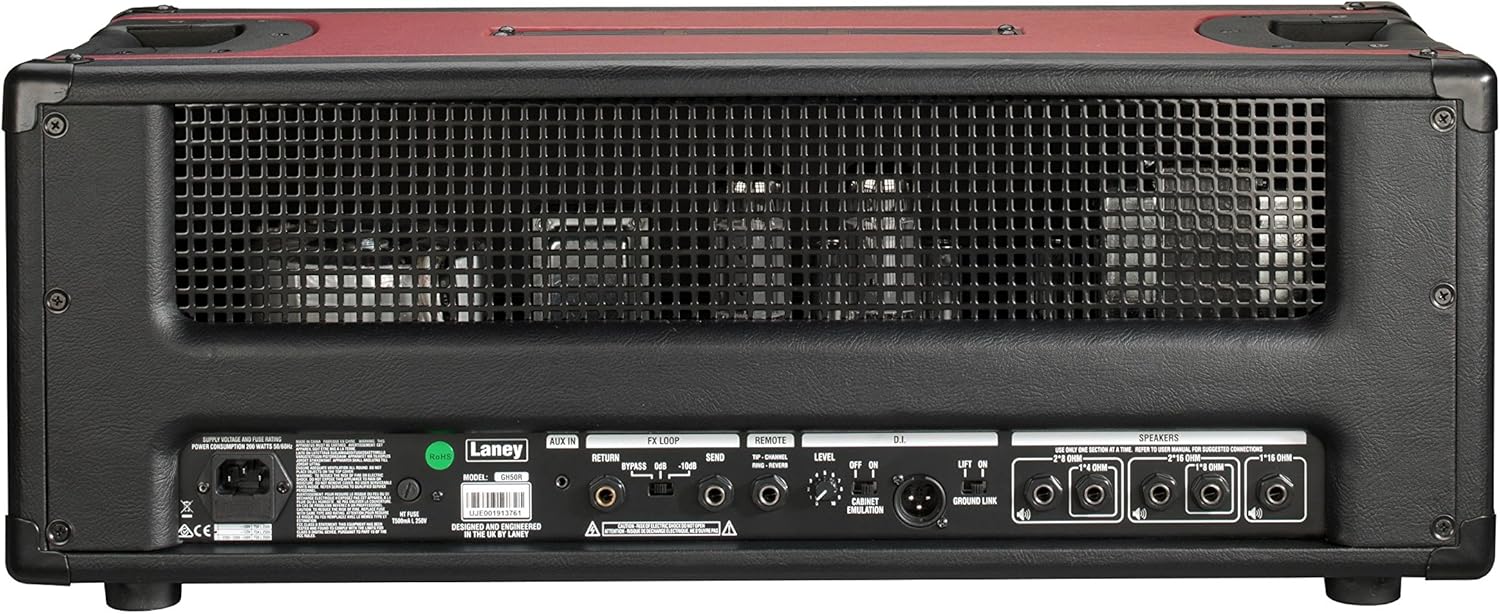
Figure 3: Rear view of the Laney GH50R amplifier head, displaying the power input, fuse, FX loop connections (return, aux in, send), remote footswitch input, DI output, and speaker outputs.
Setup
- Unpacking: Carefully remove the amplifier head from its packaging. Retain all packaging materials for future transport or storage.
- Placement: Place the amplifier head on a stable, level surface, ensuring adequate ventilation around the unit. Avoid placing it near heat sources or in direct sunlight.
- Speaker Connection: Connect the amplifier to a suitable speaker cabinet using a high-quality speaker cable. Ensure the speaker cabinet's impedance matches one of the amplifier's output impedance options (e.g., 8 Ohm, 16 Ohm). Incorrect impedance matching can damage the amplifier.
- Power Connection: Ensure the amplifier's POWER switch is in the OFF position. Connect the supplied power cord to the IEC inlet on the rear panel and then to a grounded AC power outlet.
- Instrument Connection: Connect your guitar to the INPUT jack on the front panel using a standard instrument cable.
- Footswitch (Optional): If using a footswitch, connect it to the REMOTE jack on the rear panel.
Operating Instructions
Powering On
- Ensure all connections are secure and volume controls are set to a low level.
- Flip the POWER switch to the ON position. The power indicator light will illuminate.
- Wait approximately 30-60 seconds for the tubes to warm up.
- Flip the STANDBY switch to the ON position. The amplifier is now ready for use.
Front Panel Controls Explained
- INPUT: Connect your guitar here.
- CHANNEL 1 DRIVE: Controls the gain level for Channel 1. Pulling this knob activates the 'Bright' function for increased treble.
- CHANNEL 2 DRIVE: Controls the gain level for Channel 2.
- CHANNEL SELECT: Toggles between Channel 1 and Channel 2.
- VOLUME: Adjusts the overall output volume of the selected channel.
- BASS, MID, TREBLE: 3-band equalizer to shape the tone. The MID knob features a 'Pull Shift' function for altering the mid-range frequency response.
- MASTER TONE: Provides a global tonal adjustment at the end of the signal chain.
- MASTER OUTPUT: Balances the amount of preamp distortion versus power amp distortion. Higher settings drive the power tubes harder.
- REVERB: Controls the level of the built-in digital reverb effect. Pulling this knob activates the 'Focus' function for further reverb variation.
- STANDBY: Engages or disengages the amplifier's high voltage. Use this switch when taking short breaks to prolong tube life.
- POWER: Turns the amplifier's main power on or off.
Rear Panel Connections Explained
- POWER INLET: Connects to the mains power supply.
- FUSE: Contains the main power fuse. Replace only with the specified type and rating.
- FX LOOP (SEND, RETURN, AUX IN): Allows connection of external effects pedals or processors. The AUX IN can be used for external audio sources.
- REMOTE: Connects the optional footswitch for channel switching and reverb control.
- DI OUT: Balanced XLR output for direct connection to a mixing console or recording interface. Includes a Ground Lift switch.
- SPEAKERS: Multiple output jacks for connecting speaker cabinets with various impedance ratings (e.g., 8 Ohm, 16 Ohm). Ensure correct impedance matching.
Maintenance
- Cleaning: Use a soft, dry cloth to clean the amplifier's exterior. Do not use abrasive cleaners or solvents.
- Tube Replacement: Vacuum tubes have a finite lifespan. If you notice a decrease in performance or unusual noise, consult a qualified technician for tube inspection and replacement.
- Storage: When not in use for extended periods, store the amplifier in a dry, temperature-controlled environment.
- Transportation: Always power off and unplug the amplifier before moving it. Use appropriate protective covers or cases for transport.
Troubleshooting
| Problem | Possible Cause | Solution |
|---|---|---|
| No sound | Power not on, standby off, speaker cable disconnected, incorrect impedance, faulty instrument cable, faulty guitar. | Check power and standby switches. Verify all cable connections. Ensure speaker impedance matches. Test with a different instrument cable and guitar. |
| Low volume or weak tone | Volume controls too low, worn tubes, incorrect speaker impedance. | Increase volume controls. Check speaker impedance. Consult a technician for tube inspection. |
| Excessive hum or noise | Ground loop, faulty cables, proximity to other electronic devices, worn tubes. | Ensure proper grounding. Try a different power outlet. Use shielded cables. Move away from other electronics. Consult a technician for tube inspection. |
| No power indicator light | No mains power, blown fuse. | Check power outlet. Inspect and replace fuse with the correct type and rating if blown. If fuse blows repeatedly, seek professional service. |
Specifications
- Model: GH50R
- Output Wattage: 50 Watts RMS
- Power Source: Corded Electric
- Compatible Devices: Guitar
- Number of Bands (EQ): 3
- Item Weight: 8.3 ounces (235 Grams)
- Product Dimensions: 9.17 x 11.12 x 26.33 inches
- ASIN: B01L6TUSYQ
- Date First Available: March 29, 2017
Warranty and Support
For warranty information and technical support, please refer to the official Laney website or contact your authorized Laney dealer. Keep your proof of purchase for warranty claims.
Laney Amplification Official Website: www.laney.co.uk


