
Introduction
This manual provides detailed instructions for the installation, operation, and maintenance of your 6 Sigma MicroBurst Nitrous Oxide Injection Kit. This kit is designed to enhance the performance of 4-stroke engines, including Predator 212 Hemi and Non-Hemi models, commonly found in go-karts and mini-bikes. Please read all instructions carefully before proceeding with installation or use.
Safety Information
WARNING: Nitrous oxide is a pressurized gas. Improper handling or installation can lead to serious injury or property damage. Always wear appropriate safety gear, including eye protection, during installation and handling.
- Local Laws: Always check and comply with all local, state, and federal laws regarding the use of nitrous oxide systems on vehicles.
- Ventilation: Ensure adequate ventilation when working with nitrous oxide.
- Lubrication: It is critical to LUBE THE SEAL BEFORE FIRST USE of the NOS GO Button Dispenser. Failure to do so will cause the seal to tear and leak, rendering the unit inoperable.
- Engine Compatibility: This kit is intended for 4-stroke engines. Ensure your engine is compatible before installation.
- Professional Installation: If you are unsure about any part of the installation process, consult a qualified mechanic.
Package Contents
Verify that all components listed below are present in your kit:
- NOS GO Button Dispenser
- Main Jet for Carburetor
- (5) 16 Gram Nitrous Bottles
- UV Resistant Zip Ties
- 5 ft of 3/16 Clear Poly NOS Hose
- Velcro Strap for easy NOS charger replacement
- 3/16" Nozzle & Tee poly fittings for Nitrous and Boost Bottle Install
- Re-purposed 20cc Boost Bottles (used 16 gram nitrous chargers, plain silver, ready to be painted)
- 2 Ft of 3/16 Clear Poly Boost Bottle Hose
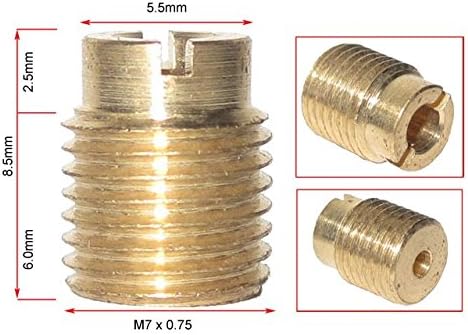
Figure 1: Overview of the 6 Sigma MicroBurst Nitrous Oxide Injection Kit components.
Setup and Installation
Installation of the 6 Sigma MicroBurst Nitrous Oxide Injection Kit is designed to be straightforward, typically requiring basic hand tools. Follow these steps carefully:
- Prepare the NOS GO Button Dispenser: Before attaching any nitrous bottles, apply a small amount of lubricant (e.g., silicone grease or machinist's oil) to the internal seal of the NOS GO Button Dispenser. Press the button repeatedly to ensure the lubricant is evenly distributed and the button moves freely without sticking. This prevents seal tearing and leaks.
- Carburetor Jet Installation: Locate your engine's carburetor. Remove the existing main jet and replace it with the provided main jet from the kit. This jet is specifically sized for optimal performance with nitrous injection.
- Mount the NOS GO Button Dispenser: Choose a convenient location on your handlebars or frame for the NOS GO Button Dispenser. Use the provided UV resistant zip ties or Velcro strap to securely mount the dispenser. Ensure the button is easily accessible during operation.
- Connect NOS Hose: Cut the 5 ft of 3/16 clear poly NOS hose to the required length. Connect one end to the NOS GO Button Dispenser and the other end to the 3/16" nozzle fitting. Install the nozzle fitting into your engine's intake system (e.g., airbox or intake manifold) using the provided Tee poly fittings if necessary. Ensure all connections are secure and leak-free.
- Boost Bottle Installation (Optional): The re-purposed 20cc boost bottles can be installed to further optimize engine response. Connect them to your engine's intake system using the 2 ft of 3/16 clear poly boost bottle hose and appropriate Tee fittings.
- Engine Tuning: After installation, perform engine tuning as necessary for 4-stroke engines to achieve optimum performance. This may involve minor adjustments to carburetor settings to compensate for the increased airflow and fuel requirements when nitrous is activated.

Figure 2: Carburetor main jet with dimensions.

Figure 3: NOS GO Button Dispenser mounted on a handlebar.
Operating Instructions
Once the kit is installed and all connections are secure, you can begin using the nitrous system:
- Insert Nitrous Bottle: Screw a 16-gram nitrous bottle into the NOS GO Button Dispenser. Ensure it is tightened sufficiently to create a seal, but do not overtighten.
- Activate Nitrous: When you desire a temporary boost in horsepower, press and hold the NOS GO Button Dispenser. Nitrous oxide will be injected into the engine's intake, providing a significant increase in power.
- Release Button: Release the button to stop the flow of nitrous oxide.
- Monitor Performance: Pay attention to engine behavior. If you notice any unusual sounds or performance issues, release the button immediately and inspect the system.
Note: Nitrous oxide provides a temporary power boost. Use it judiciously and be aware of the remaining capacity in your nitrous bottle.
Maintenance
Regular maintenance ensures the longevity and safe operation of your nitrous injection kit:
- Dispenser Lubrication: Periodically re-lubricate the seal of the NOS GO Button Dispenser, especially if it feels stiff or sticky. This prevents leaks and ensures smooth operation.
- Hose Inspection: Regularly inspect all poly hoses for cracks, kinks, or wear. Replace any damaged hoses immediately.
- Fittings Check: Ensure all fittings are tight and secure. Check for any signs of leaks around connections.
- Nitrous Bottle Replacement: Replace empty 16-gram nitrous bottles as needed. Ensure proper disposal of empty bottles according to local regulations.
- Cleaning: Keep the dispenser and hoses clean from dirt and debris.
Troubleshooting
If you encounter issues with your 6 Sigma MicroBurst Nitrous Oxide Injection Kit, refer to the following common problems and solutions:
| Problem | Possible Cause | Solution |
|---|---|---|
| NOS GO Button Dispenser sticks or is hard to press. | Lack of lubrication on the internal seal; debris. | Apply lubricant (e.g., silicone grease or machinist's oil) to the seal and press the button repeatedly to work it in. Clean any visible debris. |
| Nitrous leaks from the dispenser. | Damaged or unlubricated seal; loose nitrous bottle. | Ensure the seal is properly lubricated. Tighten the nitrous bottle. If the seal is damaged, contact customer support for replacement parts. |
| No power boost when button is pressed. | Empty nitrous bottle; clogged nozzle; kinked hose; improper jet installation. | Replace the nitrous bottle. Check the nozzle for obstructions. Inspect the hose for kinks. Verify the main jet is correctly installed in the carburetor. |
| Engine runs poorly after nitrous activation. | Improper engine tuning; incorrect jetting. | Re-evaluate engine tuning, especially carburetor settings. Ensure the correct main jet is installed. |
Specifications
- Brand: 6 Sigma
- Sub Brand: MicroBurst
- Model Number: 6SIG3525
- UPC: 763437455538
- Item Weight: 16 ounces (approximate, kit components)
- Item Dimensions (L x W x H): 3" x 1" x 4.5" (dispenser, approximate)
- Material Type: Aluminum (dispenser)
- Assembly Required: Yes
Warranty Information
Specific warranty details for the 6 Sigma MicroBurst Nitrous Oxide Injection Kit are not provided in this manual. For information regarding product warranty, including terms, conditions, and duration, please contact 6 Sigma customer support directly.
Customer Support
6 Sigma is committed to providing support for your product. If you require assistance with installation, have questions about operation, or need troubleshooting guidance beyond what is covered in this manual, please contact our customer support team.
We can also provide instructions in various languages upon request.
Contact Information:
- Please refer to the product packaging or the official 6 Sigma website for the most current contact details.