1. Introduction and General Safety Information
This manual provides essential information for the safe operation, maintenance, and care of your Metabo KGSV 72 Xact Mitre Saw. Please read all instructions carefully before operating the tool. Failure to follow these instructions may result in electric shock, fire, and/or serious injury.
General Power Tool Safety Warnings
- Work Area Safety: Keep work area clean and well lit. Cluttered or dark areas invite accidents. Do not operate power tools in explosive atmospheres, such as in the presence of flammable liquids, gases or dust.
- Electrical Safety: Power tool plugs must match the outlet. Never modify the plug in any way. Avoid body contact with earthed or grounded surfaces.
- Personal Safety: Always wear eye protection, hearing protection, and a dust mask. Dress properly; avoid loose clothing or jewelry. Keep hair, clothing, and gloves away from moving parts.
- Tool Use and Care: Do not force the power tool. Use the correct power tool for your application. Disconnect the plug from the power source before making any adjustments, changing accessories, or storing power tools.
- Service: Have your power tool serviced by a qualified repair person using only identical replacement parts.
Specific Mitre Saw Safety Warnings
- Always use the blade guard and ensure it is functioning correctly.
- Keep hands away from the cutting area and the blade.
- Secure the workpiece firmly with clamps or a vice. Never hold the workpiece by hand.
- Ensure the saw blade is sharp and suitable for the material being cut.
- Do not attempt to cut workpieces that are too small to be securely clamped.
- Be aware of the laser warning symbol.

Image Description: This image displays a standard laser warning label. It features a yellow triangular warning symbol with a radiating laser beam, the text "LASER 2", and a red circular prohibition symbol with a diagonal line over a laser beam, indicating that direct eye exposure to the laser should be avoided.
2. Product Overview
The Metabo KGSV 72 Xact Mitre Saw is designed for precise cutting of various materials, including wood, aluminum profiles, and plastics. It features a compact traction function, allowing for wide workpieces up to 305mm without requiring significant space behind the saw. The saw head is inclinable on both sides, and the rotating table offers maximum flexibility for angle adjustments. A double line laser ensures precise cutting line display, and speed control extends its application range.

Image Description: A detailed view of the Metabo KGSV 72 Xact Mitre Saw. The saw features a green motor housing and handle, a silver blade guard, and a grey base with red adjustment knobs. The saw blade is visible, and the sliding rails are extended, indicating its compact traction function. The laser guide is also visible near the blade.
Key Features:
- Compact traction function for wide workpieces (up to 305 mm).
- Rotating table and inclinable saw head for versatile angle cuts.
- Double line laser for precise cutting line indication.
- Speed control for various materials (e.g., aluminum, plastics).
- Sliding high rear fence profiles for enhanced safety.
- Depth guide for groove creation.
- Spindle lock for easy saw blade changes.
- Integrated dust scoop for effective dust extraction.
- Bright LED work light.
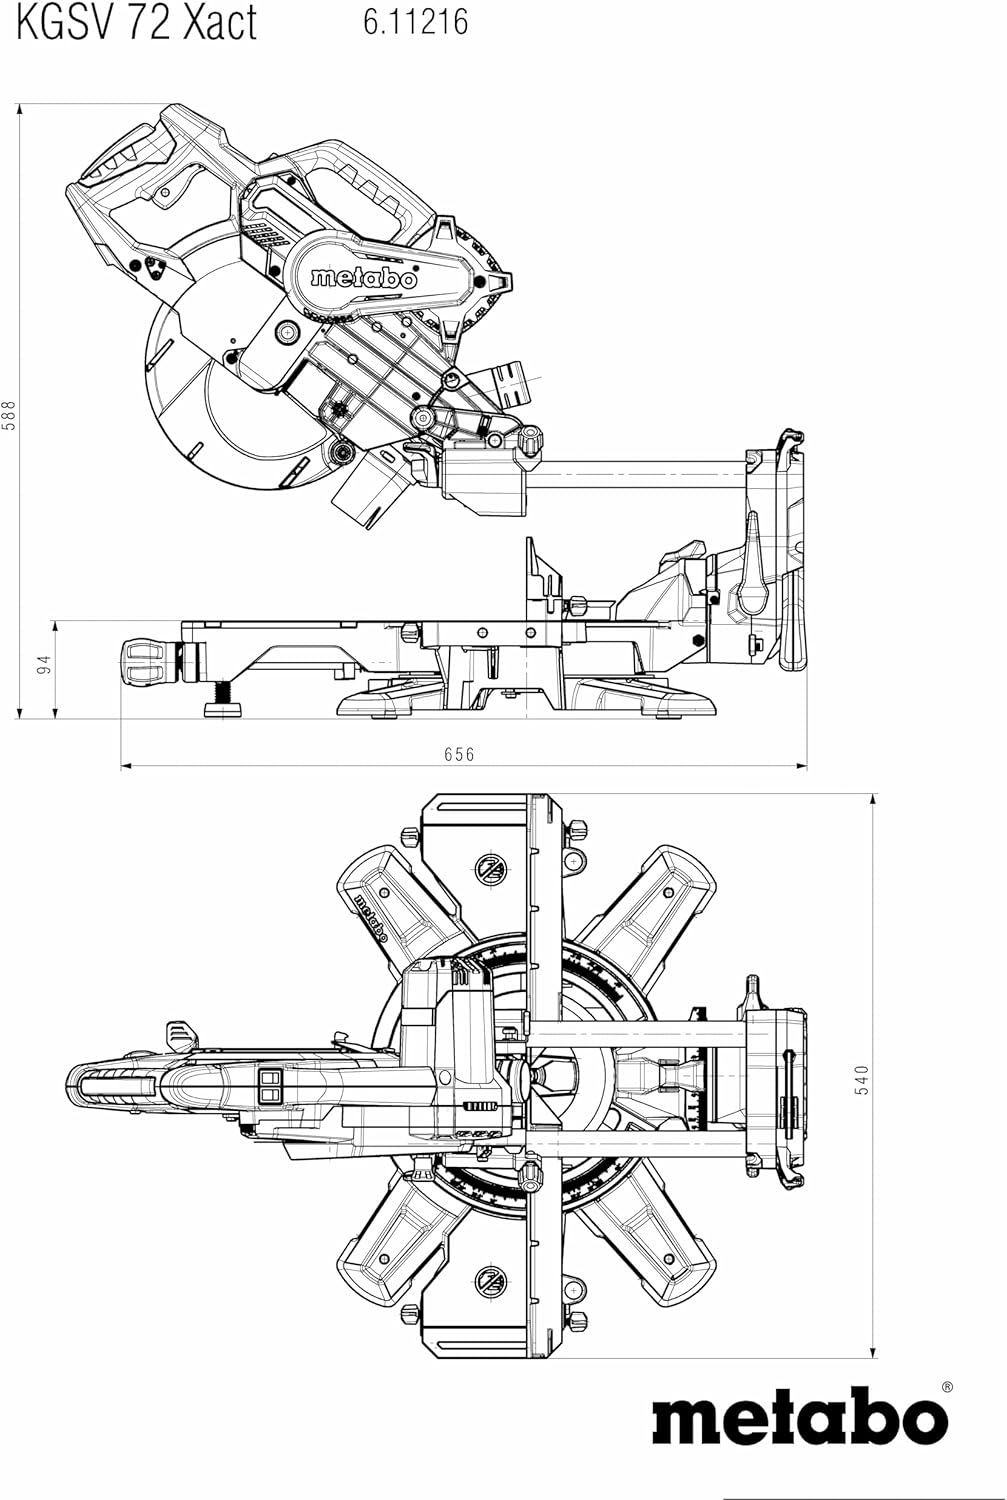
Image Description: This technical drawing illustrates the dimensions and various views of the Metabo KGSV 72 Xact Mitre Saw. It includes top, front, and side views with measurements in millimeters, providing a clear understanding of the saw's physical footprint and design.
3. Setup and Assembly
3.1 Unpacking
Carefully remove the mitre saw and all accessories from the packaging. Inspect for any damage that may have occurred during transit. Retain packaging for future transport or storage.
3.2 Attaching Table Length Extensions
- Locate the two table length extensions provided.
- Slide each extension into the designated slots on either side of the saw's main table.
- Secure them using the locking mechanisms (typically thumbscrews or levers) to provide stable support for longer workpieces.
3.3 Installing the Material Clamp
Insert the material clamp into the designated hole on the saw table. Adjust its position to securely hold the workpiece against the fence during cutting operations. Ensure it is tightened firmly before use.
3.4 Initial Adjustments
- Fence Adjustment: Ensure the rear fence profiles are correctly aligned and secured.
- Laser Alignment: Check the double line laser for accuracy. If necessary, consult the detailed instructions in the full manual for laser calibration procedures.
- Blade Inspection: Verify that the carbide saw blade (216 x 30mm x 40T) is correctly installed and secured.
4. Operating Instructions
4.1 Power Connection
Connect the saw to a suitable 230 Volt power outlet. Ensure the power switch is in the "OFF" position before plugging in the tool.
4.2 Adjusting Mitre Angle
- Loosen the mitre angle locking knob/lever.
- Rotate the turntable to the desired angle (e.g., 0°, 15°, 22.5°, 30°, 45°). The saw has stop points for common angles.
- Tighten the locking knob/lever firmly to secure the table in position.
4.3 Adjusting Bevel Angle
- Loosen the bevel angle locking mechanism (located at the rear or side of the saw head).
- Tilt the saw head to the desired bevel angle (left or right).
- Secure the saw head by tightening the locking mechanism.
4.4 Using the Sliding Function
For wider workpieces, the saw head can slide forward and backward on its rails. Ensure the workpiece is fully supported and clamped. Pull the saw head towards you, start the motor, and push the saw head smoothly through the workpiece.
4.5 Speed Control
The integrated speed control allows you to adjust the blade speed. Use lower speeds for cutting aluminum profiles and plastics to prevent melting or excessive heat buildup. Higher speeds are generally suitable for wood.
4.6 Making a Cut
- Position the workpiece against the fence and secure it with the material clamp.
- Lower the saw blade slightly to align the double line laser with your cut mark.
- Ensure the blade guard is free to move.
- Start the motor and allow the blade to reach full speed.
- Slowly lower the saw blade through the workpiece. For sliding cuts, pull the saw head forward, start the motor, and push through the material.
- Once the cut is complete, release the trigger and allow the blade to stop before raising the saw head.
- Remove the workpiece.
5. Maintenance
5.1 Cleaning
Regularly clean the saw to ensure optimal performance and longevity. Disconnect from power before cleaning.
- Remove sawdust and debris from the blade guard, motor vents, and table using a brush or compressed air.
- Clean the sliding rails to ensure smooth operation.
- Wipe down external surfaces with a damp cloth. Do not use harsh chemicals.
5.2 Saw Blade Change
Always disconnect the saw from the power supply before changing the blade.
- Engage the spindle lock button to prevent the blade from rotating.
- Using the provided tool, loosen the blade retaining bolt.
- Carefully remove the old blade, noting its rotation direction.
- Install the new blade, ensuring the teeth are pointing in the correct direction for cutting.
- Tighten the blade retaining bolt firmly while holding the spindle lock.
- Release the spindle lock.
5.3 Inspection
Periodically inspect the power cord for damage, check all fasteners for tightness, and ensure all safety features (e.g., blade guard, material clamp) are functioning correctly.
6. Troubleshooting
| Problem | Possible Cause | Solution |
|---|---|---|
| Saw does not start | No power supply; faulty switch; thermal overload. | Check power connection and circuit breaker. Allow motor to cool if overheated. Contact service if switch is faulty. |
| Inaccurate cuts | Blade dull or damaged; incorrect angle setting; loose fence; laser misalignment. | Replace blade. Re-check and adjust angle settings. Tighten fence. Calibrate laser. |
| Excessive vibration or noise | Loose blade; damaged blade; worn bearings. | Tighten blade. Replace damaged blade. Contact service for bearing issues. |
| Sawdust not effectively extracted | Dust port clogged; dust bag full or improperly attached. | Clear dust port. Empty or reattach dust bag/vacuum connection. |
7. Specifications
| Feature | Detail |
|---|---|
| Model Number | 611216000 |
| Brand | Metabo |
| Power Source | With electric cable |
| Voltage | 230 Volts |
| Wattage | 1800 watts |
| Item Weight | 16.1 Kilograms |
| Product Dimensions | 49 x 62 x 49 cm (L x W x H) |
| Blade Length | 305 Millimeters |
| Speed | 6300 RPM |
| Material | Metal (construction) |
| Special Features | Spindle Lock, Double Line Laser, Speed Control, LED Work Light |
8. Warranty and Support
Your Metabo KGSV 72 Xact Mitre Saw is covered by a manufacturer's warranty. Please refer to the warranty card included with your purchase for specific terms and conditions, including warranty period and coverage details.
For technical assistance, spare parts, or warranty claims, please contact Metabo customer support or an authorized Metabo service center. Contact information can typically be found on the Metabo official website or in your product documentation.
Always use genuine Metabo replacement parts to ensure the safety and performance of your tool.


