Introduction
This instruction manual provides essential information for the safe and efficient operation, installation, and maintenance of your Bomann GSPE 882 built-in dishwasher. Please read this manual thoroughly before using the appliance and keep it for future reference.
Important Safety Instructions
Always follow basic safety precautions when using electrical appliances to reduce the risk of fire, electric shock, and injury to persons.
- Read all instructions before using the dishwasher.
- This appliance is intended for household use only.
- Do not operate the dishwasher if it is damaged or malfunctioning. Contact qualified service personnel.
- Keep children away from the dishwasher, especially when the door is open.
- Use only detergents and rinse aids specifically designed for automatic dishwashers.
- Never touch the heating element during or immediately after use.
- Ensure the dishwasher is properly grounded.
- Do not overload the dishwasher.
- Sharp items should be loaded with points down to prevent injury.
- Disconnect the appliance from the power supply before cleaning or maintenance.
Product Overview
The Bomann GSPE 882 is a built-in dishwasher designed for efficient and thorough cleaning of your dishes. It features multiple wash programs and a user-friendly control panel.
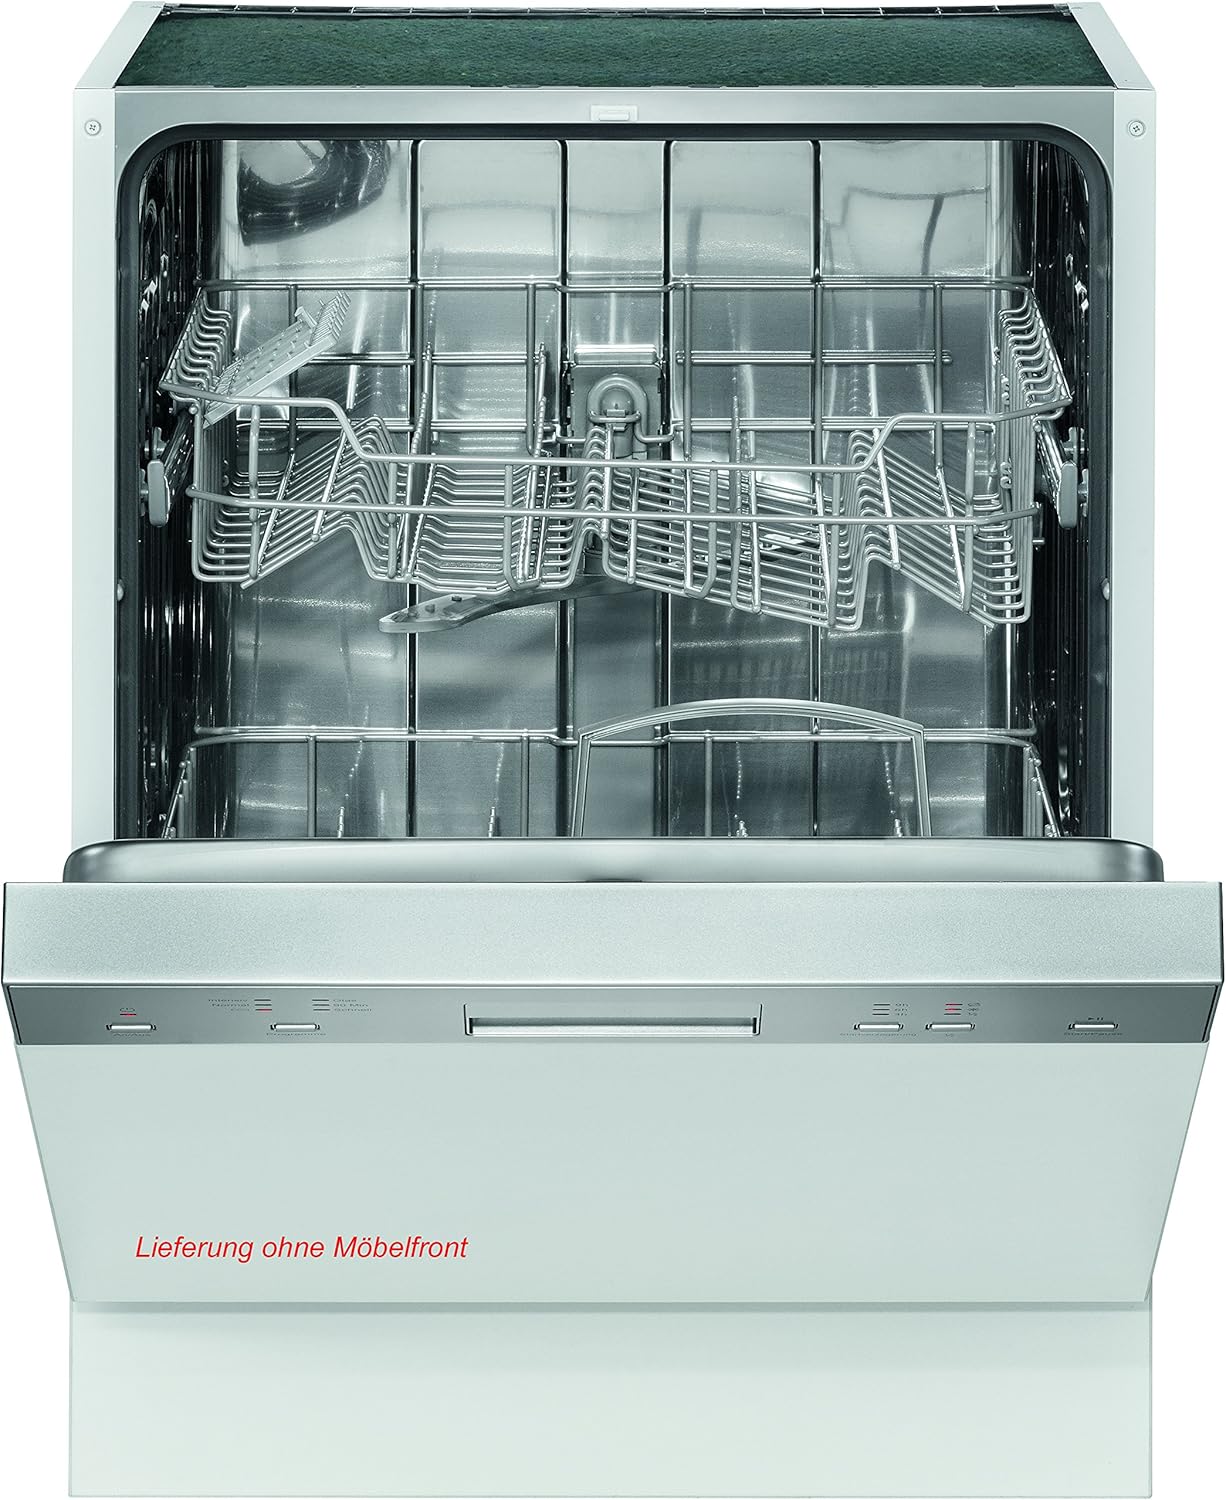
Figure 1: Front view of the Bomann GSPE 882 dishwasher with the door open, revealing the empty upper and lower racks and cutlery basket. The interior is stainless steel.
Control Panel Overview

Figure 2: Close-up of the Bomann GSPE 882 control panel. From left to right, it includes an On/Off button, Program selection button with indicator lights for Intensive, Normal, Eco, Glass, 90 Min, and Rapid programs. On the right, there are delay start options (3h, 6h, 9h) and indicator lights for salt and rinse aid, followed by a Start/Pause button.
The control panel allows you to select wash programs, set delay start times, and monitor the status of your dishwasher.
Installation and Setup
Unpacking
- Remove all packaging materials.
- Inspect the dishwasher for any damage during transit. Report any damage immediately to your retailer.
- Keep packaging materials out of reach of children.
Positioning and Leveling
- Place the dishwasher on a firm, level floor.
- Adjust the leveling feet to ensure the appliance is stable and level. This is crucial for proper door closure and operation.
Water Connection
- Connect the water inlet hose to a cold water supply tap with a 3/4-inch thread. Ensure the connection is tight to prevent leaks.
- Connect the drain hose to a suitable drain pipe or sink trap. Ensure the hose is not kinked or obstructed. The drain hose should be positioned at a height between 40 cm and 100 cm from the floor.
Electrical Connection
- Ensure the power supply voltage and frequency match the ratings on the appliance's rating plate.
- Connect the dishwasher to a properly grounded electrical outlet. Do not use extension cords or adapters.
- The electrical installation must comply with local regulations.
Salt and Rinse Aid Dispenser
- Salt: Unscrew the cap of the salt dispenser located at the bottom of the dishwasher. Fill with dishwasher salt using the funnel provided (if applicable) until the compartment is full. Replace the cap tightly. The salt indicator light will turn off once sufficient salt is detected.
- Rinse Aid: Open the rinse aid dispenser cover, usually located next to the detergent dispenser. Fill with rinse aid up to the maximum level indicator. Close the cover securely. The rinse aid indicator light will turn off once sufficient rinse aid is detected.
Operating Instructions
Loading the Dishwasher
Proper loading ensures optimal cleaning performance and prevents damage to dishes. Scrape off large food particles before loading.

Figure 3: Interior view of the Bomann GSPE 882 dishwasher loaded with various dishes. The lower rack holds plates and a cutlery basket, while the upper rack contains smaller plates, bowls, and glasses. Items are spaced to allow water circulation.
- Lower Rack: Ideal for large items like plates, serving dishes, pots, and pans. Ensure items do not block the spray arm.
- Upper Rack: Suitable for smaller items such as glasses, cups, saucers, and small bowls.
- Cutlery Basket: Place cutlery with handles down, except for knives and other sharp objects which should be placed with points down for safety.
- Avoid overcrowding to allow water and detergent to reach all surfaces.
Adding Detergent
Open the detergent dispenser and add the appropriate amount of dishwasher detergent. Close the dispenser cover firmly until it clicks. The amount of detergent depends on the program selected and the soil level of the dishes.
Selecting a Wash Program
- Press the On/Off button to power on the dishwasher.
- Press the Program button repeatedly to cycle through the available wash programs. The corresponding indicator light will illuminate.
- Intensive: For heavily soiled dishes and pots.
- Normal: Standard program for normally soiled dishes.
- Eco: Energy-saving program for normally soiled dishes.
- Glass: Gentle program for delicate glassware.
- 90 Min: For lightly soiled dishes requiring a quicker wash.
- Rapid: Shortest program for very lightly soiled dishes without drying.
- If desired, select a delay start time (3h, 6h, or 9h) using the Delay Start button.
- Press the Start/Pause button to begin the selected program. The program will start after the door is closed.
Interrupting a Program
To interrupt a program, carefully open the dishwasher door. The program will pause. To resume, close the door firmly. If the door is opened during a hot wash cycle, steam may escape. Exercise caution.
End of Program
The dishwasher will signal the end of the program. Open the door slightly to allow steam to escape and dishes to cool before unloading. Unload the lower rack first to prevent water from dripping onto dry dishes.
Care and Maintenance
Regular cleaning and maintenance ensure the longevity and optimal performance of your dishwasher.
Cleaning the Filters
The filter system prevents larger food particles from entering the pump. Clean the filters regularly (e.g., weekly) to avoid blockages and ensure efficient cleaning.
- Turn off the dishwasher and disconnect it from the power supply.
- Remove the lower spray arm.
- Twist and lift out the coarse filter, then remove the fine filter and main filter.
- Rinse all filter components under running water to remove any food residue. Use a soft brush if necessary.
- Reassemble the filters in reverse order, ensuring they are securely in place.
Cleaning the Spray Arms
Check the spray arm nozzles for blockages (e.g., from limescale or food particles). If blocked, remove the spray arms and clean the holes with a thin wire or toothpick.
Cleaning the Exterior
Wipe the exterior surfaces of the dishwasher with a damp cloth and mild detergent. Do not use abrasive cleaners or solvents.
Cleaning the Interior
Periodically run a dishwasher cleaning cycle with a specialized dishwasher cleaner to remove grease and limescale buildup.
Troubleshooting Guide
Before contacting service, refer to this table for common issues and their solutions.
| Problem | Possible Cause | Solution |
|---|---|---|
| Dishwasher does not start | Power cord not plugged in; door not closed properly; program not selected; fuse blown. | Check power connection; ensure door is latched; select a program and press Start; check household fuse/circuit breaker. |
| Dishes are not clean | Improper loading; insufficient detergent; spray arm nozzles blocked; filters clogged; incorrect program selected. | Reload dishes correctly; add more detergent; clean spray arm nozzles; clean filters; select a more intensive program. |
| White streaks on dishes | Too much rinse aid; water hardness setting incorrect; insufficient salt. | Reduce rinse aid dosage; adjust water hardness setting (refer to full manual); refill dishwasher salt. |
| Dishwasher leaks | Hose connections loose; door seal damaged; too much detergent causing excessive foam. | Check and tighten hose connections; inspect door seal for damage and clean; use correct amount of detergent. |
| Unpleasant odor | Clogged filters; food residue inside; infrequent use. | Clean filters thoroughly; run a hot wash cycle with a dishwasher cleaner; run a cycle more frequently. |
If the problem persists after attempting these solutions, please contact qualified service personnel.
Technical Specifications
| Feature | Specification |
|---|---|
| Brand | Bomann |
| Model Number | GSPE 882 |
| Installation Type | Built-in |
| Dimensions (W x D x H) | 59.8 x 57 x 81.5 cm |
| Weight | 33 kg |
| Noise Level | 49 Decibels |
| Material | Stainless Steel (Interior) |
| Capacity | 12 Place Settings |
| First Available Date | August 12, 2016 |
Warranty and Customer Support
For warranty information and customer support, please refer to the warranty card included with your appliance or contact your retailer. Keep your proof of purchase for any warranty claims.
For technical assistance or spare parts, please contact Bomann customer service or an authorized service center. Contact details can typically be found on the manufacturer's official website or in the documentation provided with the product.


