
1. Introduction
Welcome to the Ninja Coffee Bar Auto-iQ Programmable Coffee Maker user manual. This guide provides essential information for setting up, operating, maintaining, and troubleshooting your coffee system. Designed for versatility, this machine offers multiple brew sizes and styles, a built-in frother, and a removable water reservoir for convenience.
2. Important Safety Information
Please read all instructions carefully before using your Ninja Coffee Bar. Keep this manual for future reference.
- Always ensure the appliance is unplugged before cleaning or when not in use.
- Do not immerse the appliance, power cord, or plug in water or other liquids.
- Use only cold, filtered water in the reservoir.
- Do not operate any appliance with a damaged cord or plug.
- Avoid contact with moving parts.
- Do not place on or near a hot gas or electric burner, or in a heated oven.
- Always ensure the carafe is properly placed on the warming plate before brewing.
- This brewer is designed to brew coffee grounds only. Do not insert pods or K-Cups.
3. What's in the Box
Your Ninja Coffee Bar Auto-iQ Programmable Coffee Maker package includes:
- Ninja Coffee Bar Brewer Unit
- 10-cup (50-oz.) Glass Carafe
- Built-In Frother
- Removable Water Reservoir
- Permanent Reusable Filter
- Ninja Smart Scoop
- 20-Recipe Inspiration Guide
4. Parts and Features Overview
Familiarize yourself with the components of your Ninja Coffee Bar system:
- Main Brewer Unit: The central part of the coffee maker housing all brewing mechanisms and controls.
- Control Panel: Features an illuminated display and buttons for selecting brew size, brew style, and other functions like Delay Brew, Clean, and Stay Warm.
- Removable Water Reservoir: A clear, detachable tank for easy filling and cleaning, with marked fill lines.
- Brew Basket: Holds the permanent filter and coffee grounds. It swivels out for easy access.
- Permanent Reusable Filter: Eliminates the need for paper filters.
- Drip Stop: A lever to stop the flow of coffee from the brew basket, allowing you to pour a cup mid-brew.
- Glass Carafe: A 10-cup (50-oz.) glass carafe for collecting brewed coffee.
- Warming Plate: Keeps the carafe warm after brewing.
- Built-in Frother: A retractable frother arm for creating frothed milk for specialty drinks.
- Ninja Smart Scoop: A measuring scoop designed for precise coffee ground measurements.
- Single Serve Platform: A retractable platform to accommodate smaller cups and travel mugs.

Image: The Ninja Coffee Bar Auto-iQ Programmable Coffee Maker with its glass carafe and control panel visible.
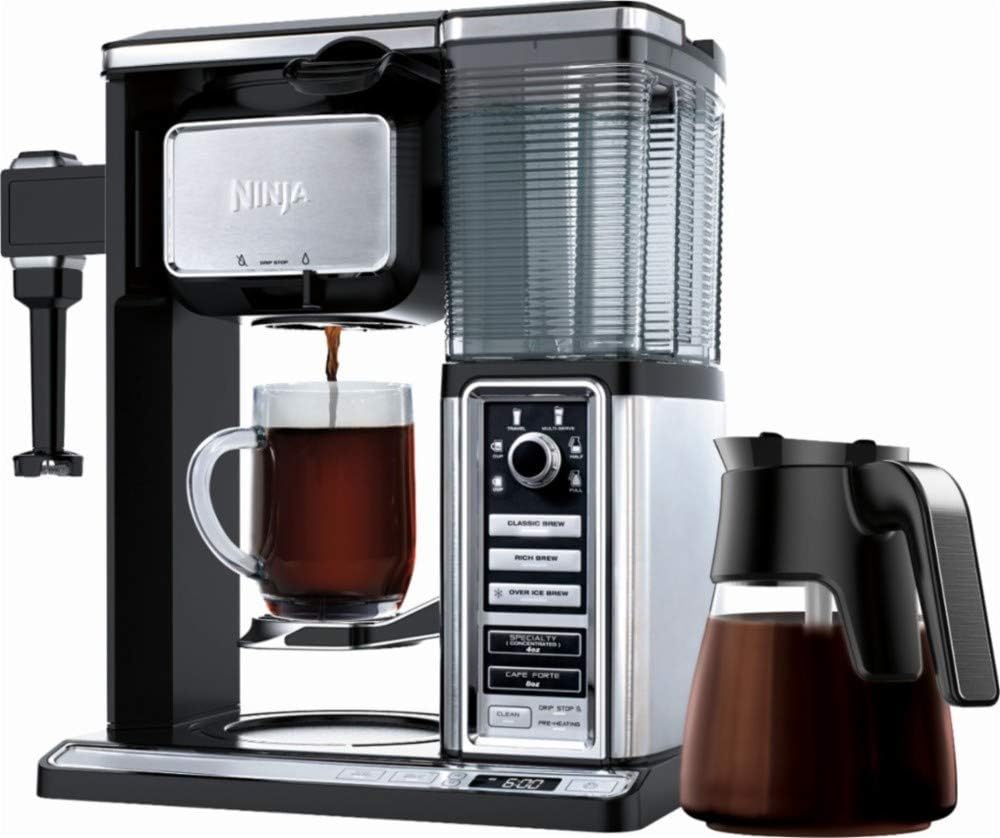
Image: The Ninja Coffee Bar system, showcasing the main unit, glass carafe, and a single-serve mug in place.
5. Setup
Follow these steps to set up your coffee maker for the first time:
- Unpack: Carefully remove all components from the packaging. Remove any tape or labels from the unit.
- Initial Cleaning: Before first use, it is recommended to run two full clean cycles. Fill the water reservoir with white vinegar to the MAX fill line. Place the empty carafe on the warming plate. Select the 'Clean' function on the control panel and allow the cycle to complete. Repeat this process with fresh water to rinse the system thoroughly.
- Positioning: Place the coffee maker on a clean, dry, and level surface. Ensure adequate clearance for the brew basket and water reservoir.
- Water Reservoir: Ensure the removable water reservoir is securely seated on the side of the brewer.
- Power: Plug the power cord into a grounded electrical outlet.
6. Operating Instructions
Learn how to brew your perfect cup of coffee:
6.1. Preparing for Brew
- Fill Water Reservoir: Remove the water reservoir and fill it with cold, filtered water to the desired level, corresponding to your chosen brew size. Reattach it securely.
- Add Coffee Grounds: Open the brew basket. Place the permanent reusable filter inside. Use the Ninja Smart Scoop to add your desired amount of coffee grounds. Refer to the included recipe guide for recommended measurements based on brew size and strength. Close the brew basket.

Image: A hand using the Ninja Smart Scoop to add coffee grounds into the permanent filter within the brew basket.
6.2. Selecting Brew Size and Style
The control panel allows you to customize your brew:

Image: A detailed view of the Ninja Coffee Bar's control panel, highlighting the various brew size and style selections.
- Brew Sizes: Use the dial to select your desired brew size:
- Cup: For a single serving.
- XL Cup: For a larger single serving or travel mug.
- Travel: Optimized for travel mugs.
- Multi-Serve: For multiple servings.
- Half Carafe: For a half pot of coffee.
- Full Carafe: For a full 10-cup pot of coffee.
- Brew Styles: Select your preferred brew strength and type:
- Classic: A smooth, balanced flavor.
- Rich: A more intense flavor, ideal for milk, cream, or flavoring.
- Over Ice Brew: Specifically designed to brew hot coffee over ice without dilution.
- Specialty Concentrated (4oz): A super-rich concentrate for hot or cold layered drinks.
- Cafe Forte (8oz): An amplified flavor experience, unique to Ninja.
6.3. Starting the Brew
- Place your chosen vessel (cup, travel mug, or carafe) under the brew basket. If brewing a single cup, extend the single-serve platform.
- Press the START/STOP button to begin brewing. The machine will automatically detect the water level and brew accordingly.
- Drip Stop: If you need to pause brewing to pour a cup, push the Drip Stop lever to the closed position. Remember to open it again to resume brewing and prevent overflow.
- Stay Warm: If brewing a carafe, the warming plate will activate. Press the 'Stay Warm' button to turn this feature on or off.
Video: Demonstrates the brewing process of the Ninja Coffee Bar, showing coffee dispensing into a mug.
6.4. Using the Built-in Frother
Create creamy frothed milk for your specialty beverages:
- Swing the frother arm out from the side of the machine.
- Add cold milk (dairy or non-dairy) to a mug.
- Submerge the frother whisk just below the surface of the milk.
- Press and hold the frother button on top of the frother arm until desired froth is achieved (typically 30-60 seconds).
- Remove the frother from the milk and swing it back into its storage position.

Image: The built-in frother actively creating foam in a glass mug, demonstrating its function.
6.5. Delay Brew Function
Set your coffee to brew automatically at a later time:
- Prepare your coffee maker with water and grounds as usual.
- Press the 'Delay Brew' button. The clock will flash.
- Use the 'H' (Hour) and 'M' (Minute) buttons to set your desired brew time.
- Press the 'Delay Brew' button again to confirm. The indicator light will illuminate, and your coffee will brew at the set time.
7. Maintenance
Regular cleaning ensures optimal performance and taste.
7.1. Daily Cleaning
- Permanent Filter: After each use, remove the permanent filter from the brew basket, discard grounds, and rinse thoroughly under warm water.
- Carafe: The glass carafe is dishwasher-safe. Alternatively, wash with warm, soapy water and rinse thoroughly.
- Water Reservoir: The removable water reservoir can be easily detached and washed with warm, soapy water.
- Frother: Rinse the frother whisk immediately after use to prevent milk residue from drying. The whisk can be detached for more thorough cleaning.
- Exterior: Wipe the exterior of the brewer with a soft, damp cloth.
7.2. Descaling (Clean Cycle)
The 'Clean' indicator light will illuminate when descaling is recommended. This process removes mineral buildup.
- Empty the carafe and ensure the permanent filter is clean and in place.
- Fill the water reservoir to the MAX fill line with white vinegar.
- Place the empty carafe on the warming plate.
- Press the 'Clean' button. The cycle will begin and may take approximately one hour to complete.
- Once the cycle is finished, discard the vinegar solution.
- Fill the water reservoir with fresh water to the MAX fill line and run another 'Clean' cycle to rinse the system. Repeat if necessary until the vinegar smell is gone.
8. Troubleshooting
Refer to this section for common issues and solutions. For more detailed troubleshooting, consult page 19 of your physical user manual.
| Problem | Possible Cause | Solution |
|---|---|---|
| Coffee not brewing or brewing slowly. | Drip Stop is closed. | Ensure the Drip Stop lever is in the open position. |
| "Clean" light remains illuminated or flashes. | Mineral buildup or component not seated correctly. | Run a descaling cycle. Check if the brew basket and water reservoir are properly seated. Ensure the Drip Stop is open. |
| Coffee is weak or too strong. | Incorrect coffee-to-water ratio or brew style selected. | Adjust the amount of coffee grounds using the Ninja Smart Scoop. Select a different brew style (e.g., 'Rich' for stronger coffee). |
| Frother not producing foam. | Milk type or temperature. Frother whisk not clean. | Use cold milk. Ensure the frother whisk is clean and fully submerged. |
9. Specifications
- Brand: Ninja
- Model Name: Coffee Makers
- Item Model Number: CF091
- Color: Silver
- Product Dimensions: 9.21"D x 11.34"W x 15"H
- Item Weight: 12.73 pounds
- Capacity: 10-cup (50-oz.) Glass Carafe / 3.1 Pounds
- Coffee Maker Type: Drip Coffee Machine
- Special Feature: Programmable
- Operation Mode: Fully Automatic
- Human Interface Input: Touchscreen
- Coffee Input Type: Ground
- Is Dishwasher Safe: No (Main unit), Yes (Carafe, Water Reservoir, Permanent Filter)
- UPC: 622356543385
Image: Diagram showing the dimensions (height, width, depth) of the Ninja Coffee Bar Auto-iQ Programmable Coffee Maker.
10. Warranty and Support
For warranty information and customer support, please refer to the warranty card included with your product or visit the official Ninja website. You can also find additional support and FAQs on the Ninja Store on Amazon.
11. Additional Resources
Explore these videos for visual guides and tips on using your Ninja Coffee Bar:
Ninja CF091 Coffee Makers Overview
Video: An official overview of the Ninja CF091 Coffee Maker, highlighting its features and capabilities.
Hot & Iced Coffee Maker by Ninja
Video: A demonstration of making both hot and iced coffee using the Ninja Coffee Bar.
Making a Quick Cup with Ninja Coffeemaker
Video: A user demonstrating how to quickly brew a single cup of coffee with the Ninja Coffee Bar.
Ninja Coffee Maker Honest Review
Video: A detailed review of the Ninja Coffee Bar, including its features and user experience.
Ninja Coffee Machine Review with Frother
Video: A review focusing on the integrated frother and its use with the Ninja Coffee Bar.
Ninja Coffee Machine Honest Review
Video: Another honest review of the Ninja Coffee Machine, covering various aspects of its functionality.


