1. Introduction
This manual provides detailed instructions for the safe and effective use of your TechCare Massager TENS/EMS Muscle Stimulator. This device is designed for temporary relief of pain associated with sore and aching muscles due to strain from exercise or normal household and work activities. It combines Transcutaneous Electrical Nerve Stimulation (TENS) and Electrical Muscle Stimulation (EMS) technologies. Please read this manual thoroughly before operating the device and retain it for future reference.
2. Important Safety Information
Warning: Do not use this device if you have a pacemaker, implanted defibrillator, or other implanted metallic or electronic device. Consult your physician before use if you have any medical conditions.
- Do not apply stimulation over the carotid sinus nerves (front of the neck), across the chest, or over the head.
- Do not use on open wounds or broken skin.
- Do not use if you are pregnant.
- Keep out of reach of children.
- Discontinue use if you experience any adverse reactions and consult a physician.
- This device is not intended for medical diagnosis or treatment.
3. Package Contents
Verify that all items listed below are included in your package:
- 1 x Main Device (TENS/EMS Muscle Stimulator)
- 1 Pair (2) x Large Electrode Pads
- 3 Pair (6) x Medium Electrode Pads
- 1 Pair (2) x Small Electrode Pads
- 1 x Type-C Charger Cable
- 1 x Wall AC Adaptor
- 1 x Belt Clip
- 1 x Pad & Wire Holder
- 2 x Electrode Leads
- 1 x User Manual (this document)
- 1 x Pad Placement Guide
- 1 x Massager Belt

Image 3.1: All components included in the TechCare Massager TENS/EMS Muscle Stimulator package. This includes the main device, various sizes of electrode pads, connection cables, charging accessories, a belt clip, a pad holder, and a massager belt.

Image 3.2: Visual representation of the included accessories, detailing the quantity and type of electrode pads.
4. Device Overview
Familiarize yourself with the main components and controls of your TENS/EMS device.
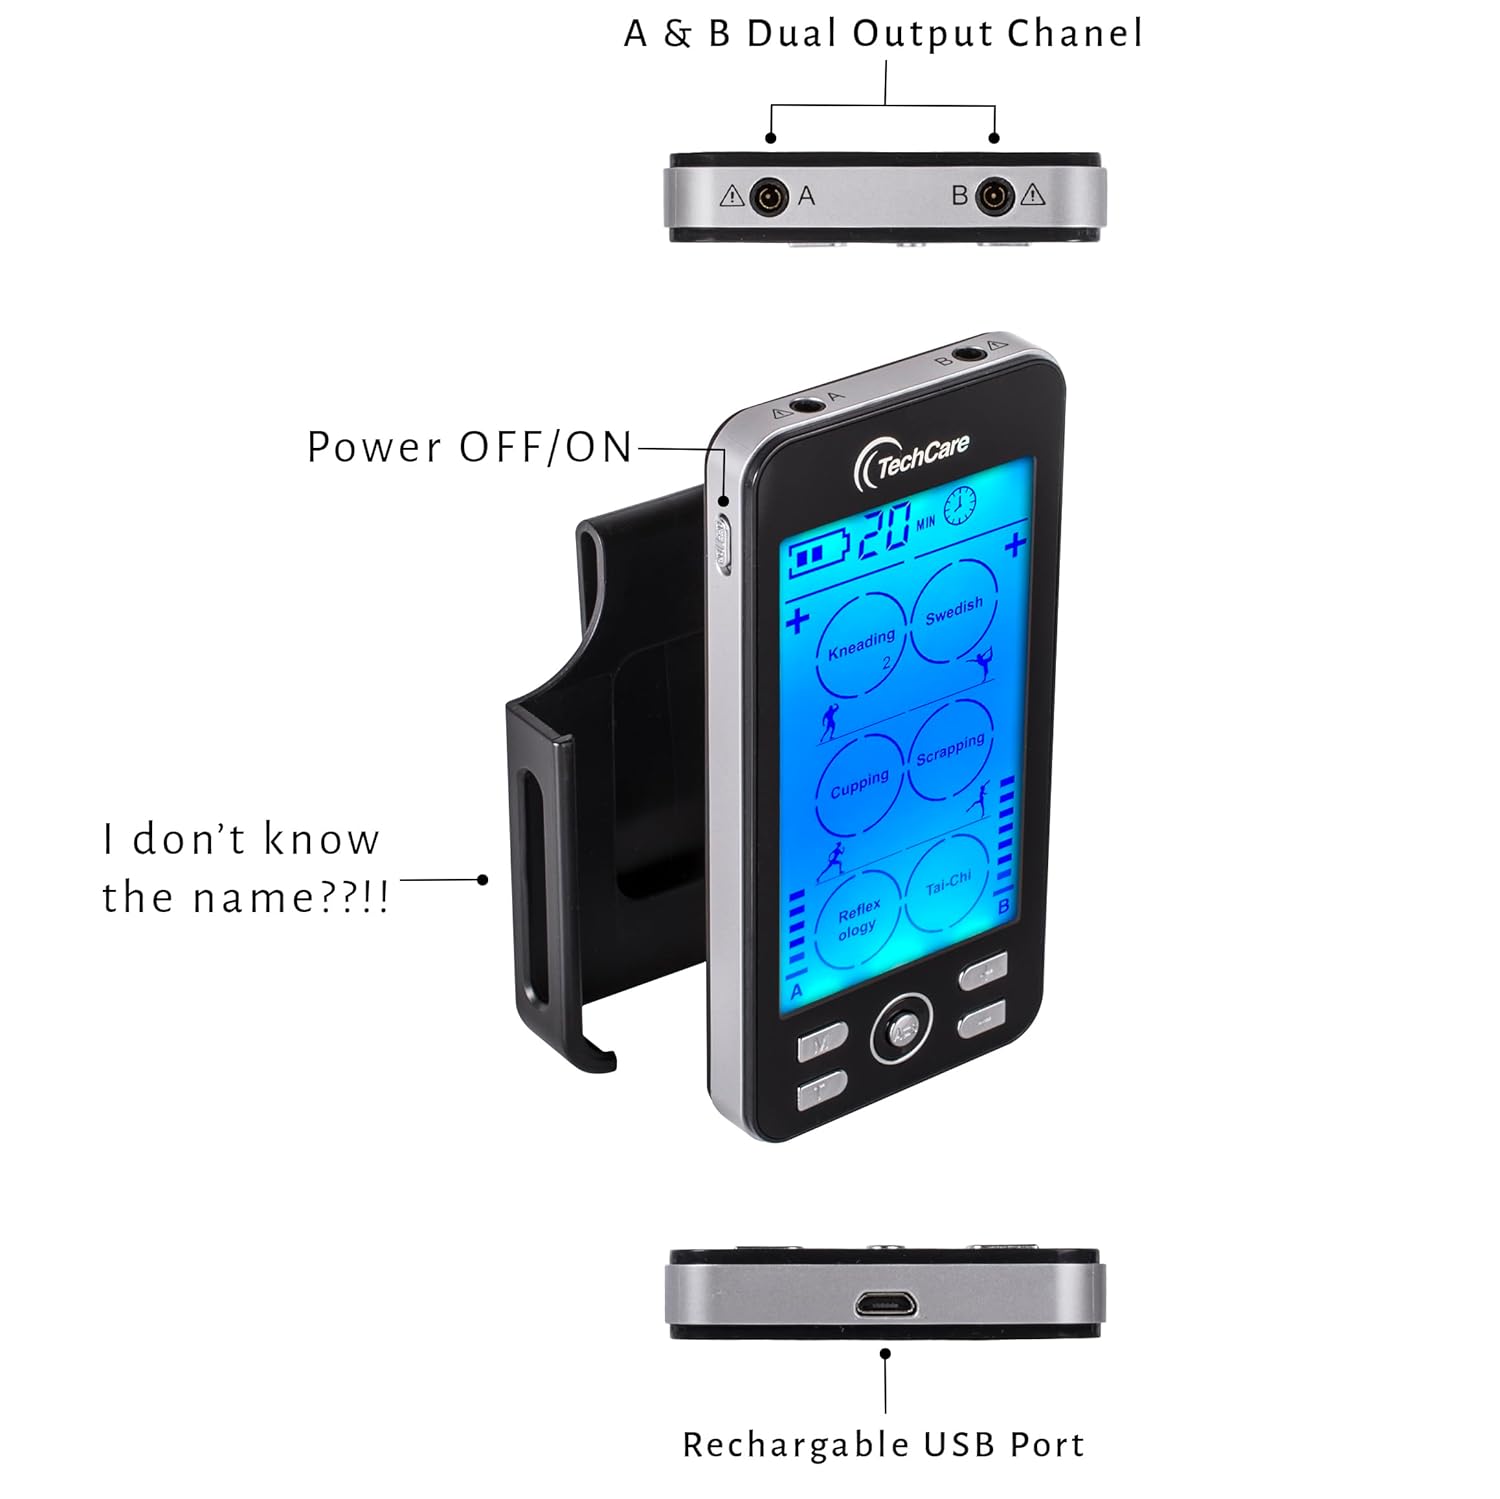
Image 4.1: Top, side, and bottom views of the device highlighting the dual output channels (A & B), the power switch, and the USB charging port.

Image 4.2: Detailed view of the device's control panel and ports, including the Mode button, central selection button, timer button, channel selection buttons, power switch, and Type-C charging port.
Controls and Display:
- Display Screen: Shows current mode, intensity levels for channels A and B, remaining time, and battery status.
- Power Switch (Side): Turns the device ON or OFF.
- M Button: Selects from 24 pre-set massage modes.
- Center Button: Confirms selections or pauses/resumes stimulation.
- T Button: Adjusts the treatment timer (10-60 minutes).
- A/B Buttons: Selects Channel A or Channel B for intensity adjustment.
- '+' / '-' Buttons: Adjusts intensity levels (20 levels) for the selected channel.
- Output Ports (Top): Connect electrode leads for Channel A and Channel B.
- USB-C Charging Port (Bottom): For recharging the internal battery.
5. Setup
5.1 Charging the Device
The device contains a rechargeable Lithium-Ion battery. Before first use, fully charge the device.
- Connect the Type-C charger cable to the charging port at the bottom of the device.
- Connect the other end of the cable to the wall AC adaptor, then plug the adaptor into a power outlet.
- The battery indicator on the display will show charging status. A full charge typically takes a few hours.
- Disconnect the charger once fully charged.

Image 5.1: The device connected to a charger, illustrating the rechargeable battery feature.

Image 5.2: The device being charged with the included Type-C cable and wall adapter.
5.2 Connecting Electrode Pads
The device supports up to four electrode pads simultaneously using two leads (Channel A and Channel B).
- Ensure the device is OFF.
- Connect the electrode leads to the electrode pads by snapping them onto the metal studs.
- Plug the electrode leads into the output ports (A and/or B) at the top of the device.
- Peel the protective film from the electrode pads. Apply the pads to clean, dry skin in the desired treatment area. Refer to the included Pad Placement Guide for recommended placements.
5.3 Using the Massager Belt
The massager belt provides a convenient way to apply stimulation to larger areas like the back.
- Ensure the device is OFF.
- Connect the electrode leads to the metal snaps inside the massager belt.
- Wrap the massager belt around the desired area (e.g., lower back) and secure it comfortably.
- Plug the electrode leads into the output ports (A and/or B) at the top of the device.

Image 5.3: Detail of the massager belt, showing the internal connection points for electrode leads.

Image 5.4: The TENS/EMS device connected to the massage belt, ready for use.

Image 5.5: Example of the massage belt being worn on the lower back.
6. Operating Instructions
6.1 Power On/Off
Slide the power switch located on the side of the device to the "ON" position to turn it on. The display will illuminate. To turn off, slide the switch to the "OFF" position.
6.2 Selecting a Mode
The device offers 24 pre-set modes, including tapping, acupuncture, cupping, deep tissue, kneading, Swedish, scrapping, reflexology, and Tai-Chi.
- With the device ON, press the M button to cycle through the available modes.
- The selected mode will be displayed on the screen.
- Press the Center Button to confirm your mode selection and begin stimulation.

Image 6.1: The device features 24 distinct massage modes for varied therapeutic experiences.
6.3 Adjusting Intensity Levels
The device offers 20 adjustable intensity levels for each channel.
- After selecting a mode, press the A/B button to select the channel you wish to adjust (A or B).
- Use the '+' button to increase intensity or the '-' button to decrease intensity.
- Adjust to a comfortable level. Start with the lowest intensity and gradually increase.

Image 6.2: The device features 20 intensity levels, indicated by bars on the display.
6.4 Setting the Timer
The built-in timer allows you to set treatment durations from 10 to 60 minutes. The device will automatically shut off when the timer expires.
- Press the T button to cycle through the available time settings.
- The selected time will be displayed on the screen.
Image 6.3: The device's timer function, allowing sessions from 10 to 60 minutes.
6.5 Dual Channel Operation
The device features dual channels (A and B), allowing you to use different modes or intensity levels on two separate body areas simultaneously, or to use up to four pads with independent intensity control for each pair.
- Connect electrode leads to both Channel A and Channel B output ports.
- Press the A/B button to toggle between controlling Channel A and Channel B.
- Adjust the intensity for each channel independently using the '+' and '-' buttons.

Image 6.4: The device's dual channel capability, allowing independent control for two sets of electrodes.
7. Pad Placement Guide
Proper electrode pad placement is crucial for effective stimulation. Refer to the included physical Pad Placement Guide for detailed diagrams. General guidelines include:
- Place pads on clean, dry, intact skin.
- Position pads around the area of discomfort, not directly over joints or bony prominences.
- Ensure pads are not touching each other.
- For TENS, place pads to encompass the painful area.
- For EMS, place pads over the muscle belly to stimulate contraction.

Image 7.1: Examples of electrode pad placement for common areas of discomfort.
8. Maintenance
8.1 Cleaning Electrode Pads
To prolong the life of your electrode pads:
- Always apply pads to clean, dry skin free of lotions or oils.
- After each use, place the pads back onto their protective film or the included pad holder.
- If pads lose their adhesiveness, gently wipe the adhesive surface with a damp cloth or a small amount of hand sanitizer and let air dry. Do not saturate.
- Replace pads when they no longer adhere well to the skin, as poor adhesion can reduce effectiveness and cause skin irritation.
8.2 Device Care and Storage
- Wipe the device with a soft, dry cloth. Do not use abrasive cleaners or immerse in water.
- Store the device and accessories in a cool, dry place, away from direct sunlight and extreme temperatures.
- Keep the device fully charged if storing for extended periods to maintain battery health.
9. Troubleshooting
| Problem | Possible Cause | Solution |
|---|---|---|
| Device does not turn on. | Battery is depleted. | Charge the device using the provided Type-C cable and AC adaptor. |
| No sensation or weak sensation. |
|
|
| Skin irritation under pads. |
|
|
10. Specifications
- Device Type: TENS/EMS Muscle Stimulator
- Channels: Dual Channel (A & B)
- Modes: 24 Pre-set Modes
- Intensity Levels: 20 Levels
- Timer: Adjustable, 10-60 minutes with auto shutoff
- Power Source: Rechargeable Lithium-Ion Battery (included)
- Charging Port: USB Type-C
- Product Dimensions: Approximately 9 x 7 x 4 inches (packaging dimensions, device is smaller)
- Weight: Approximately 2 ounces (device only)
- Manufacturer: Otto Trading
11. Warranty and Support
Your TechCare Massager TENS/EMS Muscle Stimulator comes with a LIFETIME WARRANTY. For warranty claims, technical support, or any questions regarding your device, please contact TechCare Massager customer service.
Contact information can typically be found on the product packaging or the official TechCare Massager website.


