1. Introduction
This manual provides detailed instructions for the safe and efficient use of your Andoer 96 LED Camera Light, Model AD-96. Please read this manual thoroughly before operation and retain it for future reference. This compact and versatile LED light is designed to provide bright, natural illumination for DSLR cameras and camcorders, enhancing your photography and videography.
2. Product Overview
2.1. Key Features
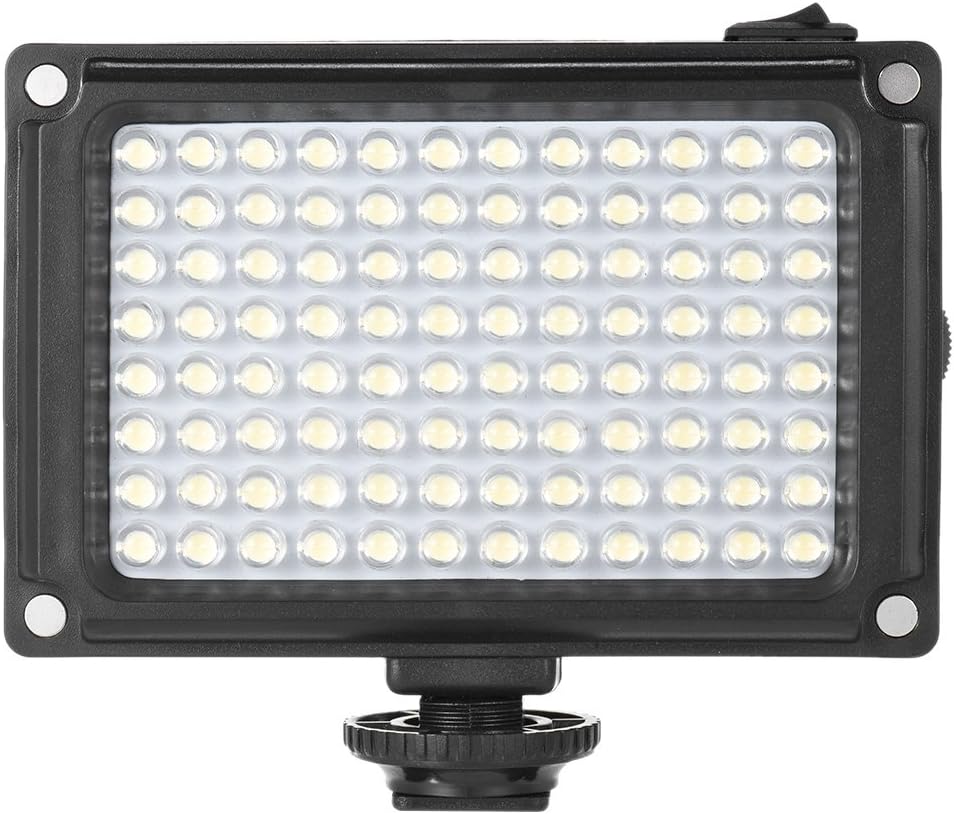
- 96 High-Quality LED Beads: Provides bright and consistent lighting.
- High Color Rendering Index (CRI 85+): Ensures accurate color reproduction.
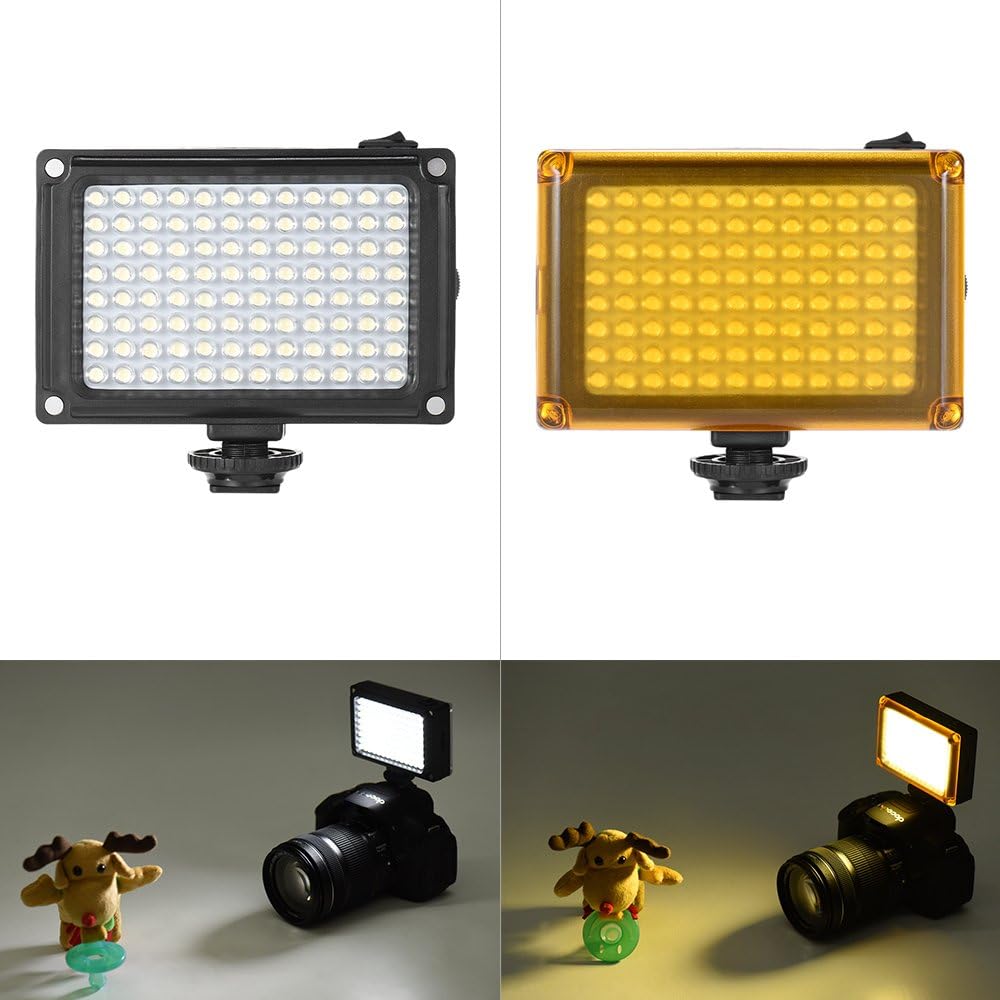
- Dual Color Temperature: Standard 5400K, adjustable to 3200K with the orange filter.
- Stepless Brightness Adjustment: Allows precise control over light intensity.
- Magnetic Filter Design: Easy attachment and removal of included white and orange filters.
- Compact and Portable: Super mini size for easy transport and mounting.
- Flexible Power Options: Operates on 4 AA batteries or 1 BP-4L battery (neither included).
2.2. Components
Familiarize yourself with the parts of your Andoer 96 LED Camera Light:
- LED Panel
- Power Switch
- Brightness Adjustment Knob
- Battery Compartment
- Hot Shoe Mount / 1/4" Screw Hole
- White Filter
- Orange Filter
- Storage Bag


3. Setup
3.1. Battery Installation
- Locate the battery compartment on the back of the LED light.
- Slide the battery cover to open it.
- Insert 4 AA batteries or 1 BP-4L battery (not included) according to the polarity indicators inside the compartment.
- Close the battery cover securely.

3.2. Mounting the Light
The Andoer 96 LED Camera Light can be mounted in two ways:
- On a Camera Hot Shoe: Slide the hot shoe mount at the base of the light into your camera's hot shoe slot and tighten the locking ring.
- On a Tripod or Light Stand: Use the 1/4" screw hole located at the bottom of the hot shoe mount to attach the light to any standard tripod or light stand.

3.3. Attaching Filters
The light comes with a white and an orange filter. These filters attach magnetically to the front of the LED panel.
- Select the desired filter (white for diffusion, orange for 3200K color temperature).
- Align the filter with the front of the LED panel. The magnets will automatically secure it in place.
4. Operating Instructions
4.1. Power On/Off
To turn the light on or off, use the power switch located on the side of the unit.
4.2. Adjusting Brightness
Rotate the brightness adjustment knob, also located on the side, to increase or decrease the light intensity. The light features stepless adjustment for precise control.
4.3. Adjusting Color Temperature
- 5400K (Daylight): Use the light without any filter or with the white diffusion filter for standard daylight-balanced illumination.
- 3200K (Warm Light): Attach the orange filter to achieve a warmer, tungsten-like color temperature.

5. Maintenance
5.1. Cleaning
To clean the LED light, use a soft, dry cloth. Do not use abrasive cleaners or solvents, as these may damage the unit. Ensure the light is turned off and batteries are removed before cleaning.
5.2. Storage
When not in use for extended periods, remove the batteries from the light to prevent leakage and damage. Store the light in its provided storage bag in a cool, dry place, away from direct sunlight and extreme temperatures.
6. Troubleshooting
| Problem | Possible Cause | Solution |
|---|---|---|
| Light does not turn on. | Batteries are dead or incorrectly inserted. Power switch is off. | Replace batteries or ensure correct polarity. Turn the power switch to the 'On' position. |
| Light is too dim or too bright. | Brightness adjustment knob is not set correctly. | Rotate the brightness adjustment knob to achieve the desired intensity. |
| Light color is incorrect. | Wrong filter attached or no filter for desired effect. | Attach the orange filter for 3200K warm light or remove it for 5400K daylight. |
7. Specifications
| Specification | Detail |
|---|---|
| Model | AD-96 |
| LED Quantity | 96 pcs |
| Power | 9W |
| Color Temperature | 5400K (standard), 3200K (with orange filter) |
| Brightness Range | Stepless adjustment |
| CRI (Color Rendering Index) | 85+ |
| Power Supply | 4 * AA batteries or 1 * BP-4L Battery (not included) |
| Item Size | 10.5 x 7 x 3.5 cm (4.13"L x 2.76"W x 1.38"H) |
| Item Weight | 142g (5.0 oz) |
| ASIN | B01J727A9A |
| Item Model Number | SAV1895435256256DN |
| UPC | 613635268822 |
8. Safety Information
- Do not look directly into the LED light when it is on, as this may cause eye strain or damage.
- Keep the device away from water and high humidity to prevent electric shock or damage.
- Handle the light with care; avoid dropping or subjecting it to strong impacts.
- Do not attempt to disassemble or modify the unit. Repairs should only be performed by qualified personnel.
- Remove batteries if the light will not be used for an extended period to prevent battery leakage.
9. Warranty and Support
This product comes with a standard manufacturer's warranty. For specific warranty details, please refer to the documentation provided at the time of purchase or contact your retailer. For technical support, product inquiries, or service, please visit the official Andoer Store or contact Andoer customer service.


