
1. Introduction
This manual provides essential information for the proper installation, operation, and maintenance of the LiftMaster Chamberlain 41DB001-1C DC Belt Drive Logic Board. This logic board is a genuine replacement part designed for specific LiftMaster and Chamberlain garage door opener models. Please read this manual thoroughly before proceeding with any installation or service to ensure safe and correct usage.
2. Safety Information
WARNING: To reduce the risk of severe injury or death, read and follow all instructions carefully.
- Always disconnect power to the garage door opener before attempting any repairs or installations. Failure to do so can result in electrical shock or serious injury.
- Garage door springs are under extreme tension and can cause serious injury. Do not attempt to adjust, repair, or remove any components connected to the springs.
- Ensure all wiring is performed by a qualified individual and complies with local electrical codes.
- Keep hands and clothing clear of the garage door and opener mechanism when the power is connected.
- This logic board is an electrical component. Handle with care to avoid damage from static electricity or physical impact.
3. Compatibility
The 41DB001-1C DC Belt Drive Logic Board is compatible with various LiftMaster and Chamberlain DC Belt Drive Garage Door Openers manufactured between 2005 and 2015. Key identification features for compatible units include:
- Frequency: 315MHz receiver.
- Learn Button Color: The original unit will feature a purple learn button.
It is crucial to verify compatibility with your specific garage door opener model by consulting your opener's original manual or parts diagram before ordering and installation. This ensures proper function and avoids potential damage.
4. Setup and Installation
IMPORTANT: Installation of this logic board should only be performed by individuals with appropriate electrical and mechanical knowledge. If you are unsure, consult a qualified garage door technician.
- Disconnect Power: Unplug the garage door opener from the electrical outlet or turn off the circuit breaker supplying power to the opener.
- Access Logic Board: Remove the outer cover of the garage door opener to expose the existing logic board. Refer to your specific opener's manual for instructions on cover removal.
- Document Connections: Before disconnecting any wires, take clear photographs or make detailed diagrams of all wire connections to the existing logic board. Pay close attention to the color and position of each wire.
- Disconnect Wires: Carefully disconnect all wires from the old logic board.
- Remove Old Board: Unmount the old logic board from its housing. There may be screws or clips holding it in place.
- Install New Board: Position the new 41DB001-1C logic board in the housing and secure it with the original screws or clips.
- Reconnect Wires: Using your photographs or diagrams, carefully reconnect all wires to the new logic board. Ensure each wire is securely fastened to its correct terminal.
- Replace Cover: Once all connections are verified, replace the opener's outer cover.
- Restore Power: Plug the garage door opener back into the electrical outlet or turn on the circuit breaker.
- Program Remotes/Accessories: After installing a new logic board, all existing remote controls, keypads, and other accessories will need to be reprogrammed. Refer to the "Operation" section of this manual or your opener's main manual for programming instructions.
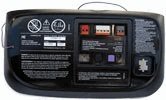
Image 1: The LiftMaster Chamberlain 41DB001-1C DC Belt Drive Logic Board. Note the purple learn button, which is a key indicator for compatibility.
5. Operation (Programming Remotes)
After replacing the logic board, you will need to reprogram all remote controls and wireless keypads to the opener. The 41DB001-1C logic board features a purple learn button for programming.
- Locate Learn Button: On the logic board, locate the purple "Learn" button.
- Press Learn Button: Press and immediately release the "Learn" button. The LED indicator on the opener will light up steadily for 30 seconds.
- Press Remote Button: Within 30 seconds, press and hold the button on your remote control that you wish to operate the garage door.
- Release Remote Button: Release the remote control button when the opener lights flash or two clicks are heard. This indicates the remote has been successfully programmed.
- Test Remote: Press the programmed button on your remote control to test its operation.
- Repeat for Other Remotes: Repeat these steps for any other remote controls or wireless keypads you wish to program.
For detailed instructions on programming specific accessories or advanced features, refer to your garage door opener's original user manual.
6. Maintenance
The logic board itself requires no routine maintenance. However, regular maintenance of your overall garage door opener system is recommended to ensure longevity and safe operation.
- Annual Inspection: Have your garage door opener system inspected annually by a qualified technician.
- Cleanliness: Keep the opener unit free from dust, debris, and moisture.
- Power Surges: Consider using a surge protector for your garage door opener to protect electronic components, including the logic board, from electrical spikes.
7. Troubleshooting
If you encounter issues after installing the new logic board, consider the following common troubleshooting steps:
- Opener Not Responding:
- Ensure the opener is plugged in and receiving power.
- Check the circuit breaker.
- Verify all wire connections to the logic board are secure and correctly placed.
- Remotes Not Working:
- Confirm remotes have fresh batteries.
- Ensure remotes are properly programmed to the new logic board (refer to Section 5).
- Check if the learn button LED illuminates when pressed.
- Safety Sensors Not Functioning:
- Ensure safety sensors are properly aligned and free from obstructions.
- Check wiring connections for the safety sensors to the logic board.
- Intermittent Operation:
- Inspect for loose wire connections.
- Ensure there are no external sources of interference (e.g., other 315MHz devices).
For more complex issues, consult your garage door opener's main troubleshooting guide or contact LiftMaster customer support.
8. Specifications
| Part Number | 41DB001-1C (also referred to as 1250349) |
| Frequency | 315MHz |
| Learn Button Color | Purple |
| Compatibility | LiftMaster and Chamberlain DC Belt Drive Garage Door Openers (2005-2015 models) |
| Manufacturer | Chamberlain Liftmaster |
9. Warranty and Support
This is a genuine LiftMaster replacement part. For specific warranty information, please refer to the documentation provided with your original garage door opener or contact LiftMaster customer support directly. Using genuine replacement parts helps ensure compatibility and maintains the integrity of your opener system.
For technical assistance or further inquiries, please visit the official LiftMaster website or contact their customer service department. Visit the LiftMaster Store for more information.


