1. Introduction
This manual provides detailed instructions for the proper setup, operation, and maintenance of your LyxPro SPA-5.5 Small PA Speaker Monitor. Please read this manual thoroughly before using the device to ensure optimal performance and safety.
The LyxPro SPA-5.5 is a compact and powerful active speaker system featuring a Class-D amplifier, a 3-channel mixer, and a 3-band equalizer. It is designed for various applications including vocal and instrument monitoring, public address, and as a guitar amplifier or karaoke system.
2. Safety Instructions
- Power Source: Connect the unit only to the specified power supply (100V – 240V AC). Ensure the power cord is not damaged or pinched.
- Ventilation: Do not block ventilation openings. Ensure adequate airflow around the unit to prevent overheating.
- Water and Moisture: Do not expose the unit to rain, moisture, or any liquids. Do not place objects filled with liquids on the unit.
- Heat Sources: Keep the unit away from heat sources such as radiators, heat registers, stoves, or other heat-producing appliances.
- Cleaning: Clean only with a dry cloth. Disconnect from power before cleaning.
- Servicing: Do not attempt to service this product yourself. Refer all servicing to qualified service personnel.
- Placement: Place the unit on a stable surface. If mounting on a microphone stand, ensure the stand is stable and capable of supporting the unit's weight.
3. Package Contents
Verify that all items are present in the package:
- LyxPro SPA-5.5 Speaker Monitor
- Power Cable
- Microphone Stand Mounting Hardware
- User Manual (this document)
4. Product Features
- 125W RMS / 150W Peak Class-D Amplifier
- Integrated 3-Channel Mixer
- 3-Band Equalizer (Bass, Mid, Treble)
- +48V Phantom Power Supply for Condenser Microphones
- Multiple Inputs: XLR, 1/4" (6.35mm), RCA, and 3.5mm (1/8") Aux
- Instrument Switch for Direct Instrument Connection
- XLR Thru Connection for Daisy-Chaining
- Echo Control
- Built-in Bluetooth Connectivity
- SD Card Compatibility
- Mounts on Standard Microphone Stands
- Durable and Compact Design
5. Controls and Connections
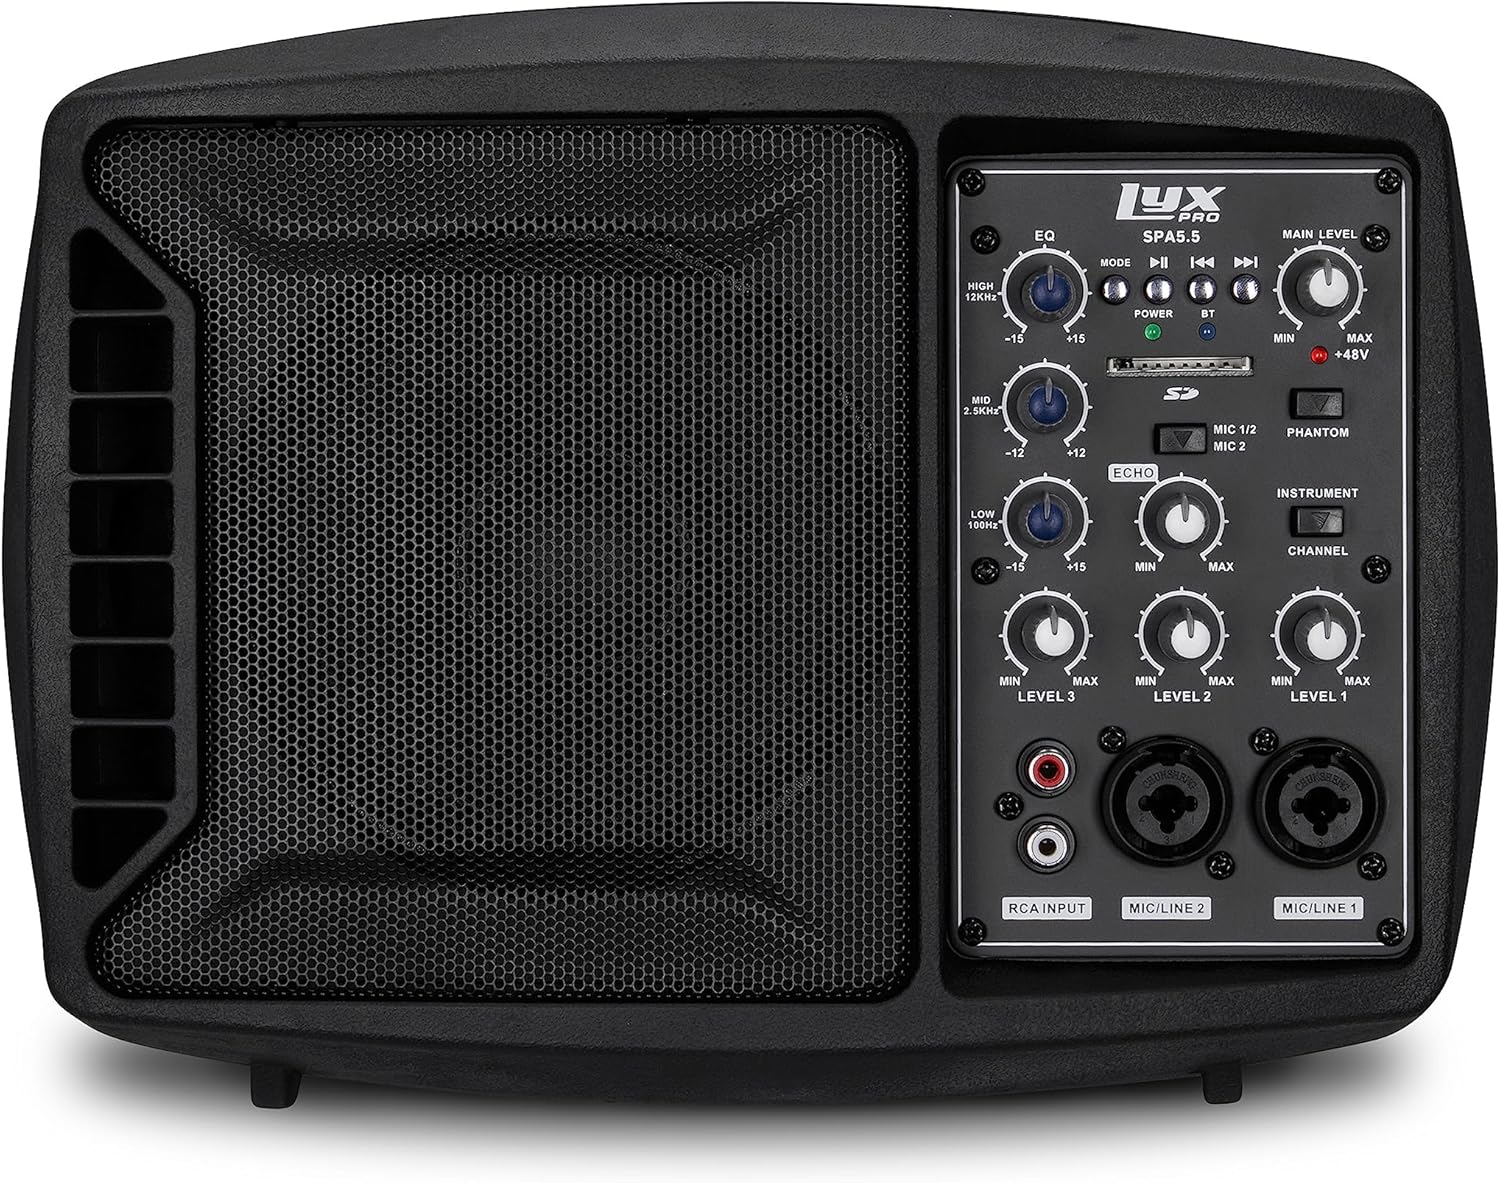
Figure 5.1: Front view of the LyxPro SPA-5.5 speaker monitor, showing the speaker grille and control panel.
5.1 Front Panel Controls

Figure 5.2: Detailed diagram of the LyxPro SPA-5.5 front control panel with labeled components.
- Equalizer (EQ):
- HIGH (12kHz): Adjusts high frequencies. Range: ±15dB.
- MID (2.5kHz): Adjusts mid frequencies. Range: ±15dB.
- LOW (80Hz): Adjusts low frequencies. Range: ±15dB.
- Main Level: Controls the overall output volume of the speaker.
- Power Light: Indicates when the unit is powered on.
- BT (Bluetooth) Light: Indicates Bluetooth connection status.
- SD Card Slot: For playing audio files from an SD card.
- Phantom Power Switch (+48V): Activates +48V phantom power for condenser microphones connected to MIC 1 or MIC 2.
- MIC 1/2 Switch: Selects between MIC 1 and MIC 2 inputs for Channel 1.
- Instrument Switch: Optimizes input impedance for direct connection of instruments (e.g., guitar) to Channel 1.
- Echo Control: Adjusts the level of echo effect applied to microphone inputs.
- Channel Level Controls (LEVEL 1, LEVEL 2, LEVEL 3): Adjusts the individual volume for each input channel.
- RCA Input (LINE 3): Stereo RCA inputs for connecting devices like CD players, MP3 players, or keyboards.
- MIC/LINE 2 Input: Combo XLR/1/4" (6.35mm) input for microphones or line-level devices.
- MIC/LINE 1 Input: Combo XLR/1/4" (6.35mm) input for microphones or line-level devices.
5.2 Rear Panel Connections

Figure 5.3: Detailed diagram of the LyxPro SPA-5.5 rear panel with labeled connections.
- MAIN IN (XLR): Main input for connecting external audio sources.
- MIC/LINE Level Switch: Selects between microphone or line level for the MAIN IN.
- THRU (XLR): XLR output for daisy-chaining to other speakers or sending the mixed signal to another device.
- Power Switch: Turns the unit on or off.
- AC INPUT: Power connector for the included AC power cable (100V – 240V AC).
6. Setup
6.1 Initial Power-Up
- Ensure all level controls (Main Level, Channel Levels) are set to minimum.
- Connect the provided AC power cable to the AC INPUT on the rear panel and then to a suitable power outlet.
- Flip the Power Switch on the rear panel to the "ON" position. The Power Light on the front panel will illuminate.
6.2 Mounting Options
The SPA-5.5 can be used in various configurations:
- Floor Monitor: Place the unit on the floor in front of the performer, angled upwards.
- Tabletop: Position on a flat, stable surface.
- Microphone Stand Mounting: The unit includes hardware to mount it directly onto a standard microphone stand.

Figure 6.1: The LyxPro SPA-5.5 speaker monitor positioned on a microphone stand, demonstrating its use as a personal monitor for a musician.

Figure 6.2: A band performing outdoors, utilizing the compact LyxPro SPA-5.5 speaker for sound reinforcement.
7. Operating Instructions
7.1 Connecting Microphones and Instruments
- Microphones: Connect dynamic or condenser microphones to the MIC/LINE 1 or MIC/LINE 2 inputs using XLR cables. If using a condenser microphone, activate the +48V Phantom Power Switch. Adjust the corresponding Channel Level control.
- Instruments: Connect instruments (e.g., guitar, bass) directly to MIC/LINE 1 or MIC/LINE 2 using a 1/4" (6.35mm) cable. Engage the Instrument Switch for optimal impedance matching. Adjust the corresponding Channel Level control.
- Line-Level Devices: Connect devices like keyboards or audio interfaces to MIC/LINE 1 or MIC/LINE 2 using 1/4" (6.35mm) cables. Ensure the Instrument Switch is disengaged. Adjust the corresponding Channel Level control.
- Stereo Audio Sources: Connect CD players, MP3 players, or other stereo sources to the RCA Input (LINE 3). Adjust LEVEL 3.
7.2 Adjusting Sound
- Channel Levels: Use the LEVEL 1, LEVEL 2, and LEVEL 3 controls to balance the volume of individual inputs.
- Main Level: Adjust the Main Level knob to control the overall output volume of the speaker.
- Equalizer (EQ): Use the HIGH, MID, and LOW knobs to shape the tone of your sound.
- Increase HIGH for brighter sound.
- Adjust MID for vocal clarity or instrument presence.
- Increase LOW for more bass.
- Echo Control: Turn the Echo knob to add a reverberation effect to the microphone inputs.
7.3 Media Playback (SD Card & Bluetooth)

Figure 7.1: Icons indicating SD card compatibility and built-in Bluetooth functionality on the LyxPro SPA-5.5.
- SD Card: Insert an SD card containing audio files into the SD Card Slot. The unit will automatically detect and begin playback. Use the built-in controls (Mode, Play/Pause, Skip) to manage playback.
- Bluetooth:
- Ensure the unit is powered on.
- Activate Bluetooth on your mobile device.
- Search for "LyxPro SPA-5.5" in your device's Bluetooth settings and pair. The BT light on the unit will indicate a successful connection.
- Play audio from your device. Adjust volume using both your device and the SPA-5.5's Main Level control.

Figure 7.2: A musician utilizing the LyxPro SPA-5.5 as a personal monitor in a studio environment.
8. Maintenance
- Cleaning: Use a soft, dry cloth to clean the exterior of the unit. Do not use liquid cleaners or aerosols.
- Storage: When not in use for extended periods, store the unit in a cool, dry place, away from direct sunlight and extreme temperatures.
- Fuse Replacement: If the unit does not power on, check the fuse located near the AC input. Replace with a fuse of the same type and rating (T 3.15 A H 250V). Refer to qualified personnel if unsure.
9. Troubleshooting
| Problem | Possible Cause | Solution |
|---|---|---|
| No power | Power cable disconnected; Power switch off; Blown fuse | Check power cable connection; Turn power switch on; Replace fuse (refer to Maintenance section) |
| No sound output | Main Level or Channel Levels too low; Input device not connected or muted; Incorrect input selected | Increase Main Level and Channel Levels; Check input device connection and volume; Verify correct input is used |
| Distorted sound | Input signal too high; Main Level too high; EQ settings incorrect | Reduce input device volume; Lower Main Level; Adjust EQ settings |
| Microphone not working (condenser mic) | Phantom power not enabled | Activate the +48V Phantom Power Switch |
| Bluetooth not connecting | Unit not in pairing mode; Device too far; Incorrect device selected | Ensure Bluetooth is active on SPA-5.5 and device; Move device closer; Select "LyxPro SPA-5.5" from device list |
10. Specifications

Figure 10.1: Diagram illustrating the compact dimensions of the LyxPro SPA-5.5 speaker monitor.
| Feature | Detail |
|---|---|
| Power Output | 125W RMS / 150W Peak |
| Speaker Size | 5 inches |
| Amplifier Type | Class-D |
| Frequency Response (-10dB) | 80Hz – 14kHz |
| Frequency Response (-3dB) | 100Hz – 10kHz |
| Max. SPL | 114dB SPL @ 1M |
| Phantom Power | +48V |
| Input Impedance | 20K Ω |
| EQ High (12kHz) | ±15dB |
| EQ Mid (2.5kHz) | ±15dB |
| EQ Low (80Hz) | ±15dB |
| Input Voltage | 100V – 240V AC |
| Power Consumption | 180W max. |
| Dimensions (L x W x H) | 13.5" x 9" x 11.8" (34.3 cm x 22.9 cm x 30 cm) |
| Weight | 6.1 lbs (2.77 kg) |
11. Warranty and Support
For warranty information and technical support, please refer to the warranty card included with your product or visit the official LyxPro website. Keep your purchase receipt as proof of purchase.
For further assistance, contact LyxPro customer support.


