
1. Product Overview
The Starry Outdoor Laser Projector Light, Model ALB-RGB230-M1, is designed to project vibrant red, green, and blue laser patterns. This unit is suitable for both indoor and outdoor use, featuring a waterproof design and remote control for convenient operation. It creates dynamic light displays for various settings.

Image 1.1: Examples of laser projection in different environments.
2. Package Contents
Verify that all components are present in the package:
- Starry Laser Projector Unit (Model ALB-RGB230-M1)
- Ground Stake
- Remote Control
- Power Adapter
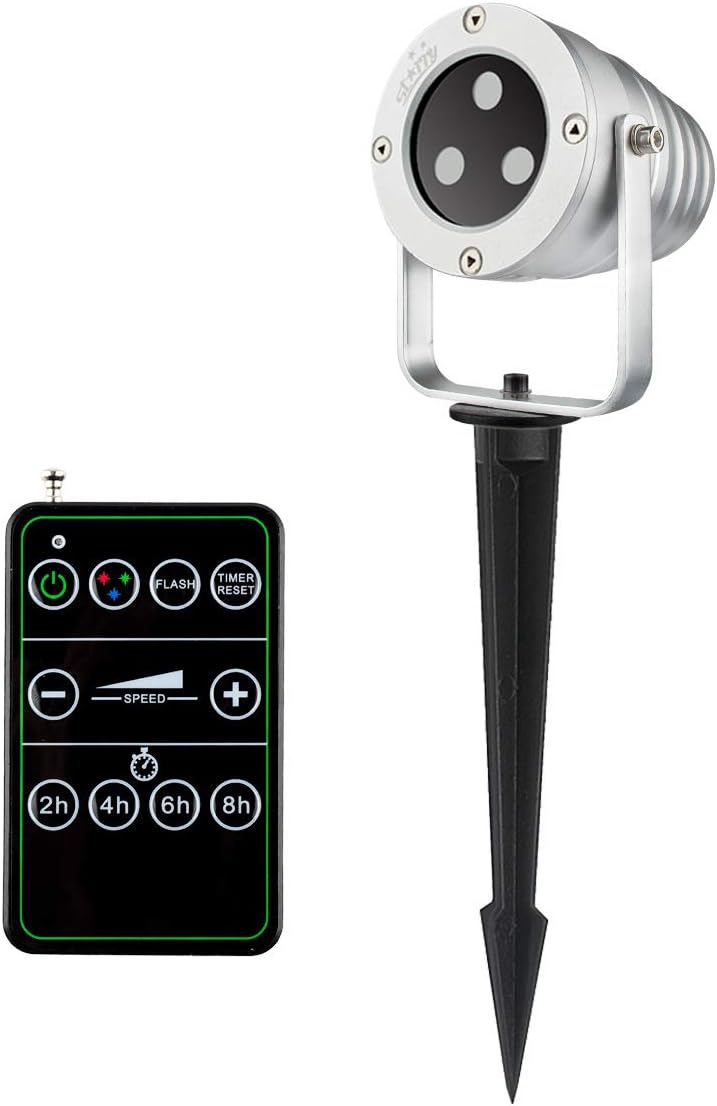
Image 2.1: Laser projector unit and remote control.
3. Safety Instructions
Please read and adhere to the following safety guidelines to prevent injury or damage to the product:
- Laser Safety: Do not look directly into the laser beam. Avoid direct eye exposure to the laser light. This product uses Class IIIA lasers.
- Electrical Safety: Ensure the power adapter and cable are not damaged. Only use the provided power adapter. Do not operate the unit if the power cord is frayed or damaged.
- Water Resistance: The projector is rated IP65 waterproof, suitable for outdoor use in rain or snow. However, do not submerge the unit in water.
- Installation: Securely install the projector to prevent it from falling or being dislodged. Ensure proper ventilation around the unit.
- Temperature: Operate the projector within the specified temperature range (refer to specifications). Extreme temperatures can affect performance and lifespan.
- Children and Pets: Keep the projector and its accessories out of reach of children and pets.
4. Setup and Installation
Follow these steps to set up your laser projector:
- Choose a Location: Select a suitable location for projection. For outdoor use, ensure the area is clear of obstructions and provides a stable surface for mounting.
- Mounting:
- Ground Stake: Attach the ground stake to the projector base. Insert the stake firmly into soft ground.
- Flat Base (Optional): If using a flat base (not included with all models, but shown in some images), place the projector on a flat, stable surface.
- Adjust Projection Angle: Loosen the adjustment screw on the side of the projector bracket to tilt the unit to the desired angle. Tighten the screw once adjusted.
- Connect Power: Plug the power adapter into the projector's power input, then plug the adapter into a standard 110V AC outdoor-rated power outlet.

Image 4.1: Projector with a flat base option, suitable for various outdoor placements.

Image 4.2: Outdoor installation demonstrating weather resistance.
5. Operating Instructions
Once installed and powered, operate the projector using the included remote control.
- Power On/Off: Press the power button on the remote control to turn the projector on or off.
- Color Selection: Use the color buttons (Red, Green, Blue, or combinations) to select the desired laser colors.
- Flash Mode: Press the 'FLASH' button to activate or deactivate the flashing effect.
- Speed Adjustment: Use the '+' and '-' buttons under 'SPEED' to increase or decrease the motion speed of the laser patterns.
- Timer Function: Select a timer duration (2H, 4H, 6H, 8H) to set the projector to automatically turn off after the specified time. The projector will then turn on automatically at the same time the next day.
- Timer Reset: Press 'TIMER RESET' to cancel any active timer setting.

Image 5.1: Example of projected laser patterns.

Image 5.2: Indoor projection example.

Image 5.3: Indoor projection on a window and wall.
6. Remote Control Functions
The remote control allows full command over the projector's features. It requires 1 AAA battery (not included).
- Battery Installation: Open the battery compartment on the back of the remote and insert 1 AAA battery, observing polarity.
- Power Button: Turns the projector ON/OFF.
- Color Buttons: Cycle through Red, Green, Blue, or combined color modes.
- FLASH: Toggles the flashing effect of the laser patterns.
- SPEED +/-: Adjusts the rotation speed of the projected patterns.
- TIMER (2H/4H/6H/8H): Sets the projector to operate for 2, 4, 6, or 8 hours respectively, then automatically turns off. It will reactivate at the same time the next day.
- TIMER RESET: Cancels any active timer setting.
7. Maintenance
To ensure the longevity and optimal performance of your laser projector, follow these maintenance guidelines:
- Cleaning: Gently wipe the projector lens and housing with a soft, dry cloth. Do not use abrasive cleaners or solvents.
- Storage: When not in use, especially during off-season, store the projector in a cool, dry place, away from direct sunlight and extreme temperatures.
- Cable Inspection: Periodically check the power cable and adapter for any signs of wear or damage. Replace if necessary.
- Weather Resistance: While waterproof (IP65), prolonged exposure to harsh weather conditions (e.g., heavy ice accumulation) may still affect performance. Consider bringing indoors during severe weather.

Image 7.1: Projector operating in snowy conditions, demonstrating its weather-resistant design.
8. Troubleshooting
If you encounter issues with your projector, refer to the following common problems and solutions:
| Problem | Possible Cause | Solution |
|---|---|---|
| Projector does not turn on. | No power, faulty connection, remote battery dead. | Check power outlet. Ensure power adapter is securely connected. Replace remote control battery. |
| No laser projection. | Unit is on but laser is off, lens obstructed. | Ensure the correct color mode is selected. Clean the projector lens. |
| Remote control not working. | Dead battery, out of range, obstruction. | Replace AAA battery in the remote. Ensure remote is pointed at the projector and within effective range. Remove any obstructions. |
| Laser patterns are dim or unclear. | Ambient light too high, projector too far from surface, dirty lens. | Operate in darker conditions. Move projector closer to the projection surface. Clean the projector lens. |
| Timer function not working as expected. | Incorrect timer setting, power interruption. | Press 'TIMER RESET' and re-select the desired timer duration. Ensure continuous power supply. |
9. Specifications
| Feature | Detail |
|---|---|
| Brand | Starry |
| Model Number | ALB-RGB230-M1 |
| Light Source Type | Laser (Red, Green, Blue) |
| Light Colors | Multi-colored (Red, Green, Blue) |
| Projection Patterns | Star, Square (moving motion) |
| Power Source | Corded Electric |
| Voltage | 110 Volts |
| Wattage | 11 watts |
| Control Method | Remote Control |
| Water Resistance Level | IP65 (Waterproof) |
| Indoor/Outdoor Usage | Outdoor |
| Mounting Type | Floor Mount (Ground Stake) |
| Item Weight | 1.99 Pounds |
| Package Dimensions | 9.65 x 6.02 x 5.24 inches |
| Remote Battery | 1 x AAA (not included) |
| UPC | 638827993788 |
10. Warranty Information
For detailed warranty information regarding your Starry Outdoor Laser Projector Light, please refer to the warranty card included with your product packaging or visit the official Starry website. Warranty terms and conditions may vary.
11. Customer Support
If you require further assistance, have questions about your product, or need to report an issue, please contact Starry customer support through the contact information provided in your product documentation or on the official Starry website. Please have your model number (ALB-RGB230-M1) and purchase details ready when contacting support.