
1. Introduction
This manual provides essential instructions for the safe and effective operation, setup, and maintenance of the JIT 900 Geomembrane Hot Wedge Welder. The JIT 900 is designed for welding geomembrane materials, creating strong, consistent seams for various applications. Please read this manual thoroughly before operating the machine to ensure proper use and to prevent injury or damage.
2. Safety Instructions
Always prioritize safety when operating any machinery. Failure to follow these safety guidelines may result in serious injury or equipment damage.
2.1 General Safety
- Read and understand all instructions in this manual before operation.
- Only trained and authorized personnel should operate this equipment.
- Keep the work area clean and well-lit. Cluttered or dark areas invite accidents.
- Do not operate the machine in explosive atmospheres, such as in the presence of flammable liquids, gases, or dust.
- Wear appropriate personal protective equipment (PPE), including safety glasses, gloves, and hearing protection, as required.
2.2 Electrical Safety
- Ensure the power supply matches the machine's requirements (220V, 50Hz).
- Always connect the machine to a properly grounded outlet.
- Inspect the power cord and plug for damage before each use. Do not use if damaged.
- Never operate the machine in wet conditions or with wet hands.
- Disconnect power before performing any maintenance or adjustments.
2.3 Operation Safety
- The welding wedge and surrounding components become extremely hot during operation (up to 450°C). Avoid direct contact.
- Keep hands and loose clothing away from moving parts, especially the rollers.
- Ensure proper ventilation in the work area to dissipate any fumes produced during welding.
- Secure the geomembrane material to prevent unexpected movement during welding.
3. Product Overview
The JIT 900 Geomembrane Hot Wedge Welder is a robust and efficient tool for creating high-quality seams in various geomembrane materials. Its design focuses on precision and ease of use.

Figure 1: This image displays the JIT 900 Geomembrane Hot Wedge Welder from a top-down perspective, showing its main body, control panel, handle, and welding mechanism.
Key Components:
- Control Panel: Features digital temperature display, power switch, fuse, and speed adjustment.
- Handle: Ergonomically designed for easy maneuvering and transport.
- Welding Head: Contains the heated wedge and pressure rollers for sealing.
- Engagement Lever: Used to engage and disengage the welding rollers with the material.
- Material Guides: Ensure proper alignment of geomembrane sheets.
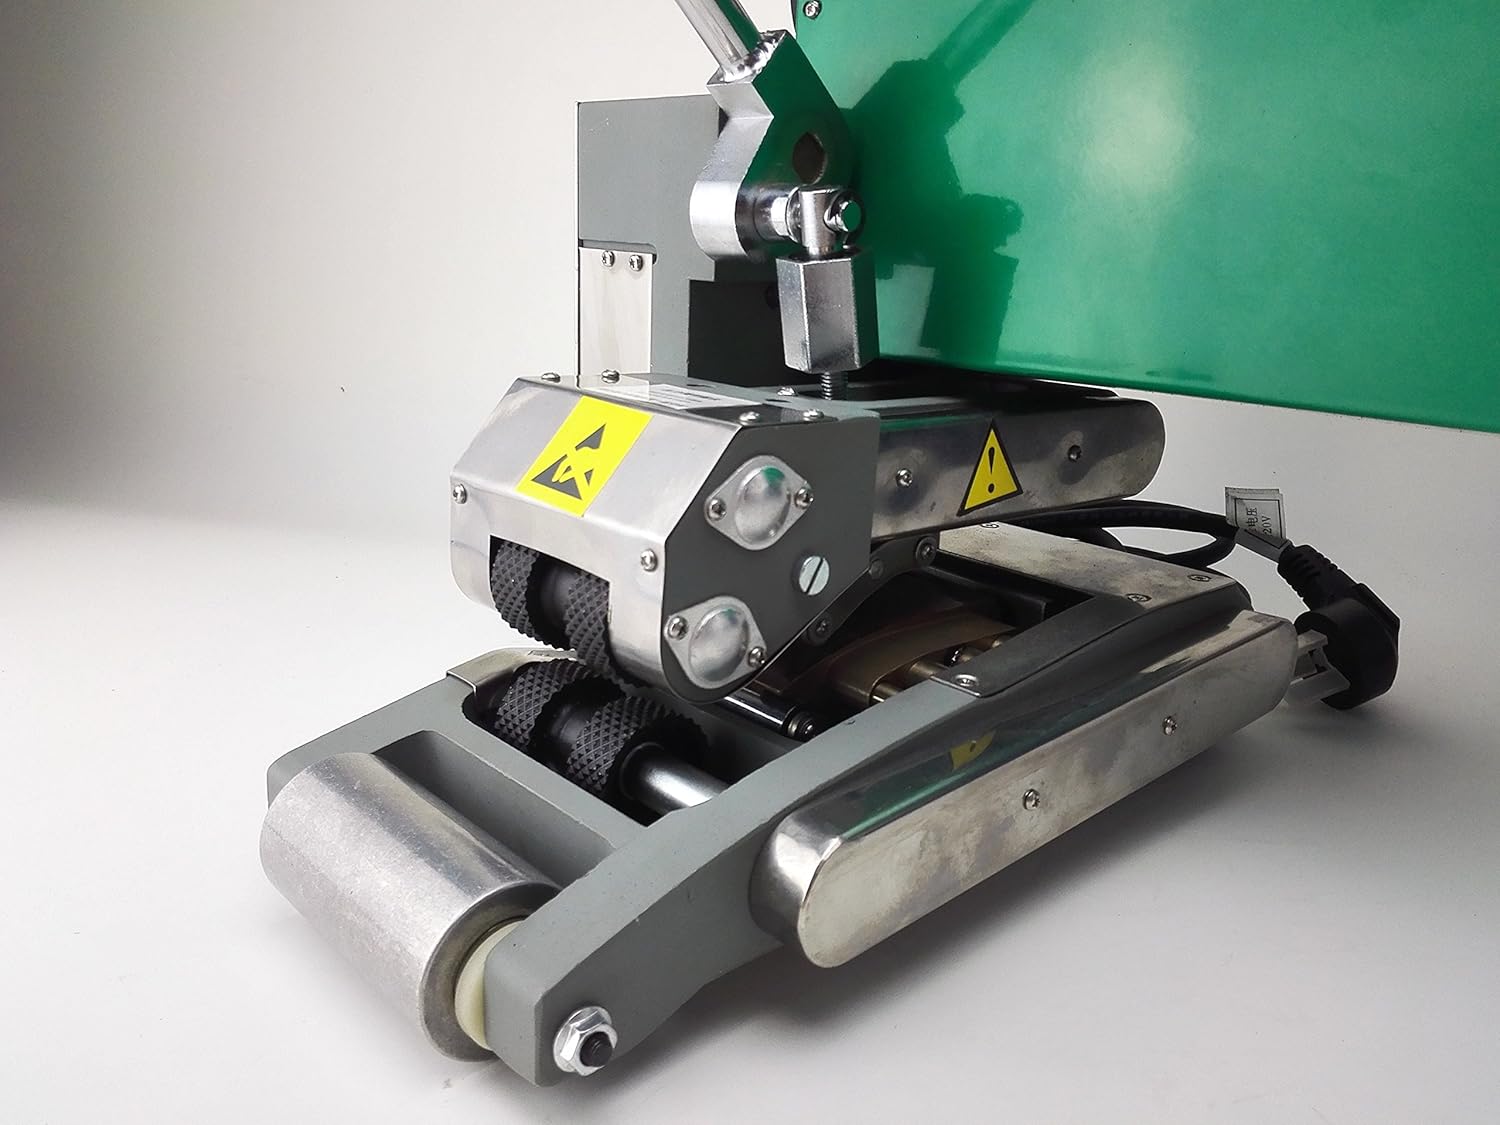
Figure 2: A detailed view of the welding head of the JIT 900, highlighting the heated wedge, pressure rollers, and material guides crucial for creating strong seams.
4. Technical Specifications
| Parameter | Value |
|---|---|
| Output Voltage | 220 V |
| Frequency | 50 Hz |
| Power | 1800 W |
| Welding Speed | 0.5 ~ 5 m/min |
| Heating Temperature Range | 0 ~ 450 °C (with temperature showing function) |
| Welding Material Thickness | 1.0 mm ~ 3.0 mm (single membrane thickness) |
| Welding Width | 14 mm x 2 (Interior Cavity: 16 mm) |
| Welding Intention | > 85% Maternity material (Resistance to the direction of cutting) |
| Joint Width | 120 mm |
| Machine Body Weight | 13 KG (approx. 28.6 lbs) |
| Item Weight (Shipping) | 42.5 pounds |
| Package Dimensions | 18.3 x 14.9 x 14 inches |
5. Setup
Proper setup is crucial for optimal performance and safety.
5.1 Unpacking and Inspection
- Carefully remove the welder from its packaging.
- Inspect the machine for any visible damage that may have occurred during shipping. Report any damage to the supplier immediately.
- Ensure all components listed in the packing list are present.

Figure 3: The durable silver carrying case designed to protect and transport the JIT 900 Geomembrane Hot Wedge Welder, featuring secure latches and a top handle.
5.2 Power Connection
- Ensure the power switch on the control panel is in the 'OFF' position.
- Connect the power cord to the machine.
- Plug the power cord into a grounded 220V, 50Hz electrical outlet.
5.3 Material Preparation
- Clean the geomembrane surfaces to be welded, ensuring they are free from dust, dirt, moisture, and oil.
- Overlap the two geomembrane sheets according to the required seam width (typically 120mm joint width). Ensure the overlap is consistent and smooth.
- Secure the material to prevent shifting during the welding process.
6. Operation
Follow these steps for effective welding with the JIT 900.

Figure 4: A close-up of the control panel, showing the digital temperature display, power switch, fuse, and speed adjustment knob, labeled 'Geomembrane Welding Machine Model: 900 Voltage: 220 Power: 1800W'.
6.1 Powering On and Initial Settings
- Turn the main power switch to the 'ON' position. The digital display will illuminate.
- Set the desired welding temperature using the temperature control knob. Refer to the geomembrane manufacturer's recommendations for optimal welding temperature, typically between 0-450°C. Allow the machine to preheat until the set temperature is reached and stable.
- Adjust the welding speed using the speed control knob. Start with a lower speed (e.g., 1-2 m/min) and adjust as needed based on material thickness and desired weld quality.
6.2 Welding Process
- Position the welder at the start of the seam, ensuring the geomembrane sheets are correctly aligned under the welding head and guides.
- Lower the engagement lever to bring the pressure rollers into contact with the geomembrane, applying even pressure.
- The machine will automatically begin to move forward, heating and pressing the geomembrane layers together to form a weld.
- Monitor the welding process to ensure consistent speed and temperature. Adjust settings if the weld quality is not satisfactory.
- At the end of the seam, lift the engagement lever to disengage the rollers and stop the welding process.
6.3 Post-Welding Inspection
- Visually inspect the welded seam for consistency, absence of gaps, and proper fusion.
- Perform peel tests or shear tests on test welds to verify weld strength and integrity, especially when starting a new project or changing material types.
7. Maintenance
Regular maintenance ensures the longevity and reliable performance of your JIT 900 welder.
7.1 Cleaning
- After each use, ensure the machine is powered off and cooled down.
- Clean the welding wedge and rollers to remove any accumulated plastic residue or debris. Use a non-abrasive cloth and, if necessary, a suitable solvent recommended by the geomembrane manufacturer.
- Wipe down the exterior of the machine to keep it free from dust and dirt.
7.2 Inspection
- Regularly inspect the power cord for cuts, fraying, or other damage.
- Check the condition of the welding wedge and rollers for wear or damage. Replace worn components as needed.
- Ensure all fasteners are tight.
7.3 Storage
- Store the welder in its protective carrying case in a dry, clean environment when not in use.
- Avoid storing in areas with extreme temperatures or high humidity.
8. Troubleshooting
This section addresses common issues you might encounter during operation.
8.1 Machine Does Not Power On
- Check Power Connection: Ensure the power cord is securely plugged into both the machine and a live 220V outlet.
- Check Fuse: Inspect the fuse on the control panel (refer to Figure 4). If blown, replace it with a fuse of the correct rating.
- Main Power Switch: Confirm the main power switch is in the 'ON' position.
8.2 Poor Weld Quality (e.g., weak seam, burn-through)
- Temperature Setting: Adjust the welding temperature. Too low a temperature results in a weak weld; too high can cause burn-through. Refer to material specifications.
- Welding Speed: Adjust the welding speed. Slower speeds allow more heat transfer; faster speeds reduce it.
- Material Cleanliness: Ensure the geomembrane surfaces are clean and free of contaminants.
- Roller Pressure: Verify that the pressure rollers are applying adequate and even pressure.
- Worn Components: Inspect the welding wedge and rollers for wear. Worn components can lead to inconsistent welds.
8.3 Machine Not Moving or Irregular Movement
- Engagement Lever: Ensure the engagement lever is fully lowered to engage the drive mechanism.
- Speed Setting: Check the speed control knob setting.
- Obstructions: Inspect the path of the machine and the rollers for any obstructions or debris.
For issues not covered here, or if troubleshooting steps do not resolve the problem, contact customer support.
9. Warranty and Support
The JIT 900 Geomembrane Hot Wedge Welder comes with a one-year warranty from the date of purchase, covering manufacturing defects. This warranty does not cover damage resulting from misuse, neglect, unauthorized modifications, or normal wear and tear.
For technical assistance, warranty claims, or to order replacement parts, please contact your authorized JIT dealer or customer support. When contacting support, please have your product model (JIT 900) and purchase information readily available.