Introduction
Thank you for choosing the Summerset Alturi Series 42-Inch Natural Gas Grill on Cart. This manual provides essential information for the safe assembly, operation, maintenance, and troubleshooting of your new grill. Please read all instructions carefully before using the appliance to ensure proper function and safety.
Important Safety Information
Failure to follow these safety instructions could result in fire, explosion, or serious injury. Keep this manual for future reference.
- FOR OUTDOOR USE ONLY: Never operate this appliance indoors.
- NATURAL GAS ONLY: This grill is designed for natural gas. Do not attempt to use it with propane gas.
- CLEARANCE: Maintain minimum clearances from combustible materials: 18 inches from sides and rear.
- VENTILATION: Ensure adequate ventilation. Do not obstruct the flow of combustion and ventilation air.
- LEAK TEST: Always perform a leak test on all gas connections after assembly and before initial use, and after any service.
- CHILDREN & PETS: Keep children and pets away from the grill at all times.
- HOT SURFACES: The grill surfaces become very hot during operation. Use heat-resistant gloves and appropriate tools.
- FLAMMABLE MATERIALS: Do not store or use gasoline or other flammable vapors and liquids in the vicinity of this or any other appliance.
- CARBON MONOXIDE HAZARD: Burning charcoal or gas indoors can kill you. It gives off carbon monoxide, which has no odor. NEVER burn charcoal or gas inside homes, vehicles, or tents.
Setup and Assembly
Carefully unpack all components and ensure all parts are present before beginning assembly. Refer to the included assembly diagram for detailed steps.
1. Unpacking and Inspection
Remove all packaging materials. Inspect the grill and cart for any shipping damage. If damage is found, do not assemble or operate the grill. Contact your retailer immediately.
2. Cart Assembly
Assemble the grill cart according to the separate assembly instructions provided with the cart. Ensure all fasteners are securely tightened.
3. Grill Head Installation
Carefully lift the grill head and place it onto the assembled cart, aligning it with the mounting points. Secure the grill head to the cart using the provided hardware.

Image: The Summerset Alturi Series 42-inch natural gas grill fully assembled on its cart, showcasing its stainless steel construction and storage drawers.
4. Gas Connection (Natural Gas)
This grill requires a permanent natural gas supply line. Connection must be performed by a qualified gas technician in accordance with local codes and ordinances. Ensure the gas supply is turned off before making any connections. Use only approved gas supply hoses and fittings.
5. Leak Test
After connecting the gas supply, perform a leak test. Mix a solution of equal parts liquid dish soap and water. With the gas supply turned on, apply the solution to all gas connections. Bubbles indicate a leak. If a leak is detected, turn off the gas supply immediately, tighten the connection, and retest. Do not operate the grill if a leak persists.
Operating Instructions
1. Before Each Use
- Ensure the grill area is clear of flammable materials.
- Check all gas connections for leaks (refer to Leak Test in Setup section).
- Ensure the drip tray is clean and properly installed.
2. Lighting the Main Burners
- Open the grill hood.
- Ensure all burner control knobs are in the 'OFF' position.
- Turn on the natural gas supply valve.
- Push in and slowly turn one main burner control knob to the 'HIGH' position. You should hear a clicking sound from the igniter.
- If the burner does not light within 5 seconds, turn the knob to 'OFF', wait 5 minutes for gas to dissipate, and repeat the lighting procedure.
- Once lit, you can adjust the flame to your desired setting. Repeat for other main burners as needed.

Image: Close-up view of the Summerset Alturi Series gas grill burners, showing the blue flames indicating proper ignition.

Image: Ceramic briquettes positioned above the burners, designed for even heat distribution and vaporizing drippings for flavor.

Image: Stainless steel cooking grates, providing a durable and easy-to-clean surface for grilling.
3. Lighting the Rear Infrared Burner (if equipped)
- Open the grill hood.
- Ensure all other burners are off.
- Push in and slowly turn the rear burner control knob to the 'HIGH' position.
- The infrared burner should ignite. If not, turn the knob to 'OFF', wait 5 minutes, and repeat.
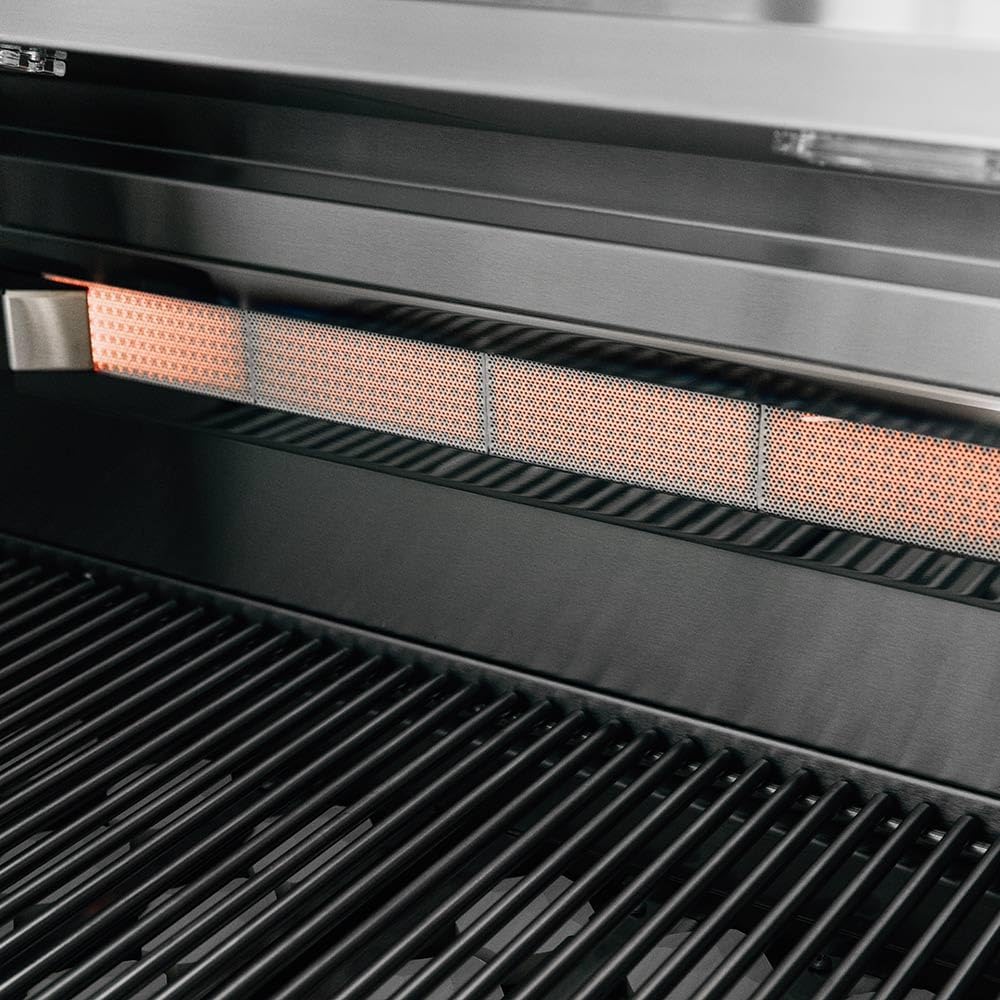
Image: The rear infrared burner, designed for rotisserie cooking, glowing red when active.

Image: The rotisserie spit and forks installed in the grill, ready for use with the rear infrared burner.
4. Temperature Control
Adjust the burner control knobs between 'HIGH' and 'LOW' to achieve the desired cooking temperature. The built-in thermometer on the hood provides an approximate internal temperature reading.

Image: A close-up of a Summerset Alturi Series control knob, showing the 'OFF' and 'HI' settings, with integrated blue LED lighting.
5. Shutting Down the Grill
- Turn all burner control knobs to the 'OFF' position.
- Turn off the natural gas supply valve.
- Allow the grill to cool completely before covering or cleaning.
Care and Maintenance
Regular cleaning and maintenance will extend the life of your grill and ensure optimal performance.
1. Cleaning the Cooking Grates
After each use, while the grates are still warm, brush off any food residue with a stiff wire brush. For deeper cleaning, remove the grates and wash with warm soapy water, then rinse and dry thoroughly.
2. Cleaning the Burners
Periodically inspect burner ports for blockages (e.g., from food debris or insects). Use a wire brush or a small wire to clear any obstructions. Ensure burner tubes are free of spider webs or insect nests, which can cause flashback fires.
3. Cleaning the Drip Tray
Empty and clean the drip tray regularly to prevent grease fires. Wash with warm soapy water and rinse thoroughly.
4. Exterior Cleaning
Wipe down stainless steel surfaces with a soft cloth and a stainless steel cleaner or mild soapy water. Always wipe in the direction of the grain to prevent scratching. Avoid abrasive cleaners or pads.
5. Storage
When not in use, cover the grill with a weather-resistant grill cover to protect it from the elements. If storing for an extended period, disconnect the natural gas supply and ensure the grill is clean and dry.
Troubleshooting Guide
This section addresses common issues you might encounter with your grill.
| Problem | Possible Cause | Solution |
|---|---|---|
| Burner won't light | No gas supply Blocked burner port Faulty igniter | Check gas supply valve Clean burner ports Contact customer support |
| Uneven heating | Blocked burner ports Grease buildup Wind conditions | Clean burner ports Clean grill interior and drip tray Position grill away from strong winds |
| Excessive flare-ups | Grease buildup High fat content food | Clean grill interior and drip tray Trim excess fat from food Reduce burner heat |
| Gas odor | Gas leak | IMMEDIATELY turn off gas supply. Perform leak test. If odor persists, evacuate area and call gas supplier/fire department. |
Product Specifications
- Brand: Summerset Grills
- Model: ALT42-NG-CART
- Product Dimensions: 23.06"D x 40.5"W x 10.19"H (Grill Head)
- Material: Stainless Steel
- Color: Stainless Steel
- Power Source: Natural Gas
- Installation Type: On Cart (Built-In grill head on a cart)
- Special Feature: Durability
Warranty and Customer Support
Summerset Grills products are manufactured to high-quality standards. For specific warranty details, please refer to the warranty card included with your product or visit the official Summerset Grills website. For technical assistance, replacement parts, or any questions not covered in this manual, please contact Summerset Grills customer support.
Contact Information: Please refer to your product registration materials or the Summerset Grills official website for the most current contact details.


