
Rollei DF-S 310 SE
Contents
Rollei DF-S 310 SE Digital Film Scanner User Manual
Model: DF-S 310 SE
1. Introduction
The Rollei DF-S 310 SE is a digital film scanner designed to convert your analog slides, negative film strips, Super 8 films, and 110 pocket films into digital images. This manual provides instructions for setting up, operating, and maintaining your scanner to ensure optimal performance and longevity.
2. Safety Information
- Do not expose the device to moisture or extreme temperatures.
- Use only the provided power adapter or a compatible USB power source.
- Keep the device away from direct sunlight and heat sources.
- Do not attempt to disassemble or repair the device yourself. Refer all servicing to qualified personnel.
- Keep out of reach of children.
3. Package Contents
Please check the package for the following items:
- 1x Rollei DF-S 310 SE Scanner
- 1x Slide magazine for framed slides
- 1x Slide for color negatives
- 1x Insert for Super 8 films
- 1x Insert for 110 films (pocket film)
- 1x Cleaning brush
- 1x USB cable
- 1x AV cable
- 1x Power adapter

Image: All components included with the Rollei DF-S 310 SE scanner, including the main unit, various film holders, cables, and power adapter.
4. Product Overview
4.1. Scanner Components
The Rollei DF-S 310 SE scanner features a compact design with a built-in display and control buttons on the top panel. Film inserts are fed through a slot on the side of the unit.

Image: The Rollei DF-S 310 SE scanner showing a film strip partially inserted into the side slot, with the control panel and display visible on top.
4.2. Controls and Display
The scanner's top panel includes the following controls and a display:
- Power Button: Turns the scanner on/off.
- OK/Enter Button: Confirms selections and initiates scanning.
- Left/Mirror Button: Navigates left or mirrors the image.
- Right/Flip Button: Navigates right or flips the image.
- Convert/Mode Button: Switches between modes or initiates conversion.
- 2.4" Color TFT LCD: Displays previews of your films and menu options.
5. Setup
Follow these steps to set up your Rollei DF-S 310 SE scanner:
- Power Connection: Connect the provided 5V power adapter to the scanner and a power outlet. Alternatively, you can power the scanner via the USB cable connected to a computer or a USB power source.
- Memory Card (Optional): If you wish to save scanned images directly to an external memory card, insert an SD or SDHC card (up to 32 GB) into the designated slot. The scanner has 128 MB of internal memory for temporary storage.
- TV Connection (Optional): To view scanned images on a TV, connect the provided AV cable (3.5 mm jack plug) from the scanner's TV output to your television's video input.
- Computer Connection (Optional): To transfer images to your computer or use the scanner with software, connect the USB 2.0 cable from the scanner to your computer. The scanner is compatible with Windows 7/8/10 and Mac OS 10.4 and above.

Image: The Rollei DF-S 310 SE scanner with its film holder extended, ready for insertion of film or slides.
6. Operating
6.1. Scanning Process
The Rollei DF-S 310 SE uses a single-pass image capture method. This means you only need to guide the film carriage through the scanner once for each image. Locking points ensure precise positioning.
6.2. Loading Film and Slides
Select the appropriate film holder or insert for your media type:
- Framed Slides: Use the slide magazine.
- Color Negatives: Use the slide for color negatives.
- Super 8 Films: Use the dedicated insert for Super 8 films.
- 110 Pocket Films: Use the dedicated insert for 110 films.
Carefully insert your film or slides into the correct holder, ensuring they are clean and free of dust. Then, insert the loaded holder into the scanner's film slot.

Image: A close-up view of a film strip being carefully inserted into the film slot of the Rollei DF-S 310 SE scanner.
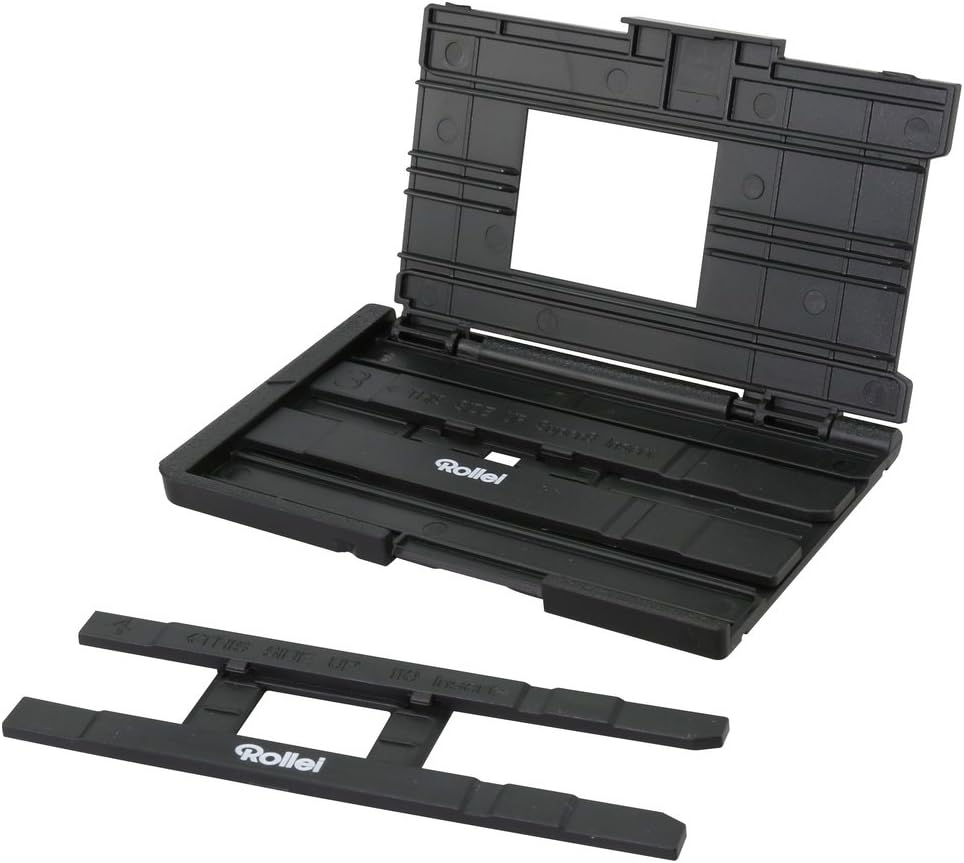
Image: A selection of film holders and inserts provided with the Rollei DF-S 310 SE scanner, designed for different film formats like negatives, slides, and Super 8.
6.3. Scanning and Saving
- Turn on the scanner using the Power button.
- Use the navigation buttons (Left/Mirror, Right/Flip) to select the desired film type or mode on the LCD.
- Adjust settings such as color balance and exposure control. You can choose between automatic adjustment or manual control (-2.0 EV to +2.0 EV).
- Preview the image on the 2.4" color TFT LCD.
- Press the OK/Enter button to initiate the scan. The scanner will capture the image.
- Scanned images will be saved to the internal 128 MB memory or the inserted SD/SDHC card.
7. Maintenance
To ensure the longevity and optimal performance of your scanner, regular maintenance is recommended:
- Cleaning the Lens/Sensor: Use the provided cleaning brush to gently remove dust and debris from the scanner's lens and film path. Avoid using abrasive materials or liquid cleaners directly on optical components.
- Cleaning Film Holders: Keep the film holders and inserts clean to prevent dust from transferring to your films during scanning.
- Storage: When not in use, store the scanner in a clean, dry, and dust-free environment.
8. Troubleshooting
If you encounter issues with your Rollei DF-S 310 SE scanner, please refer to the following common solutions:
- Device not powering on: Ensure the power adapter is securely connected to both the scanner and a working power outlet. If using USB power, ensure the USB port provides sufficient power.
- Poor image quality: Check if the film or slides are clean and free of dust. Ensure the scanner's lens is clean. Adjust exposure and color balance settings if images are too dark, bright, or have incorrect colors.
- Film not feeding correctly: Ensure the film is properly seated in the correct film holder and that the holder is inserted straight into the scanner's slot.
- No image on TV: Verify the AV cable is correctly connected to both the scanner and the TV, and that the TV input source is set to the correct AV channel.
- Cannot save images: Check if an SD/SDHC card is inserted and has sufficient free space. If using internal memory, ensure it is not full.
If the problem persists, please contact Rollei customer support.
9. Specifications
| Feature | Specification |
|---|---|
| Image Sensor | 14 Megapixel Sensor |
| Resolution | 14 Megapixels (22 Megapixels interpolated) |
| Lens | Multi-element Precision Lens |
| LC Display | 2.4" Color TFT LCD |
| Internal Storage | 128 MB |
| Memory Card Slot | SD / SDHC cards up to 32 GB |
| Focus Range | Fixed Focus |
| Exposure Control | Automatic, Manual (-2.0 EV to +2.0 EV) |
| Color Matching | Automatic, Manual |
| Scan Quality | 3,600 dpi |
| Data Conversion | 10 bits per color channel |
| Scan Method | Single Pass |
| Light Source | Transmitted Light (3 white LEDs) |
| Interface | USB 2.0, TV Output (Video 3.5 mm Jack Plug) |
| Operating Systems | Windows 7 / 8 / 10, Mac OS 10.4 and above |
| Power Supply | 5V Adapter, USB Mains Power |
| Dimensions (W x D x H) | 9.1 x 10.4 x 10.5 cm |
| Weight | 276 g |
10. Warranty and Support
For warranty information and technical support, please refer to the documentation provided with your purchase or visit the official Rollei website. Keep your proof of purchase for any warranty claims.
Ask a question about this manual
Ask about setup, troubleshooting, compatibility, parts, safety, or missing instructions. Manuals+ will review the question and use this page’s manual context to help answer it.