
Eagle FE803
Ss Brewtech Mini Brew Bucket Fermenter Instruction Manual
Model: FE803
1. Introduction
The Ss Brewtech Mini Brew Bucket Fermenter is a high-quality 3.5-gallon stainless steel vessel designed for home brewing. Its robust construction and thoughtful features aim to provide a sanitary and efficient fermentation environment. This manual provides detailed instructions for the setup, operation, maintenance, and troubleshooting of your fermenter.
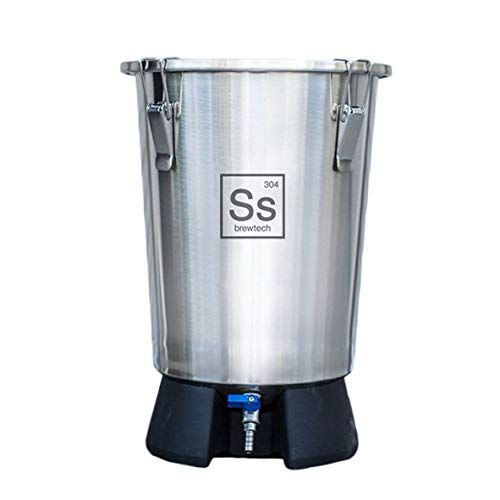
Figure 1: Overview of the Ss Brewtech Mini Brew Bucket Fermenter.
2. Setup and Assembly
Before initial use, it is crucial to clean and sanitize all components of the fermenter. Follow these steps for proper setup:
- Unpacking: Carefully remove all components from the packaging. Verify that all parts are present: main fermenter body, lid, spring clamps, mini ball valve, and silicone base.
- Initial Cleaning: Wash all stainless steel components with a mild detergent and warm water. Rinse thoroughly. For sanitation, use a brewing-specific sanitizer solution according to its instructions. Ensure all surfaces, including the interior, lid, and valve components, are sanitized.
- Attach Mini Ball Valve: Thread the 3/8" mini ball valve onto the port at the bottom of the fermenter. Ensure the connection is hand-tight and secure to prevent leaks.
- Secure Lid: Place the wide lid onto the fermenter body. Engage the secure spring clamps around the rim of the fermenter to create a tight seal.
- Install Blow-Off Tubing: Insert appropriate 1/2" blow-off tubing into the 17mm port located on the lid. This port is designed to accommodate standard blow-off setups for active fermentation.
- Racking Arm Orientation: The fermenter features a rotatable racking arm inside. Familiarize yourself with its movement. This arm will be used during operation to draw clear liquid above the settled yeast and trub.

Figure 2: The 3/8 inch mini ball valve for transfers and gravity samples.

Figure 3: The wide lid secured with spring clamps.

Figure 4: The 17mm port on the lid for blow-off tubing connection.

Figure 5: External view of the rotatable racking arm mechanism.
3. Operating Instructions
Once assembled and sanitized, your Mini Brew Bucket is ready for fermentation.
- Filling: Carefully transfer your wort or liquid into the fermenter. The etched volume markings on the interior wall assist in measuring the volume.
- Fermentation: Pitch your yeast according to your recipe. Secure the lid and blow-off tubing. Place the fermenter in a temperature-controlled environment. The conical base is designed to concentrate yeast and trub, minimizing contact with the fermenting liquid.
- Temperature Monitoring: The fermenter includes a thermowell for accurate temperature monitoring. Insert a thermometer (not included) into the thermowell to track fermentation temperature.
- Gravity Samples: The mini ball valve can be used to draw small samples for gravity readings without exposing the main batch to air.
- Transfers and Racking: When fermentation is complete and it's time to transfer, rotate the internal racking arm to a position just above the settled trub layer. This allows you to draw clear liquid through the ball valve, leaving the sediment behind.

Figure 6: Etched volume markings for precise measurement.

Figure 7: Internal view of the rotatable racking arm for clean transfers.
4. Maintenance and Cleaning
Proper cleaning and maintenance are essential for the longevity and sanitary operation of your fermenter.
- Immediate Cleaning: After transferring your fermented liquid, immediately rinse the fermenter with warm water to remove residual yeast and trub.
- Deep Cleaning: For thorough cleaning, disassemble the ball valve and remove the lid. Use a soft brush or cloth with a non-abrasive cleaner designed for stainless steel. Avoid using harsh chemicals or abrasive pads that can scratch the surface.
- Sanitization: Always sanitize the fermenter and all components before each use to prevent contamination.
- Storage: Store the fermenter in a clean, dry place. Ensure all components are completely dry before storage to prevent water spots or corrosion.
5. Troubleshooting
This section addresses common issues you might encounter.
| Problem | Possible Cause | Solution |
|---|---|---|
| Leak from ball valve | Valve not tightened sufficiently; damaged O-ring/gasket. | Ensure valve is securely tightened. Inspect and replace O-ring/gasket if damaged. |
| Lid not sealing properly | Clamps not engaged correctly; lid gasket misaligned or damaged. | Ensure all spring clamps are fully engaged. Check lid gasket for proper seating and damage. |
| Difficulty cleaning interior | Dried residue; insufficient soaking. | Rinse immediately after use. For stubborn residue, soak with a suitable cleaner (e.g., PBW) for several hours or overnight. Use a soft brush. |
6. Specifications
- Model Number: FE803
- Capacity: 3.5 Gallons
- Material: 304 Stainless Steel
- Dimensions (Approximate): 17 x 12.3 x 12 inches
- Weight (Approximate): 9.1 Pounds
- Features: Conical base, rotatable racking arm, 3/8" mini ball valve, wide lid with spring clamps, 17mm lid port, etched volume markings.
7. Warranty and Support
For information regarding warranty coverage, product support, or replacement parts, please contact the manufacturer directly. Refer to the product packaging or the manufacturer's official website for contact details.
Ask a question about this manual
Ask about setup, troubleshooting, compatibility, parts, safety, or missing instructions. Manuals+ will review the question and use this page’s manual context to help answer it.