1. Introduction
This manual provides essential information for the safe and efficient operation, maintenance, and troubleshooting of your TROTEC TTK 72 E electric dehumidifier. Please read these instructions carefully before initial use and keep them for future reference.

Figure 1: Front view of the TROTEC TTK 72 E Dehumidifier. This image shows the compact design of the unit, with the TROTEC logo prominently displayed on the front panel.
2. Safety Instructions
Always observe the following safety precautions to prevent injury and damage to the device:
- Ensure the power supply matches the specifications on the rating label.
- Do not operate the device with a damaged power cord or plug.
- Keep the device away from water and other liquids.
- Do not insert objects into the air inlets or outlets.
- Unplug the device before cleaning or maintenance.
- This appliance is not intended for use by persons (including children) with reduced physical, sensory or mental capabilities, or lack of experience and knowledge, unless they have been given supervision or instruction concerning use of the appliance by a person responsible for their safety.
3. Product Overview and Components
The TROTEC TTK 72 E is designed for efficient dehumidification in various indoor environments. Key features include:
- Dehumidification capacity: Up to 24 liters per day.
- Suitable for rooms up to 50 m² or 125 m³.
- Integrated 5.5-liter water collection container.
- Automatic shut-off when the water tank is full.
- Humidistat-controlled automatic operation.
- Two fan speed levels.
- Timer function.
- Washable air filter.
- Continuous drainage option.

Figure 2: The dehumidifier highlighting its key features such as coverage area (50 m², 125 m³), dehumidification capacity (24 l/24h), 2 speed levels, condensate drain, washable air filter, and portability.
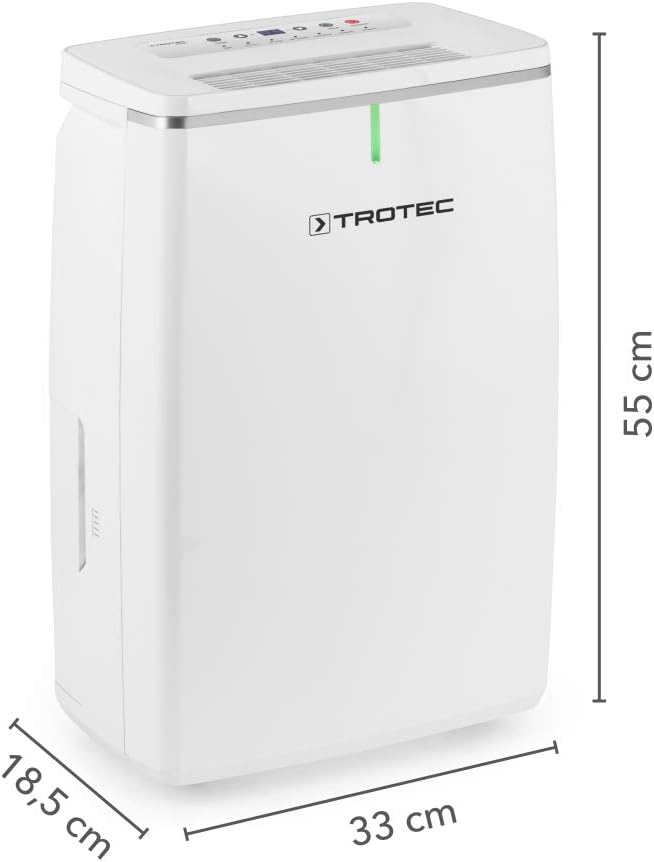
Figure 3: Dimensions of the TROTEC TTK 72 E Dehumidifier. The image shows the height (55 cm), width (33 cm), and depth (18.5 cm) of the unit.
4. Setup
4.1 Unpacking
Carefully remove the dehumidifier from its packaging. Retain the packaging for future storage or transport. Check for any visible damage. If the unit appears damaged, do not operate it and contact customer support.
4.2 Placement
Place the dehumidifier on a firm, level surface. Ensure there is at least 20 cm of clear space around all sides of the unit to allow for proper airflow. Do not place the unit near heat sources or in direct sunlight. The unit is designed for rooms up to 50 m² or 125 m³.
4.3 Power Connection
Plug the power cord into a grounded electrical outlet. Ensure the voltage and frequency of the power supply match the specifications on the device's rating label.
5. Operating Instructions
5.1 Control Panel
The control panel is located on the top of the unit and features various buttons and indicators for operation.

Figure 4: Close-up view of the control panel. It displays buttons for Timer, Humidity adjustment (+/-), Mode, and Stand-by, along with indicators for Tank Full, Air Clean, Dry Clothes, Continuous, and Automatic operation.
5.2 Power On/Off
Press the Stand-by button (represented by a power symbol) to turn the unit on or off.
5.3 Setting Desired Humidity
In Automatic mode, use the + and - buttons to set the desired relative humidity level (e.g., between 30% and 80% r.F.). The unit will operate until the set humidity is reached, then cycle on and off to maintain it.
5.4 Operating Modes
Press the Mode button to cycle through available operating modes:
- Automatic Mode: The unit dehumidifies to the set humidity level.
- Continuous Operation: The unit runs continuously, regardless of humidity levels, until the water tank is full or the unit is turned off.
- Laundry Drying Mode: Optimized settings for drying laundry in indoor environments.
5.5 Timer Function
Press the Timer button to set an operating duration (e.g., 1-24 hours). The unit will automatically turn off after the set time has elapsed.
5.6 Water Tank and Continuous Drainage
The unit features a 5.5-liter water collection tank. When the tank is full, the unit will automatically shut off, and the "Tank Full" indicator will illuminate. Empty the tank as described in the Maintenance section.
For continuous operation without needing to empty the tank, connect a drainage hose (not included) to the continuous drainage port located on the side of the unit. Ensure the hose is routed downwards to a suitable drain.

Figure 5: Side view of the dehumidifier, showing the location of the continuous drainage port cover and the air outlet grille.
6. Maintenance
Regular maintenance ensures optimal performance and extends the lifespan of your dehumidifier. Always unplug the unit before performing any maintenance.
6.1 Emptying the Water Tank
- When the "Tank Full" indicator illuminates, gently pull out the water tank from the front of the unit.
- Carefully carry the tank to a sink or drain and empty the collected water.
- Reinsert the empty water tank firmly into the unit until it clicks into place. The unit will resume operation if it was running before.

Figure 6: A user demonstrating the removal of the water collection tank from the front of the dehumidifier for emptying.
6.2 Cleaning the Air Filter
The air filter should be cleaned every two weeks or more frequently depending on usage and air quality.
- Locate the air filter cover on the back of the unit.
- Open the cover and carefully remove the air filter.
- Clean the filter with a vacuum cleaner or wash it gently with warm, soapy water. Rinse thoroughly and allow it to air dry completely before reinserting.
- Place the dry filter back into its slot and close the cover.

Figure 7: A user removing the washable air filter from the back of the dehumidifier for cleaning. Regular cleaning of this filter is crucial for efficient operation.
6.3 General Cleaning
Wipe the exterior of the unit with a soft, damp cloth. Do not use abrasive cleaners or solvents. Ensure no water enters the internal components.
7. Troubleshooting
Before contacting customer support, please refer to the following troubleshooting guide:
| Problem | Possible Cause | Solution |
|---|---|---|
| Unit does not turn on. | No power supply; power cord not plugged in; power outage. | Check power connection; ensure outlet is functional. |
| Unit is running but not dehumidifying. | Air filter is clogged; room temperature too low; humidity setting too high. | Clean the air filter; ensure room temperature is above 5°C; lower the desired humidity setting. |
| "Tank Full" indicator is on, but tank is not full. | Water tank not properly inserted. | Remove and reinsert the water tank firmly. |
| Unit is noisy. | Unit not on a level surface; fan obstruction. | Ensure unit is on a stable, level surface; check for obstructions in air inlets/outlets. (Note: A noise level of 48 dB is normal operation.) |
8. Technical Specifications
| Specification | Value |
|---|---|
| Model | TTK 72 E |
| Brand | TROTEC |
| Dehumidification Capacity | Max. 24 liters/day |
| Recommended Room Size | Up to 50 m² / 125 m³ |
| Water Tank Capacity | 5.5 liters |
| Operating Range (Humidity) | 30% to 80% r.F. |
| Noise Level | 48 dB |
| Number of Speeds | 2 |
| Product Dimensions (D x W x H) | 18.5 x 33 x 55 cm |
| Weight | 13 kg |
| Material | Plastic |
| Special Features | Automatic Shutoff, Humidistat Control, Timer Function, Continuous Drainage |
9. Warranty and Customer Support
For warranty information, please refer to the documentation provided with your purchase or contact your retailer. If you experience any issues that cannot be resolved using the troubleshooting guide, please contact TROTEC customer support for assistance.
Contact details can typically be found on the manufacturer's official website or on your purchase receipt.


